National Cowboy and Western Heritage Museum

Are you ready for another field trip?

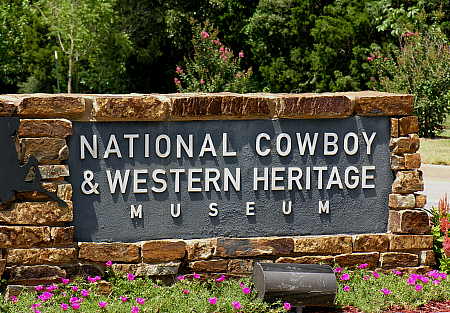
It is often said that anything relating to Texas is big, but be aware that the neighboring state of Oklahoma has something that even Texans would probably have to admit is grand, even by Texas standards.  I’m referring to the National Cowboy and Western Heritage Museum, located in Oklahoma City, Oklahoma.

National Cowboy and Western Heritage Museum campus

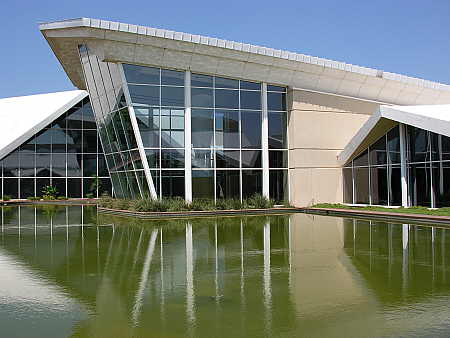
The first thing you will notice upon arriving at the Museum are the exquisitely designed buildings which house the exhibits and collections.

National Cowboy and Western Heritage Museum campus

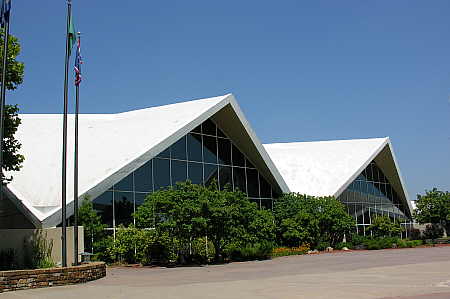
No matter which way you look, you will see beautiful buildings and extremely well landscaped and manicured grounds.  The buildings are modern and airy, and contain well over 200,000 square feet of exhibition, office and auditorium space.

National Cowboy and Western Heritage Museum campus

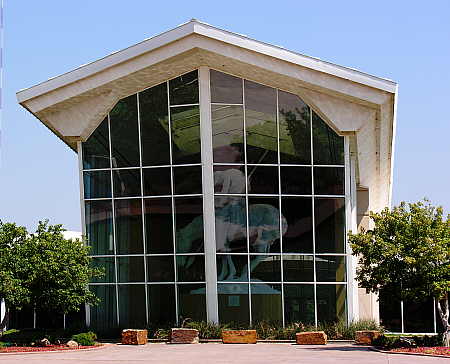
It soon becomes apparent that the Museum collection contains many exhibits of truly grand stature, as you can see from the wing in the photograph above, which contains only one item, a massive sculpture called “The End of the Trail,”  a well known piece of art created by James Earle Fraser for the 1915 Pan-Pacific Exhibition held in San Francisco, California.

End of the Trail sculpture

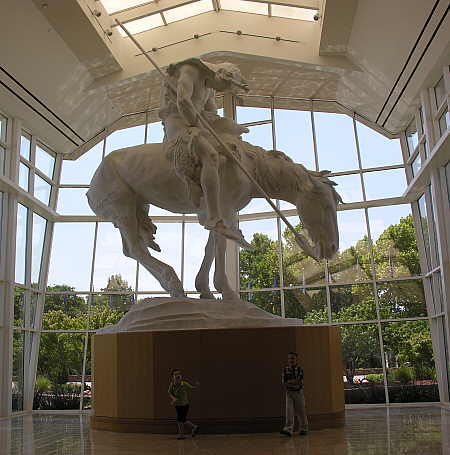
The photograph above, taken from inside the building,  gives a good indication of the size of this sculpture.  The children do not come close to reaching even the top of the pedestal on which the sculpture stands.

Garden pond and sculptures

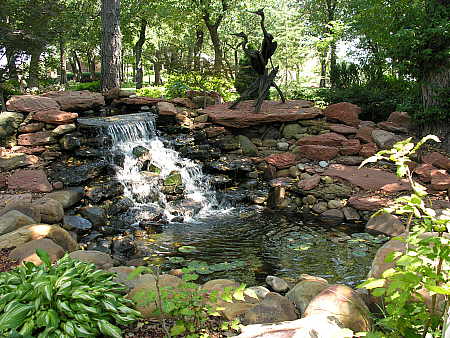
The grounds of the National Cowboy Museum are gorgeous, with man-made streams, waterfalls, and Koi ponds artfully placed throughout the beautifully landscaped gardens. 

Mare and foal sculpture

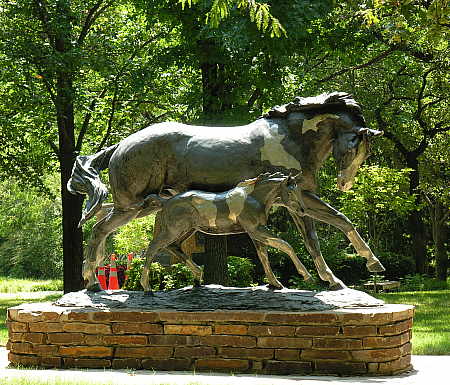
As you stroll through the gardens, you will see many varied sculptures, such as this piece depicting a mare and her foal.

Wild Bill Hickock

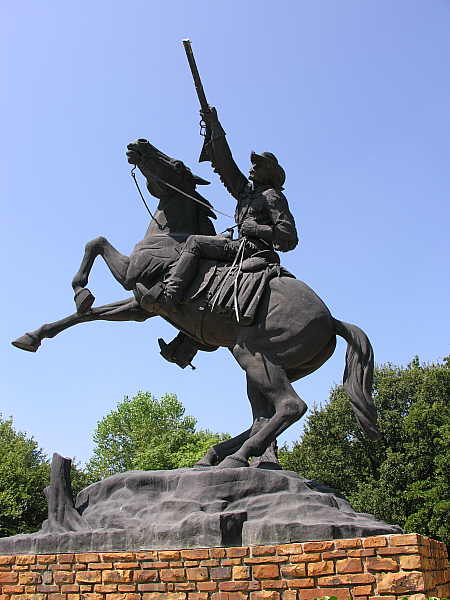
When you reach the spot where this giant (I mean HUGE) sculpture of Wild Bill Hickock Buffalo Bill Cody is located, you start to realize that many of the exhibits at the Museum were created without constraints on size.  I don’t know whether the buildings were designed to be large in order to house the massive exhibits, or whether the exhibits were selected to fill the massive buildings.  Whatever the case, it all seems to work together well.

Early western hunters

Inside the Museum are many different wings, each housing a varied collection of themed exhibits, such as this diorama of buffalo hunters contained in the Joe Grandee Museum of the Frontier West.

Mounted Cavelryman exhibit

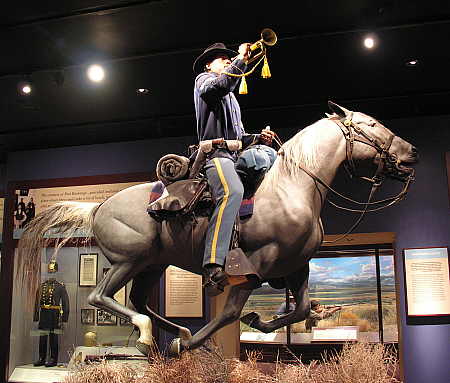
The U.S. Army Cavalry is well represented in the displays, and again, the exhibits are massive and full scale.

American rodeo exhibit

Even the American Rodeo Gallery contains many life sized sculptures and displays, such as this bronc rider seen in the photograph above. 

Early western coat

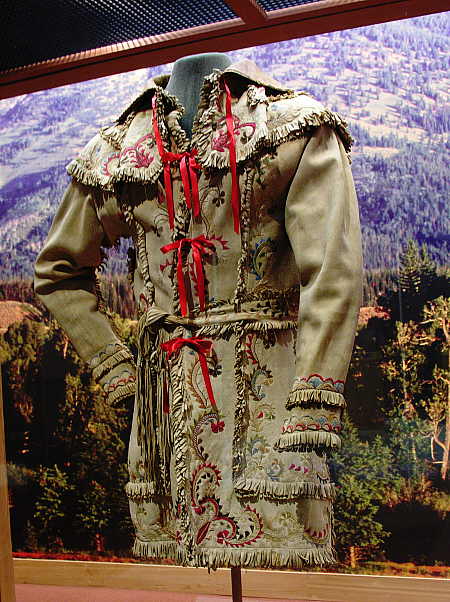
This finely detailed coat is just one of the hundreds of pieces of cowboy and western apparel on display at the museum.  Each piece on display is of similarly high quality as the coat seen here.

Theater to view “oaters”

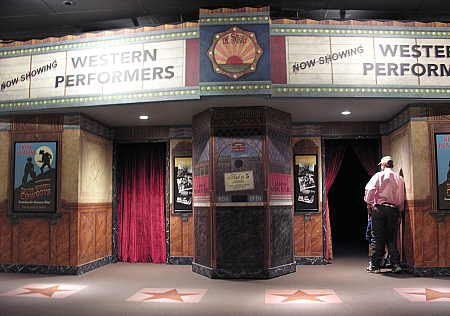
Because westerns, or “oaters” were such a large part of the American culture for those of us who pre-date Generation X’ers, the Museum contains a separate Western Performers Gallery.  Within this gallery is the theater shown above, where you can enter and watch an old western while you rest up for more exploration of the Museum’s many exhibits.

In addition to the galleries pictured in this post,  the Museum has a number of galleries which house a large and valuable collection of fine art relating to cowboys and western heritage.  Because of copyright concerns, the Museum (understandably) forbids photography in these galleries, so I have no photographs to include here.  Rest assured, however, that the quality of the art on display is on a par with the quality of the other exhibits that I have included in this post.

Also there are galleries and wings that are not conducive to casual photography, due to lighting and display considerations.  For instance, the Weitzenhoffer Gallery of Fine Arms contains a collection of artistic, historic and rare firearms, housed in glass display cases which cast reflections making photography challenging, at best.  So too for the Native American Gallery.  There is also a wing of the Museum called Prosperity Junction, which is an indoor re-creation of a typical frontier town.  It is well worth seeing, however the dim lighting makes casual photography difficult or impossible.  Additionally, the Museum includes the Children’s Cowboy Corral, where the little ones can wear western clothing,  build a fire and fix some “grub” at the chuck wagon for their parents.  It is a hands-on environment, and the kids can touch to their hearts content.

All in all, the National Cowboy and Western Heritage Museum is a wonderful place to visit when traveling to or through Oklahoma City.  Be sure to allocate enough time to see the Museum in it’s entirety, which could easily take several hours if you like to study all of the displays and enjoy all of the artwork.

Well done, Oklahomans.  This museum is a great asset to your state, and a real treasure for all of us.

Boosting the Average

5′ x 5′ round bale

Remember a previous post on this blog (It’s Time for Another Try) wherein I lamented a mere .500 success rate in getting our hay fields cut and baled over six growing seasons?  Well, the average has just been upped to .571 (four full cuttings over the past seven seasons).  Our neighbor Bill, along with his sons Craig and Matt, have been out here over the past several days cutting, raking and baling several of our hay fields, and will probably be continuing their activities here for the next few days.  I thought I would take this opportunity to briefly show how the process occurs here in the Ozarks, for those of you who may have never seen grass being converted to bales of hay.

The first step in the baling process is to cut the grass near it’s base.  There are several choices the farmer has in a mower.  Some use a sickle-bar mower, which resembles a giant hedge trimmer adapted to cutting grass.  Others use a hay mower/conditioner, which not only cuts, but also crimps the crop for faster drying, while still other farmers use a  forage macerator  to complete the cutting.

Disk mower

Craig and Matt are using an implement called a disk mower to cut the grass in preparation for baling.  It consists of a series of small rotary disks, each with two pivoting cutting blades attached to the disk via a shoulder bolt.

Persuasion

Unfortunately, besides hay, we also grow rocks prolifically here in the Ozarks, as you may remember from an old post (Dang Rocks).  In the photograph above, you can see Craig applying a little “persuasion” to a bent cutting blade, the result of an encounter with a rock that probably wasn’t there last year!

Cut grass left to dry before baling

When the hay is cut, it is allowed to dry in the field prior to being put up into bales.  The drying time is affected by many variables, including the type of forage crop, humidity and temperature levels, and procedures used in the baling process.  If a mower/conditioner or forage macerator has been used to cut the crop, drying time will be shortened.  Alternatively, a hay tedder can be used to turn the hay over in the field and fluff it up, thus allowing the hay to dry quickly.

Hay rake

When the hay is sufficiently dry,  a side-rake such as the one seen above is used to sweep the cut crop into wind rows, in preparation for the actual baling.

Raking grass into wind rows

In the photograph above you can see Bill pulling the side rake through the field.  First traveling in one direction, and then turning around and repeating the process from the other side produces a nice wind row of grass.

Completed wind row awaiting hay baler

This is what the wind row looks like after two passes of the side rake.  It is now ready to be swept up by the baling machine.

Hay baler sweeping up the wind rows of dried grass

In this photograph you see Craig operating a tractor pulling a large round baler over the previously wind-rowed forage.  The baler gathers the hay and rolls it into a tight, uniformly sized dense round bale, and when the bale capacity is reached, the baler wraps the round bale with a continuous spiral of baling twine.

Discharging the finished bale of hay

After securing the integrity of the bale with twine, the baler opens up to eject the finished bale from the rear of the machine, then closes back up again in order to repeat the process once again.

Size comparison

I included this photograph to illustrate the size of the bales that are being produced by this particular round baler.  This is a 5′ X 5′ bale.  Depending upon the crop the weight of each bale can range from about 1200-1600 pounds.  As you can imagine, it take special equipment to be able to handle these large round bales.

The next step in the process is to gather the bales of hay to transport them to their final destination, which, along with a final tally of this year’s hay production will be the subject of a future post.

Trial and Error Sometimes Works

Example #1 – Foiling the Rats

Perhaps you recall from a previous post (entitled In This Corner…) that over the past several years I have been engaged in an on-going battle of wits with a rat in my equipment barn.   This rat had found a good nesting spot in the engine compartment or behind the dash of our tractor,  and in the course of his day to day activities, took to chewing up the wiring harnesses that are located in these spots.

This became more than an annoyance, as the tractor would have to be trucked over to the local New Holland dealer for repairs, which became very expensive, very quickly.  I ultimately decided to try and discourage the rat from nesting in my tractor by placing rubber snakes at various points in the barn and on the tractor.

Snake guarding the engine compartment

After using the tractor, I store it in the barn with the engine hood opened up, and I place this rubber snake in plain sight to deter any pesky varmint from finding a warm, protected nesting spot within the confines of the diesel engine.

A snake in the tractor cab

This is a rubber snake that I place on the floor of the cab when I am finished using the tractor.  The purpose of putting the snake here is to deter any pests from climbing up into the dashboard of the tractor, where a massive tangle of electrical wires is located.

I purchased these rubber snakes in September of 2005.  Since that time, which has been nearly two years now, I have not had any repeats of the incidents like those referred to in the post entitled In This Corner… 

If you are interested in purchasing rubber snakes, there is a large selection available from the Nature Pavilion on-line store at reasonable prices.  This trick has worked for me for two years now, and maybe it can work for you too.


Example #2 – Foiling the Locust Thorns

Trecherous locust thorn

If you have locust trees on your property,  you will undoubtedly recognize this thorn as being the weapon of choice for these wicked trees.  And if you drive any kind of vehicle around where these trees are situated, you will most certainly have experienced the woe of having a perfectly good tire run flat due to a puncture from a locust thorn.

I battled frequent flat tires on my tractor due to these thorns for a few years before finding a solution to the problem.  My local tractor dealer was no help.  They insisted that I should be running my tractor with fluid filled tires that utilized inner-tubes.  The purpose of filling the tires partially with fluid is to provide increased traction and a lower center of gravity for the tractor.  To prevent the fluid (water) from freezing in the winter, a solution is formed by adding either alcohol, ethylene glycol, or calcium chloride to the water.

So my tractor had great traction, and was less likely to roll over due to the lower center of gravity caused by the fluid filled tires, but was a major headache when the inevitable encounter with a locust thorn occurred.  To repair such a tire, it was necessary to call for a mobile tire truck to visit the farm, where the technician would pump the fluid out of the tire, dismount the tire, patch the tire and put in a new inner tube.  The tire would then be remounted, and the inner tube refilled with the fluid solution that was previously pumped out.  About $100 later, the tractor tire would be good as new, but with flat tires coming about frequently, this became rather expensive.

As a possible solution, I investigated the use of foam-filled tires.  These are tires that have been filled with a poly foam filling and cured,  creating a puncture-proof tire.  This is a technique that is often used on military vehicles, where tire performance is critical.

No dampening suspension underneath the tractor

The problem with this solution is that the foam-filled tire is not very forgiving to the vehicle operator when traveling over rough terrain.  As you can clearly see from the photograph above, my tractor (and most every other tractor in existence) does not have any kind of sprung suspension between the wheels and the chassis.  In effect, the only shock absorbers are the tires themselves, and of course, the adjustable suspension seat found in the cab of the tractor.  If the tires are foam-filled, then the ride of the tractor would quickly take it’s toll on the operator’s back.

My local tire dealers all told me that this is just the way it is in the Ozarks – you live with frequent flat tires due to locust thorns and briers, and just have to get used to it!  I believed them too, that is, until I got to listening to two gray-haired, coverall clad old farmers talking to one another.  Without knowing it, they had divulged the secret to flat-free farm equipment in the Ozarks.

Slime

The trick was simple enough – ignore the tractor dealers, and ignore the tire dealers.  Instead of using fluid-filled tubed tires, as they suggested, switch to a tubeless agricultural tire and put a sufficient quantity of tire sealant into the tire.

Since making the change, as the old experienced farmers had talked about, I have not experienced one flat tire on the tractor as a result of a puncture.

Using the front-end loader as a jack

So if this works so well, why am I removing the front tires from my tractor, as seen above?

Cracked sidewall

Even though the tires have not been affected by punctures, the sidewall will still tend to crack over time, as you can see here.

Leeking sealant

Eventually, the cracks will progress to the point that the sealant will no longer perform its intended task, as it begins to leak out of the sidewall cracks.  When this happens, the tire will no longer hold pressure, and it is time to replace the tire.  But at least the tire has provided service for a decent amount of time, without the expense and hassle of constant thorn-induced flats.

My thanks to the anonymous old farmers who inadvertently let me in on the secret to tire longevity here in the Ozarks.