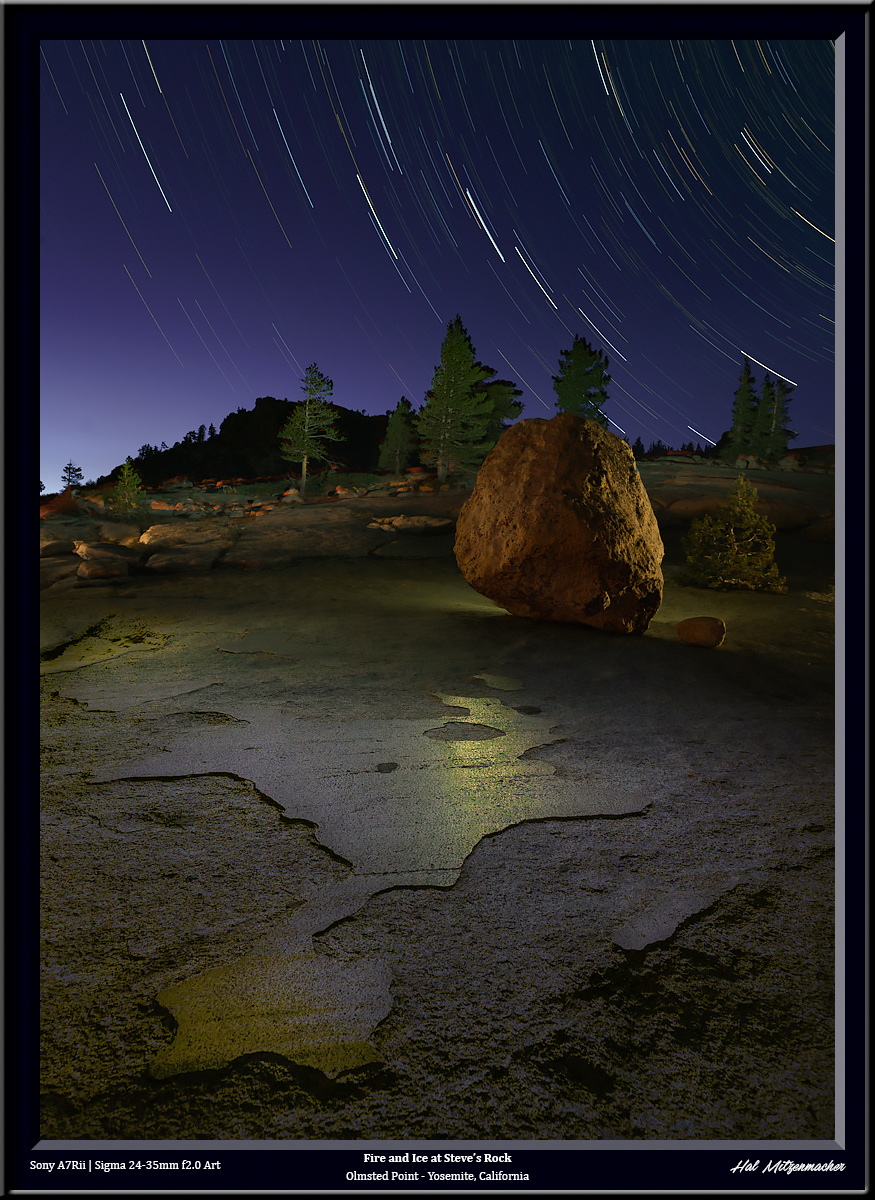
This image was created using a technique I call time stacking. It is similar to taking a time lapse video over the course of a night, but instead of sequentially displaying each frame in a short animated video, I take the best parts from each exposure, and combine them in Photoshop using layers and masks to create the final image that is pleasing to my eye. It is a topic worthy of a separate post, which I shall write soon, but this post is about one small step in the process, in which I deliberately created the look of the sky you see in the image above during a new moon phase.
Original Star Circles Taken During Dark Sky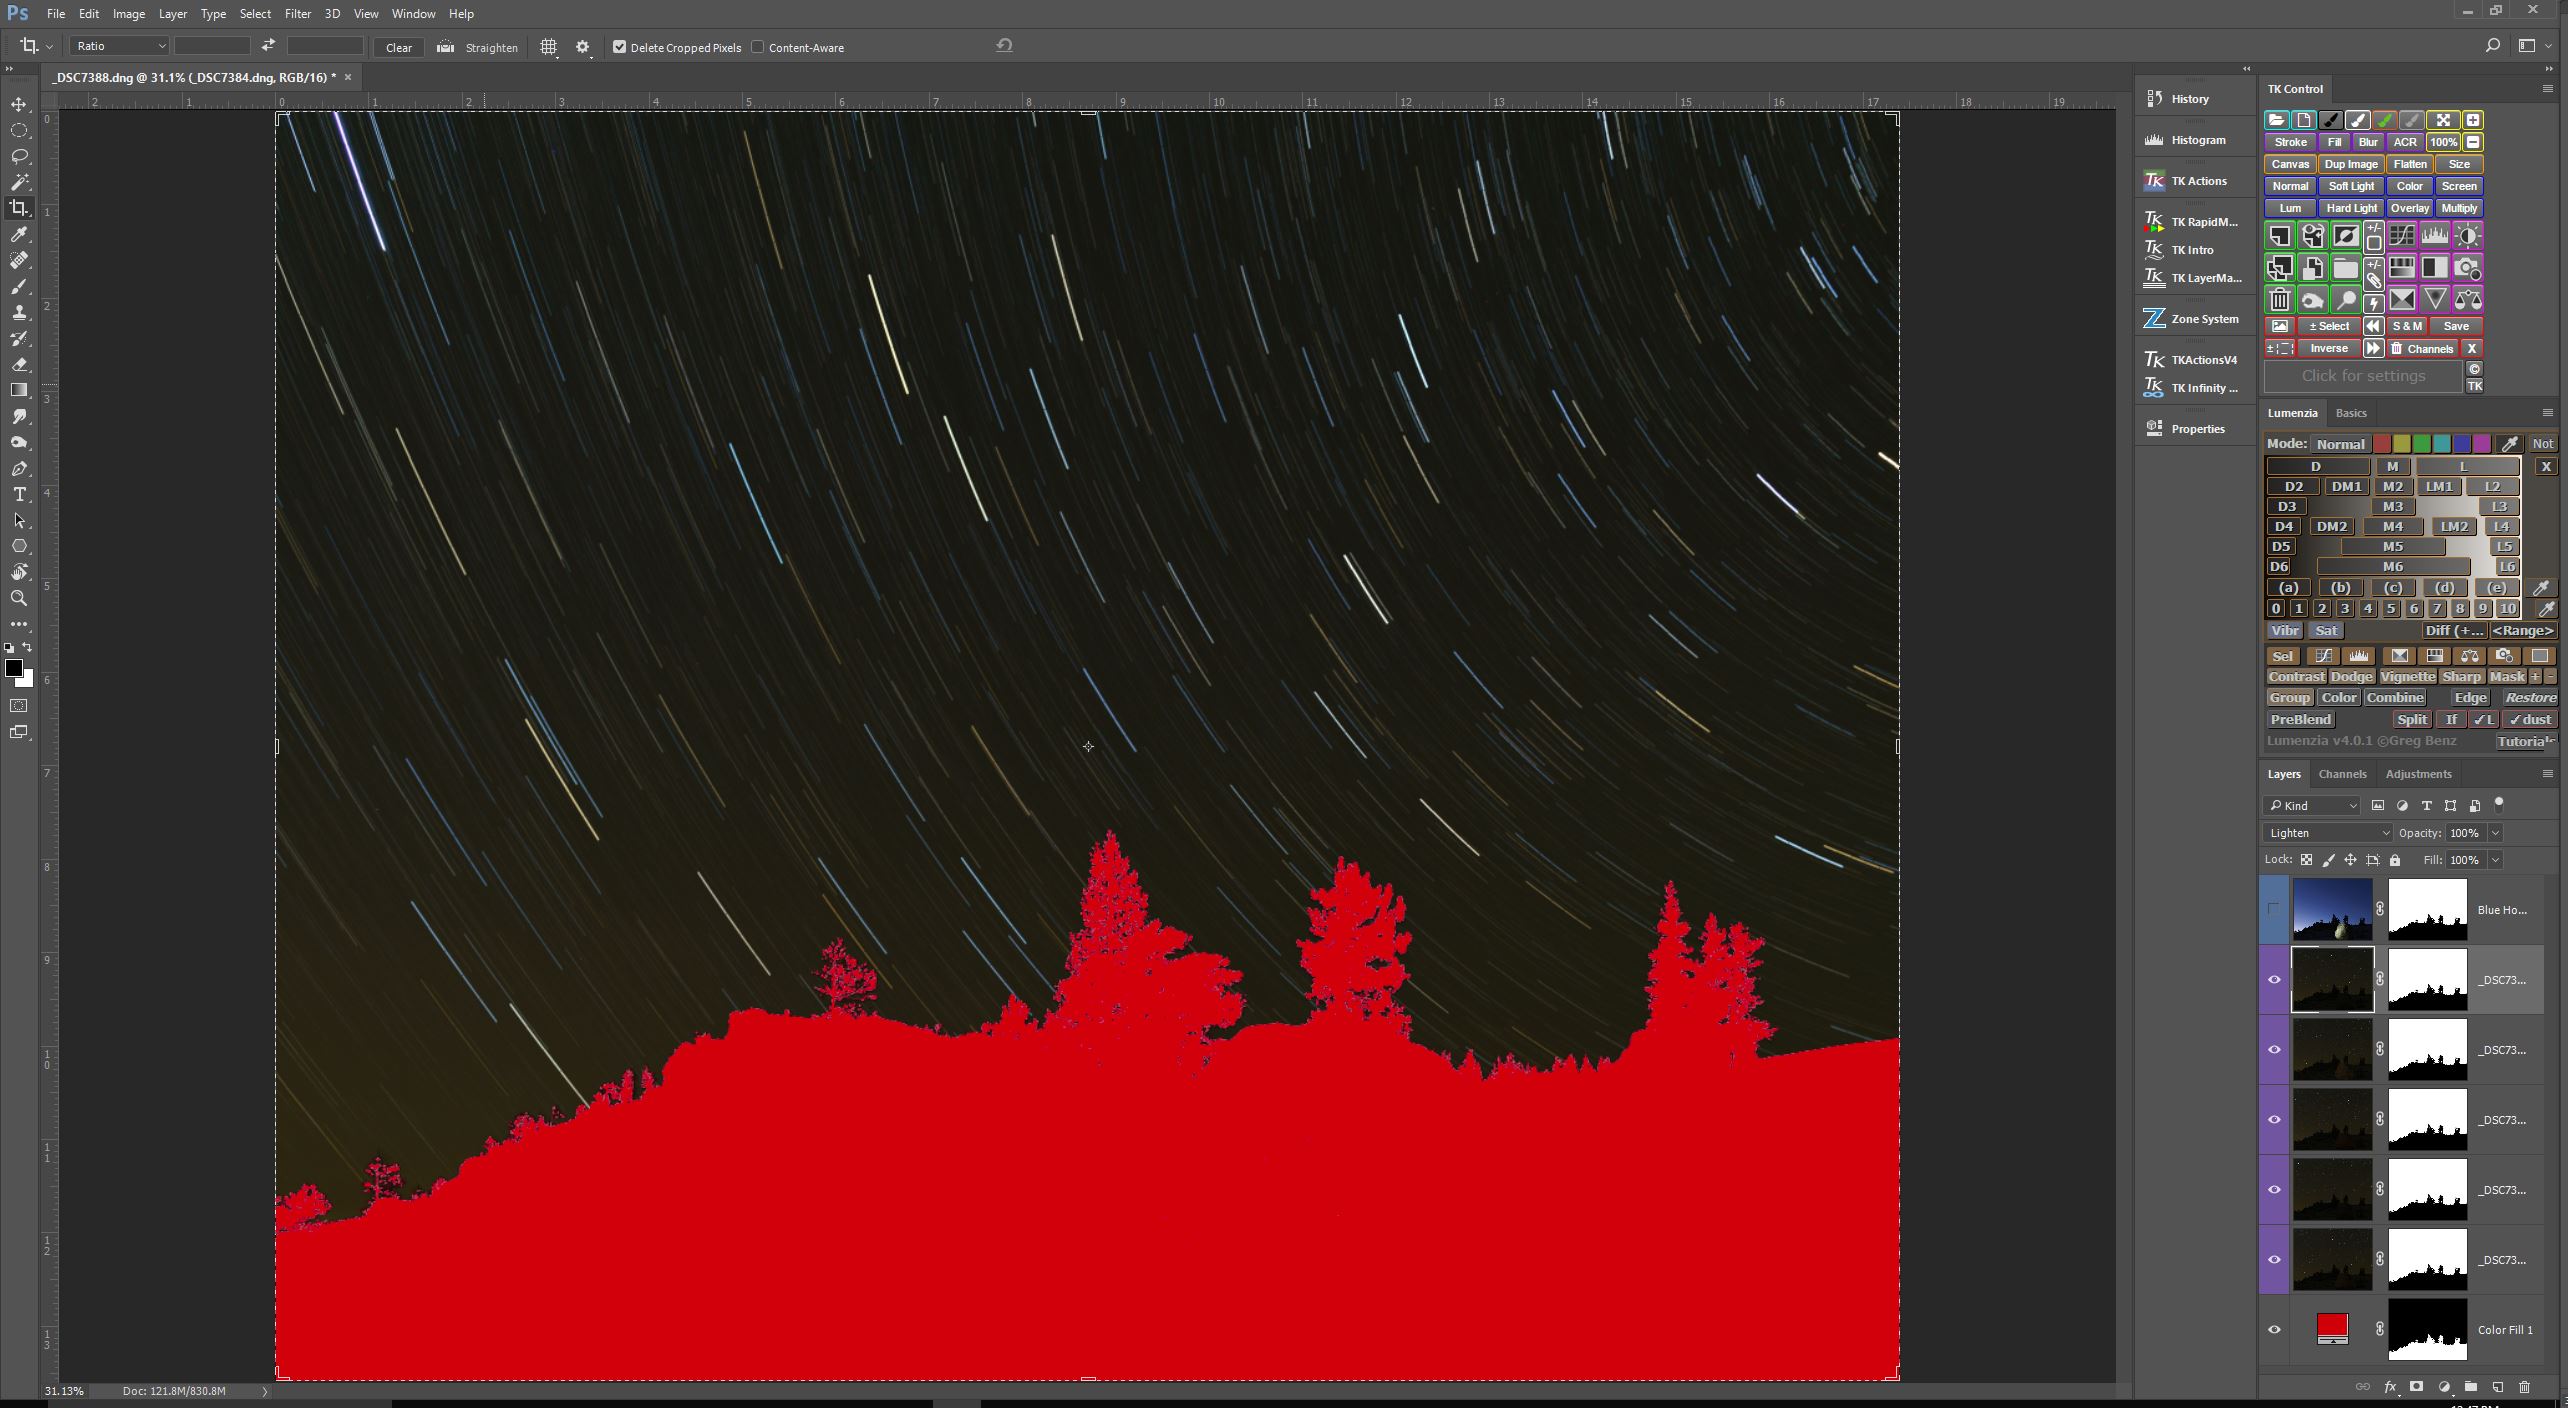
So here is the problem I was trying to solve (I have masked out the foreground for the purposes of this post, this is about the sky only). Â The star circle layers I wanted to use consisted of 5 consecutive exposures, each @4min/f4.0/ISO400, taken during astronomical darkness. When the Blending Mode of these 5 layers are set to Lighten, you end up with a very dark, almost black sky. I like the way my chosen exposure settings rendered the star circles – bright, colorful, and at the density and intensity I find appealing, but I do not care for a black sky. How to lighten the sky? That is the question.
Sky Exposure Taken During Blue Hour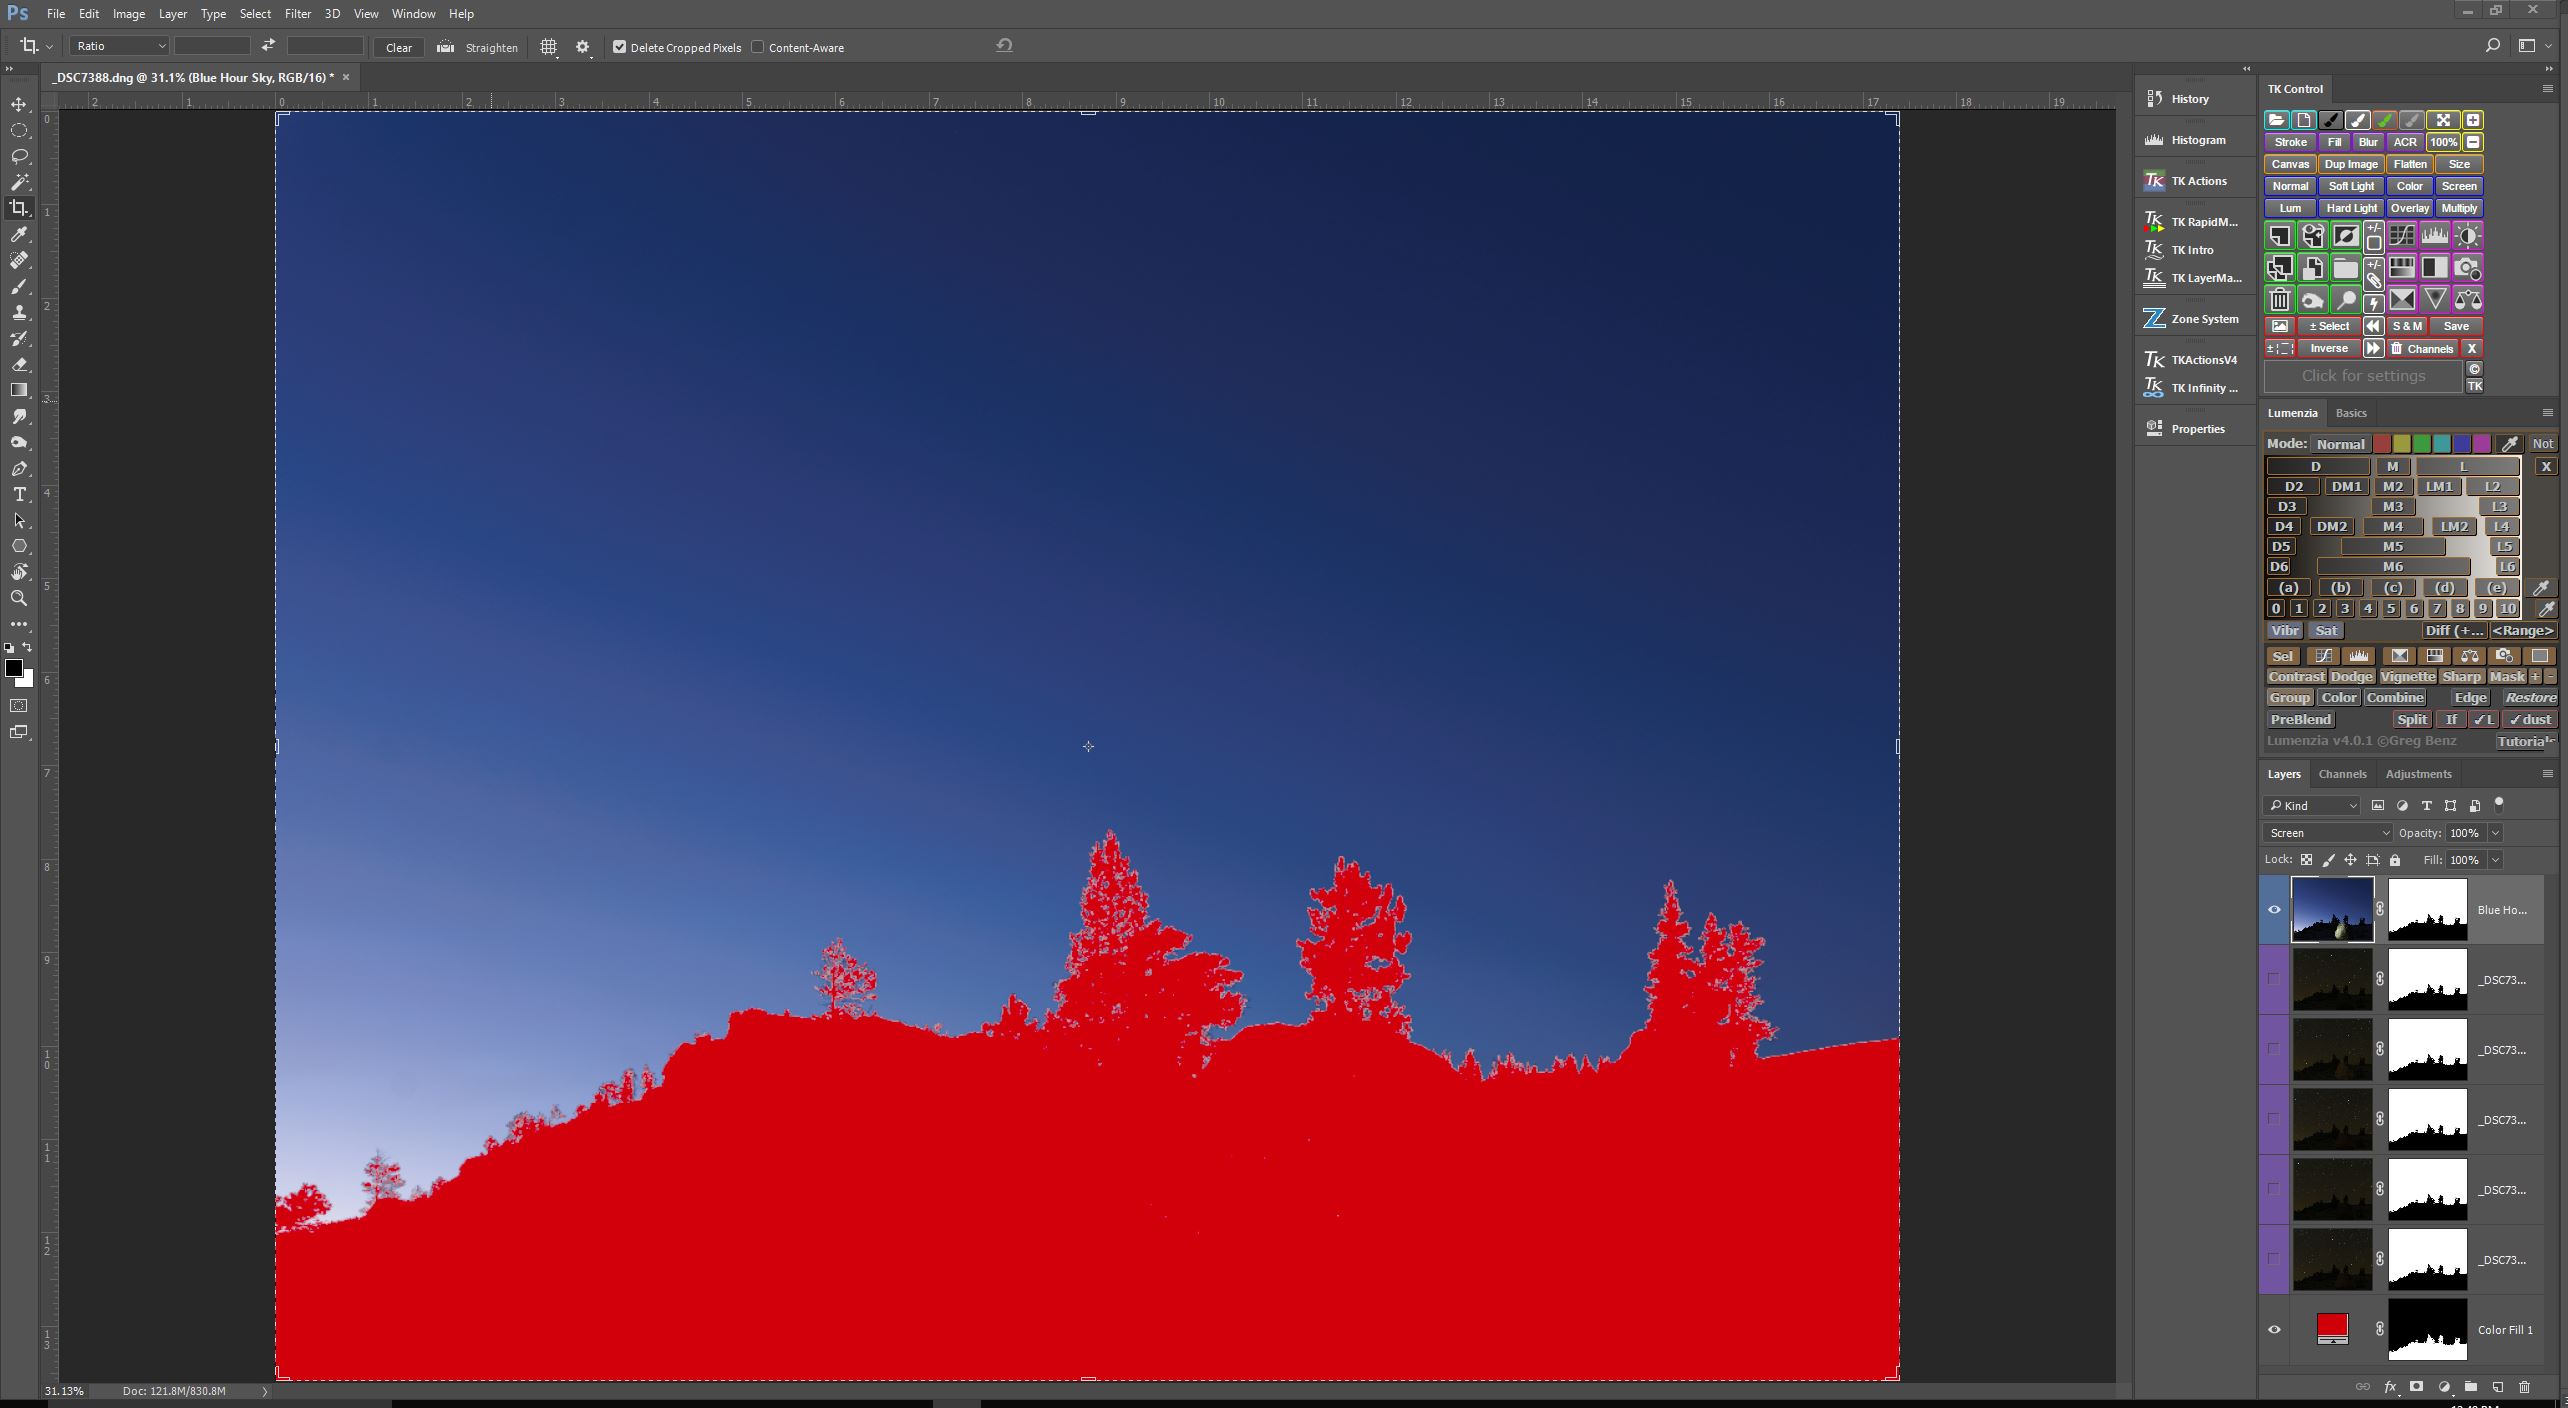
Here is one technique that I turn to often to control the color of the sky when I set out to create star circle images. Remember, I am essentially recording data to be put together in a final image later on, so as part of the process, I make sure to capture a sequence of exposures during the entire blue hour, just up until the time when stars become visible. So the series of exposures I have to choose from range from very light blue, to very dark blue. I just pick the one exposure that I like best, and include it in my image as a separate layer. as you can see in the screen capture above.
           Blue Hour Sky Blended With Dark Sky Star CirclesÂ
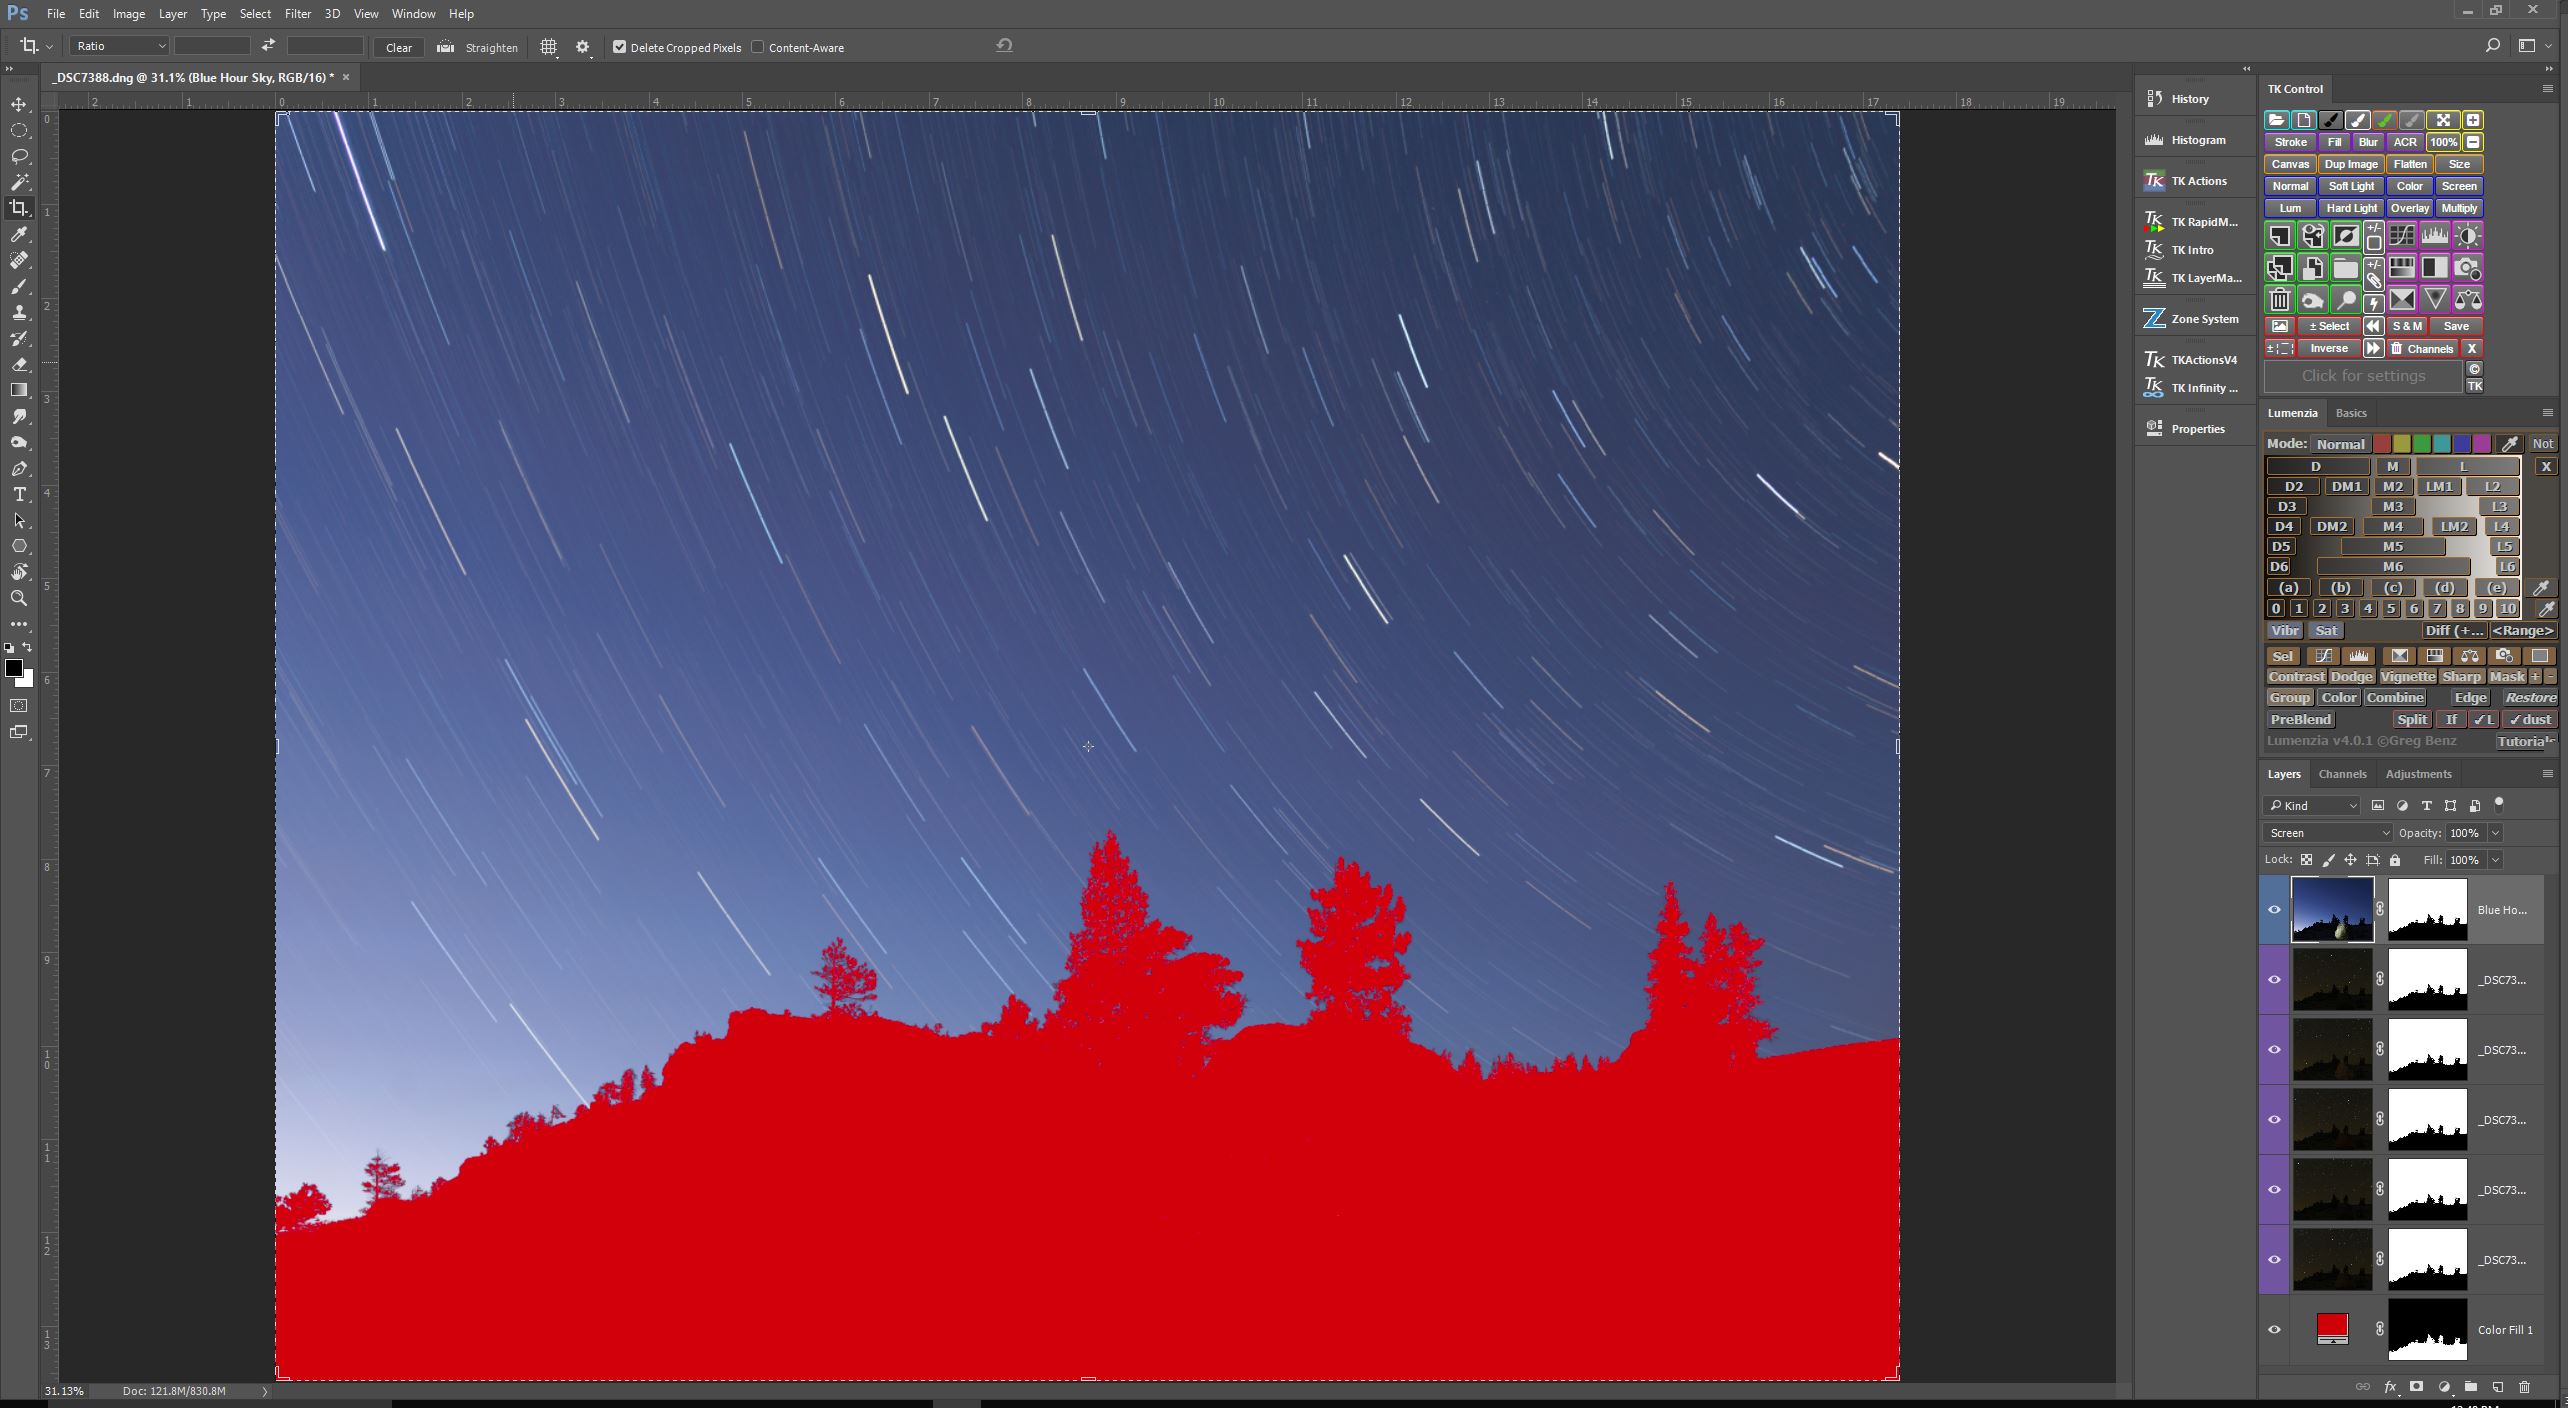 Now, if I set the Blending Mode of this new “blue hour” layer to Screen, you’ll see that the star circles remain nearly unchanged, but the color of the sky is now the “blue hour”color, as shown in the screen capture above.
Composite Sky Darkened By Reducing Opacity Of Blue Sky Layer
I like to select a “blue hour” sky exposure that is a bit lighter than what I envision for the final image. By doing this, I can dynamically change the lightness of the sky simply by changing the Opacity amount for the “blue hour” layer. In this case, I thought 40% Opacity looked the best.
So there you have it. Another tool in the arsenal of techniques at your disposal for controlling the look of your star circle images. Give it a whirl

This image was created using a technique I call time stacking. It is similar to taking a time lapse video over the course of a night, but instead of sequentially displaying each frame in a short animated video, I take the best parts from each exposure, and combine them in Photoshop using layers and masks to create the final image that is pleasing to my eye. It is a topic worthy of a separate post, which I shall write soon, but this post is about one small step in the process, in which I deliberately created the look of the sky you see in the image above during a new moon phase.
Original Star Circles Taken During Dark Sky
So here is the problem I was trying to solve (I have masked out the foreground for the purposes of this post, this is about the sky only). Â The star circle layers I wanted to use consisted of 5 consecutive exposures, each @4min/f4.0/ISO400, taken during astronomical darkness. When the Blending Mode of these 5 layers are set to Lighten, you end up with a very dark, almost black sky. I like the way my chosen exposure settings rendered the star circles – bright, colorful, and at the density and intensity I find appealing, but I do not care for a black sky. How to lighten the sky? That is the question.
Sky Exposure Taken During Blue Hour
Here is one technique that I turn to often to control the color of the sky when I set out to create star circle images. Remember, I am essentially recording data to be put together in a final image later on, so as part of the process, I make sure to capture a sequence of exposures during the entire blue hour, just up until the time when stars become visible. So the series of exposures I have to choose from range from very light blue, to very dark blue. I just pick the one exposure that I like best, and include it in my image as a separate layer. as you can see in the screen capture above.
           Blue Hour Sky Blended With Dark Sky Star CirclesÂ
Now, if I set the Blending Mode of this new “blue hour” layer to Screen, you’ll see that the star circles remain nearly unchanged, but the color of the sky is now the “blue hour”color, as shown in the screen capture above.
Composite Sky Darkened By Reducing Opacity Of Blue Sky Layer
I like to select a “blue hour” sky exposure that is a bit lighter than what I envision for the final image. By doing this, I can dynamically change the lightness of the sky simply by changing the Opacity amount for the “blue hour” layer. In this case, I thought 40% Opacity looked the best.
So there you have it. Another tool in the arsenal of techniques at your disposal for controlling the look of your star circle images. Give it a whirl
{"id":2065,"date":"2017-10-02T14:30:08","date_gmt":"2017-10-02T19:30:08","guid":{"rendered":"http:\/\/www.mitzenmacher.net\/blog\/?p=2065"},"modified":"2017-10-03T21:16:42","modified_gmt":"2017-10-04T02:16:42","slug":"controlling-sky-color-in-star-circle-images-during-the-new-moon","status":"publish","type":"post","link":"https:\/\/www.mitzenmacher.net\/blog\/?p=2065","title":{"rendered":"Controlling Sky Color in Star Circle Images During the New Moon"},"content":{"rendered":"","protected":false},"excerpt":{"rendered":"","protected":false},"author":1,"featured_media":0,"comment_status":"open","ping_status":"open","sticky":false,"template":"","format":"standard","meta":{"_jetpack_newsletter_access":"","_jetpack_dont_email_post_to_subs":false,"_jetpack_newsletter_tier_id":0,"_jetpack_memberships_contains_paywalled_content":false,"_jetpack_feature_clip_id":0,"_jetpack_memberships_contains_paid_content":false,"footnotes":"","jetpack_publicize_message":"","jetpack_publicize_feature_enabled":true,"jetpack_social_post_already_shared":true,"jetpack_social_options":{"image_generator_settings":{"template":"highway","default_image_id":0,"font":"","enabled":false},"version":2},"jetpack_post_was_ever_published":false},"categories":[15],"tags":[],"class_list":["post-2065","post","type-post","status-publish","format-standard","hentry","category-night-photographers-ramblins"],"jetpack_publicize_connections":[],"jetpack_featured_media_url":"","jetpack_sharing_enabled":true,"jetpack_shortlink":"https:\/\/wp.me\/p8xyVp-xj","jetpack_likes_enabled":true,"_links":{"self":[{"href":"https:\/\/www.mitzenmacher.net\/blog\/index.php?rest_route=\/wp\/v2\/posts\/2065","targetHints":{"allow":["GET"]}}],"collection":[{"href":"https:\/\/www.mitzenmacher.net\/blog\/index.php?rest_route=\/wp\/v2\/posts"}],"about":[{"href":"https:\/\/www.mitzenmacher.net\/blog\/index.php?rest_route=\/wp\/v2\/types\/post"}],"author":[{"embeddable":true,"href":"https:\/\/www.mitzenmacher.net\/blog\/index.php?rest_route=\/wp\/v2\/users\/1"}],"replies":[{"embeddable":true,"href":"https:\/\/www.mitzenmacher.net\/blog\/index.php?rest_route=%2Fwp%2Fv2%2Fcomments&post=2065"}],"version-history":[{"count":3,"href":"https:\/\/www.mitzenmacher.net\/blog\/index.php?rest_route=\/wp\/v2\/posts\/2065\/revisions"}],"predecessor-version":[{"id":2076,"href":"https:\/\/www.mitzenmacher.net\/blog\/index.php?rest_route=\/wp\/v2\/posts\/2065\/revisions\/2076"}],"wp:attachment":[{"href":"https:\/\/www.mitzenmacher.net\/blog\/index.php?rest_route=%2Fwp%2Fv2%2Fmedia&parent=2065"}],"wp:term":[{"taxonomy":"category","embeddable":true,"href":"https:\/\/www.mitzenmacher.net\/blog\/index.php?rest_route=%2Fwp%2Fv2%2Fcategories&post=2065"},{"taxonomy":"post_tag","embeddable":true,"href":"https:\/\/www.mitzenmacher.net\/blog\/index.php?rest_route=%2Fwp%2Fv2%2Ftags&post=2065"}],"curies":[{"name":"wp","href":"https:\/\/api.w.org\/{rel}","templated":true}]}}