From the moment that I picked up my first camera and started taking pictures, I have always desired the ability to easily and quickly create and display a print of my work, and to do so in an inexpensive manner. But in the film medium, the steps involved in film processing into negatives (or slides), darkroom enlargement onto photographic paper, and the subsequent chemical baths and processes needed to bring the print to fruition are neither quick nor easy. And the cost of the enlarging equipment and processing supplies, as well as the need for a dedicated and specially equipped darkroom makes the endeavor anything but inexpensive.
Because of the costs and difficulties involved, I had opted to sit it out on the sidelines, with an occasional trip to the local camera store (or film counter) to take care of my photographic print needs. But all things eventually change, and so it has with the entire film experience. We are now in a digital world, and the equipment and processes have changed, along with the associated technologies utilized to produce a fine photographic print.
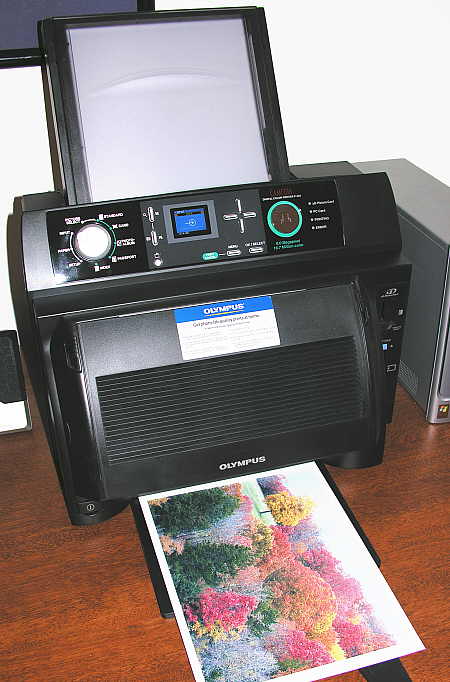
For the photographic hobbyist such as myself, there is a type of digital photo printer that has reduced the skill and effort required to produce an astoundingly high quality print to simply pushing a button. The type of printer I am referring to is a dye-sublimation printer, such as the Olympus P440 unit shown below, the various Kodak dye-sub printers, and those produced by many other manufacturers as well. The cost of this type of printer has dropped dramatically in recent years, to the point that some now cost no more than one decent enlarger lens alone!
Using this type of printer is simple. Either pop the camera’s memory card into the printer’s memory card-reader slot and print directly from the card, or connect the printer to your computer (via USB) and print from within any imaging application.
The results are indistinguishable from an 8″x10″ enlargement ordered from a photo lab, since they are using the same types of printer technologies to produce the prints that you order. The cost for an 8″x10″ print (using the P440) is $1.60/print, factoring in the ribbon cartridge and the special dye-sub paper that is required.  Printing an 8″x10″ is quickly accomplished in a four-pass printing process, which leaves a clear protective coating on the finished print.
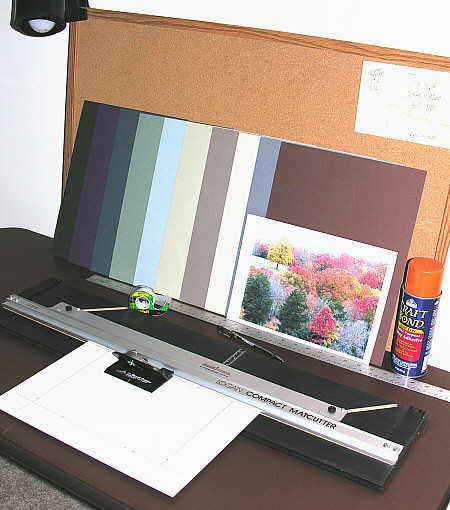
Here you can see the few simple tools and materials needed to mount, mat and frame your finished 8″x10″ photograph. First, mat board in a color that compliments your picture and frame is necessary. I purchase 11″x14″ mat board from Internet art supply storefronts, where an assortment of various colored boards can be purchased at a steep discount from normal prices.  By buying the mats this way, I can buy them for about 40 cents each, and I can usually find an appropriate color to fit my needs.. A mat cutter is essential to be able to produce a fine, bevel-cut mat edge, in whatever custom size and style you choose to use. A straight edge/ruler for measuring mat opening layouts is necessary, and spray adhesive is used to cement the photograph to a backing board so that it does not warp and curl beneath the mat.
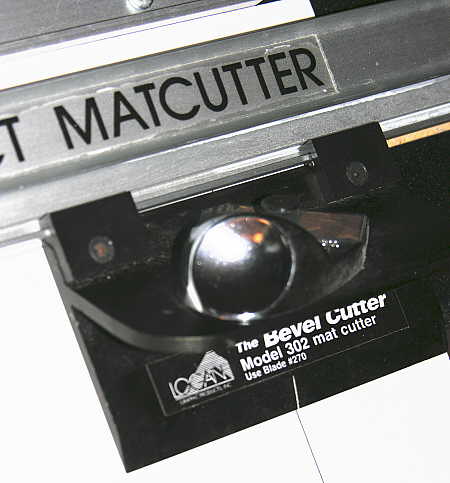
The mat cutter is composed of a few simple parts, one being the cutter assembly shown above. The cutter rides along a track that keeps it moving straight and true, and the 45 degree slant to the blade produces a nice beveled cut. Once the photo is attached to the backing board, the pre-cut mat is placed over the photo, and the entire unit is placed within the frame of your choosing. Now, all you need to do is find an empty space on the wall to hang the mounted, matted and framed photograph on.
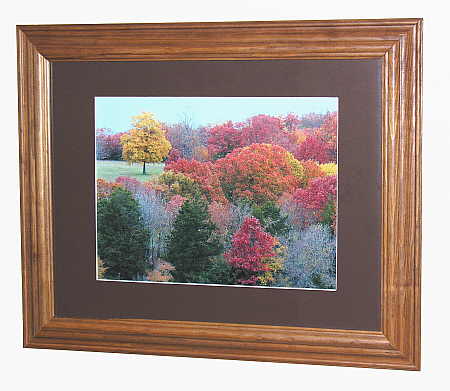
The total cost for the print shown above?
8″x10″ photo paper and cartridge cost, per print = $1.60
11″x14″ mat board (2), per print = $0.80
11″x14″ Frame (Walmart special) =$5.00
Grand total = $7.40 for framed, mounted and matted print.
There you go – it’s as simply as that!

From the moment that I picked up my first camera and started taking pictures, I have always desired the ability to easily and quickly create and display a print of my work, and to do so in an inexpensive manner. But in the film medium, the steps involved in film processing into negatives (or slides), darkroom enlargement onto photographic paper, and the subsequent chemical baths and processes needed to bring the print to fruition are neither quick nor easy. And the cost of the enlarging equipment and processing supplies, as well as the need for a dedicated and specially equipped darkroom makes the endeavor anything but inexpensive.
Because of the costs and difficulties involved, I had opted to sit it out on the sidelines, with an occasional trip to the local camera store (or film counter) to take care of my photographic print needs. But all things eventually change, and so it has with the entire film experience. We are now in a digital world, and the equipment and processes have changed, along with the associated technologies utilized to produce a fine photographic print.
For the photographic hobbyist such as myself, there is a type of digital photo printer that has reduced the skill and effort required to produce an astoundingly high quality print to simply pushing a button. The type of printer I am referring to is a dye-sublimation printer, such as the Olympus P440 unit shown below, the various Kodak dye-sub printers, and those produced by many other manufacturers as well. The cost of this type of printer has dropped dramatically in recent years, to the point that some now cost no more than one decent enlarger lens alone!
Using this type of printer is simple. Either pop the camera’s memory card into the printer’s memory card-reader slot and print directly from the card, or connect the printer to your computer (via USB) and print from within any imaging application.
The results are indistinguishable from an 8″x10″ enlargement ordered from a photo lab, since they are using the same types of printer technologies to produce the prints that you order. The cost for an 8″x10″ print (using the P440) is $1.60/print, factoring in the ribbon cartridge and the special dye-sub paper that is required.  Printing an 8″x10″ is quickly accomplished in a four-pass printing process, which leaves a clear protective coating on the finished print.
Here you can see the few simple tools and materials needed to mount, mat and frame your finished 8″x10″ photograph. First, mat board in a color that compliments your picture and frame is necessary. I purchase 11″x14″ mat board from Internet art supply storefronts, where an assortment of various colored boards can be purchased at a steep discount from normal prices.  By buying the mats this way, I can buy them for about 40 cents each, and I can usually find an appropriate color to fit my needs.. A mat cutter is essential to be able to produce a fine, bevel-cut mat edge, in whatever custom size and style you choose to use. A straight edge/ruler for measuring mat opening layouts is necessary, and spray adhesive is used to cement the photograph to a backing board so that it does not warp and curl beneath the mat.
The mat cutter is composed of a few simple parts, one being the cutter assembly shown above. The cutter rides along a track that keeps it moving straight and true, and the 45 degree slant to the blade produces a nice beveled cut. Once the photo is attached to the backing board, the pre-cut mat is placed over the photo, and the entire unit is placed within the frame of your choosing. Now, all you need to do is find an empty space on the wall to hang the mounted, matted and framed photograph on.
The total cost for the print shown above?
8″x10″ photo paper and cartridge cost, per print = $1.60
11″x14″ mat board (2), per print = $0.80
11″x14″ Frame (Walmart special) =$5.00
Grand total = $7.40 for framed, mounted and matted print.
There you go – it’s as simply as that!
{"id":664,"date":"2006-11-30T16:55:08","date_gmt":"2006-11-30T21:55:08","guid":{"rendered":"http:\/\/www.mitzenmacher.net\/blog\/?p=664"},"modified":"2006-11-30T17:00:10","modified_gmt":"2006-11-30T22:00:10","slug":"a-simple-way-to-display-your-photographs","status":"publish","type":"post","link":"https:\/\/www.mitzenmacher.net\/blog\/?p=664","title":{"rendered":"A Simple Way to Display Your Photographs"},"content":{"rendered":"","protected":false},"excerpt":{"rendered":"","protected":false},"author":1,"featured_media":0,"comment_status":"open","ping_status":"open","sticky":false,"template":"","format":"standard","meta":{"_jetpack_newsletter_access":"","_jetpack_dont_email_post_to_subs":false,"_jetpack_newsletter_tier_id":0,"_jetpack_memberships_contains_paywalled_content":false,"_jetpack_memberships_contains_paid_content":false,"footnotes":"","jetpack_publicize_message":"","jetpack_publicize_feature_enabled":true,"jetpack_social_post_already_shared":false,"jetpack_social_options":{"image_generator_settings":{"template":"highway","default_image_id":0,"font":"","enabled":false},"version":2},"jetpack_post_was_ever_published":false},"categories":[4],"tags":[],"class_list":["post-664","post","type-post","status-publish","format-standard","hentry","category-photography-ramblins"],"jetpack_publicize_connections":[],"jetpack_featured_media_url":"","jetpack_sharing_enabled":true,"jetpack_shortlink":"https:\/\/wp.me\/p8xyVp-aI","jetpack_likes_enabled":true,"_links":{"self":[{"href":"https:\/\/www.mitzenmacher.net\/blog\/index.php?rest_route=\/wp\/v2\/posts\/664","targetHints":{"allow":["GET"]}}],"collection":[{"href":"https:\/\/www.mitzenmacher.net\/blog\/index.php?rest_route=\/wp\/v2\/posts"}],"about":[{"href":"https:\/\/www.mitzenmacher.net\/blog\/index.php?rest_route=\/wp\/v2\/types\/post"}],"author":[{"embeddable":true,"href":"https:\/\/www.mitzenmacher.net\/blog\/index.php?rest_route=\/wp\/v2\/users\/1"}],"replies":[{"embeddable":true,"href":"https:\/\/www.mitzenmacher.net\/blog\/index.php?rest_route=%2Fwp%2Fv2%2Fcomments&post=664"}],"version-history":[{"count":0,"href":"https:\/\/www.mitzenmacher.net\/blog\/index.php?rest_route=\/wp\/v2\/posts\/664\/revisions"}],"wp:attachment":[{"href":"https:\/\/www.mitzenmacher.net\/blog\/index.php?rest_route=%2Fwp%2Fv2%2Fmedia&parent=664"}],"wp:term":[{"taxonomy":"category","embeddable":true,"href":"https:\/\/www.mitzenmacher.net\/blog\/index.php?rest_route=%2Fwp%2Fv2%2Fcategories&post=664"},{"taxonomy":"post_tag","embeddable":true,"href":"https:\/\/www.mitzenmacher.net\/blog\/index.php?rest_route=%2Fwp%2Fv2%2Ftags&post=664"}],"curies":[{"name":"wp","href":"https:\/\/api.w.org\/{rel}","templated":true}]}}