
I can, with my new (but as of yet, unimproved) super-duper home-built photographic macro stand (SDHBPMS). Past gentle readers of this blog might recall the “super-duper, multi-purpose, portable cartographic data collection machineâ€Â (SDMPPCDCM) that I invented in order to do some digital mapping at our ranch in the post “If They Can Do It, So Can I.” Well, I had a little free time on my hands today, so I set off to invent something to aid in my photographic hobbyist pursuits. And every hobbyist with a camera capable of macro focusing should really have a macro stand. “Why?” you may ask. Because it’s a fun way to take macro shots of all kinds of interesting things. Just use your imagination – you’ll think of some worthy subjects, I’m sure. Here is my SDHBPMS, assembled with odds and ends that I found around the house.
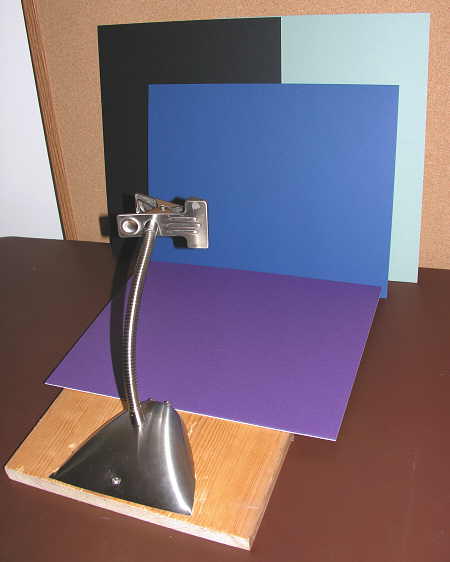
I had an old flexible goose-neck clamp-on table lamp sitting unused in a closet, so I took my trusty tin-snips to the shade side of the lamp, cutting it in half. I proceeded to flatten out the remaining part of the shade, creating a base which I attached to a piece of 1×12 board. Now, I had a sturdy clamp at the end of a long flexible arm, all secured to a base capable of supporting many items suitable for macro photography. Finding an old folding table and cork bulletin board in my “photolab” office closet, I created the setup you see above. The cork board in the rear will allow me to pin up any background that I desire. Shown in the picture are several different colored pieces of matte board. Since I cut my own mats, I have a large choice in background colors to choose from. The purpose for all the colors, as you will see, is to create a background that is substantially different from the subject matter that you are photographing.
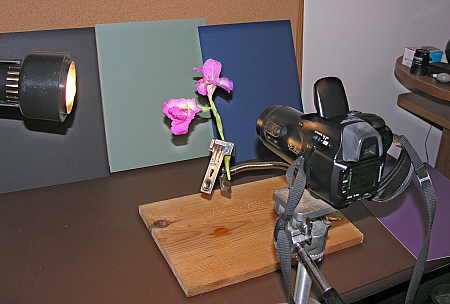
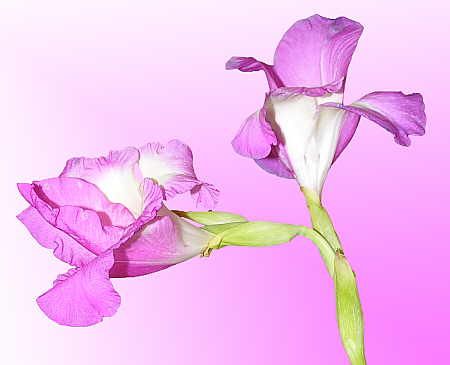
To test out the new SDHBPMS, I grabbed a gladiola from the flower vase in the kitchen, and popped it into the stand. I selected the black matte board to use as the background, and set my camera up on a tripod and composed the picture in the camera’s monitor. My technique was to set the camera self-timer to 10 seconds, press the shutter to allow the camera to precalculate exposure and focus, and then use a simple hand held lamp to paint the subject with side lighting. This resulted in the following photo, which is what the macro stand setup was intended to achieve.
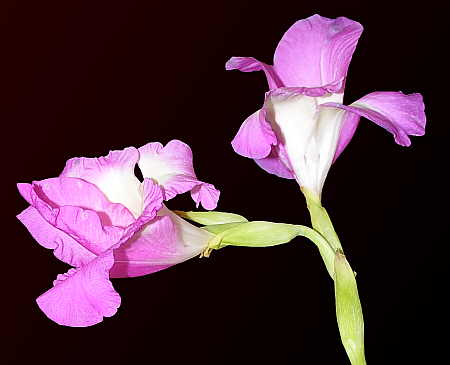
The goal of the contrasting background is to allow the magic wand tool of your photo editing software to easily and quickly isolate the subject. The technique is simple. Using the magic wand, select the background color. Keep adding to the selection with the magic wand tool if necessary, until all the background is selected. Now simply invert the selection. There you have it – a simple method of isolating a subject. If you have chosen a good contrasting background color when you shoot the photo, this process will be quick and accurate.
Once you have isolated the subject from the background, you can easily change the background to transparent. Now you will have an image of the gladiola, for example, that is surrounded by transparency. This is great! With this image you can do many things, simply and easily. How about adding a different background to it, as I did below?Â
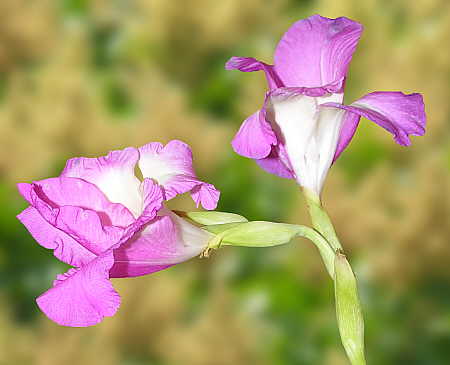
This background is from a photo in a previous post entitled Landscaping, My Way, in which there was a picture of dwarf sumac flowering in the summer. This background is just some of those sumac blossoms, blurred with the Gaussian blur function of my software, and pasted behind the gladiola that I just photographed on my macro stand.
Perhaps you are an artistic sort of person, and would like to create your own background? Anything is possible once you have isolated the subject. I am not particularly artistic, so I usually just rely on simple gradients for these type of backgrounds, as shown in the following photo-illustration-
The point is, if you are the type of person who enjoys tinkering, and also likes the hobby of photography, you might want to consider constructing your own home-brewed macro photography stand, as I have done. In the meanwhile, I’ll let you ponder the size of the macro stand that I built to create the following photo-illustration-

Â


Very Sneaky, Hal 😉
If we had more room around here, I might set the hubs to building something like that… I’m sure it would come in handy for those nights I’m trying to get the “perfect” picture of some little thing in order to make yet another Photoshop creation.
I’m wondering if you might get even better results using a blue or green background, since these colors are harder for the human eye to detect than the strong border contrast created by black (human eyes are good at border contast and lines). A colored background (eg. blue/green screening) should anti-alias better than black. (I notice some black edges on the left side of the flower.)
This is a great post. Very interesting how it works. Thanks very much.
Mr C – Thanks for the added insight about the background colors. You are absolutely right about using blue or green whenever possible for the screening material. There is a trade off between using blue or green, however, for the lesser fringe effects, as opposed to any color with a high contrast to the subject matter, for the ease of magic wand select-ability.
The local weatherman, for instance, may use a green screen for the weather cast. But the weatherman is instructed never to wear green clothing. When shooting flowers, as in the photos in this post, it’s hard to tell the gladiola not to wear a green stem. Blue might have worked, but the magic wand tool can get confused between shades of blue, and the shades of violet in the flowers petals.
If this were a project of any meaningful significance, rather than a blog post about a macro stand, I would have probably shot several versions of the flower, each using a different color background, and used the one producing the best results. Also, I would have gone through additional post-selection steps, as follows:
A) Select-Contract 1 pixel – by contracting the selection 1 pixel from the outer edge, some of the fringing can be eliminated.
B) Select-Defringe – by using the editing software defringe function, most of the remaining fringe effects will be eliminated.
C) Select-Feather – this will allow the subject image to blend in more naturally with the background, rather than having a sharp subject-background transition.
D) Judicious use of a blurring brush (about 4-6 pixels wide) around the flower edge, to further soften the transition.
E) Balancing the relative lighting between the subject and background to achieve a realistic look and feel.
I suppose it just depends on what the final use of the image is intended for, and how much time one wants to devote to the project. Since no one is providing me with a paycheck for this experiment, I took the quick and easy route 😉
You da PhotoShop man!
MrC – I only wish I was. I’ve seen people who are really adept at photoshop, and their work is amazing. But I do like to play around with the software.
PS – If I only did things I was good at, I would be sitting around doing nothing! And I AM good at that!
You might be interested in this setup as well:
http://strobist.blogspot.com/2006/07/how-to-diy-10-macro-photo-studio.html
Duane – Thanks for the link to the macro studio setup. I really like the light diffusion that setup provides, and I am going to plagiarize some of those ideas.