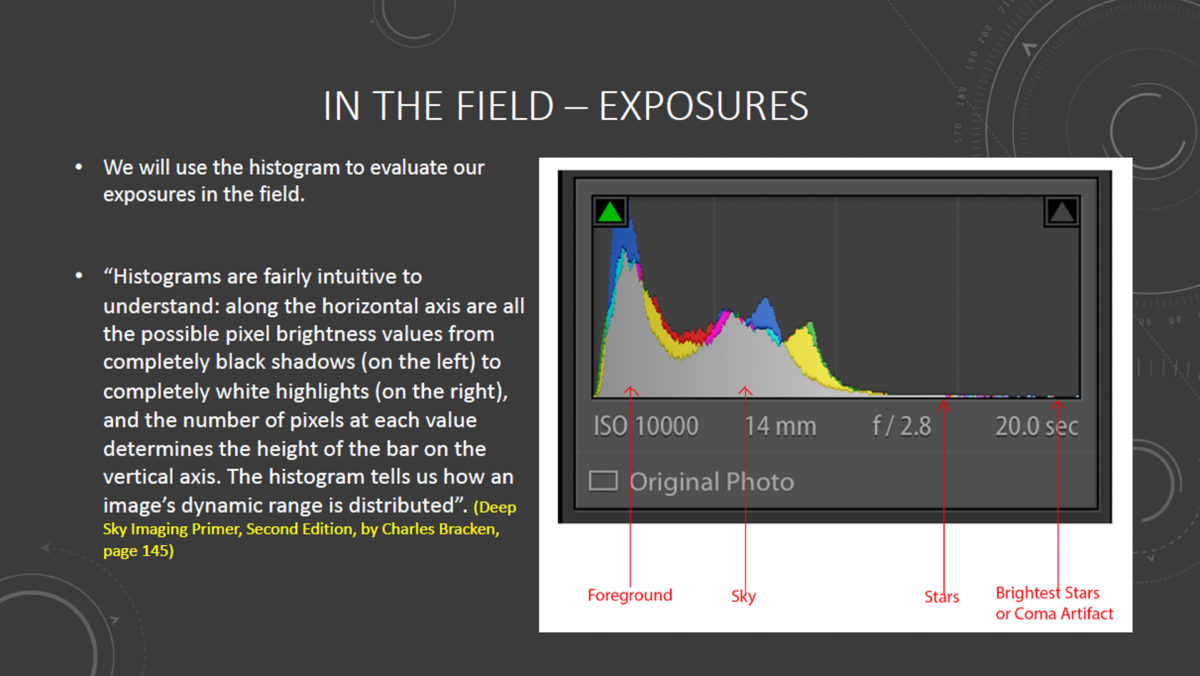
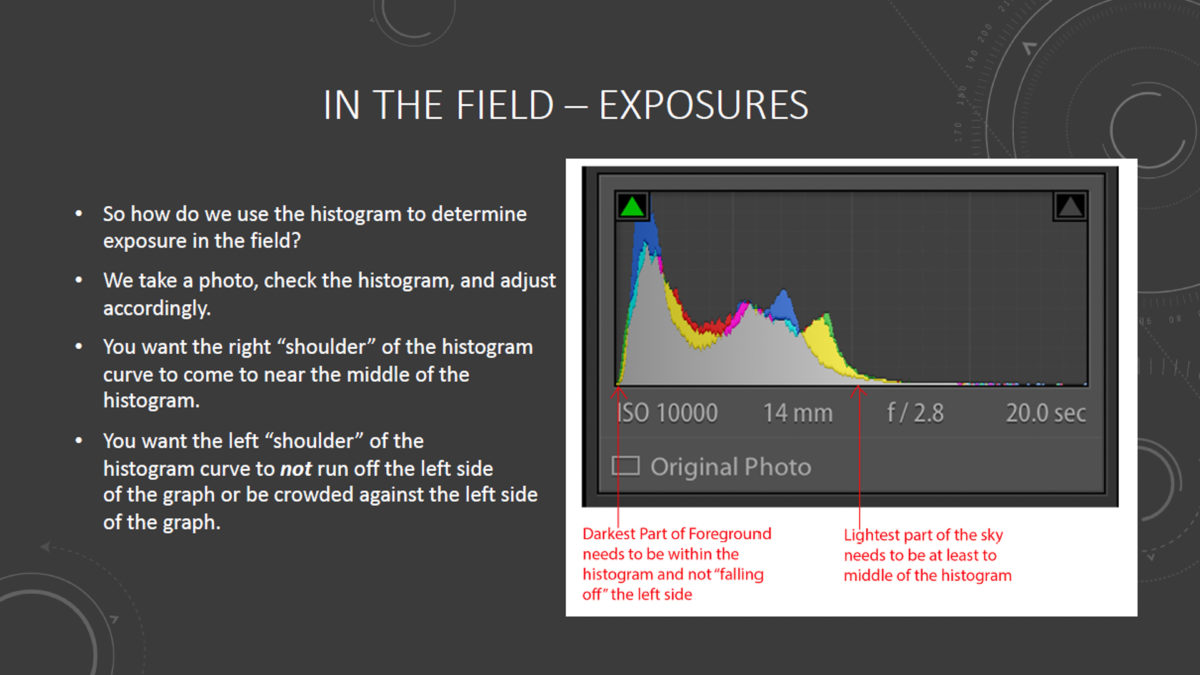
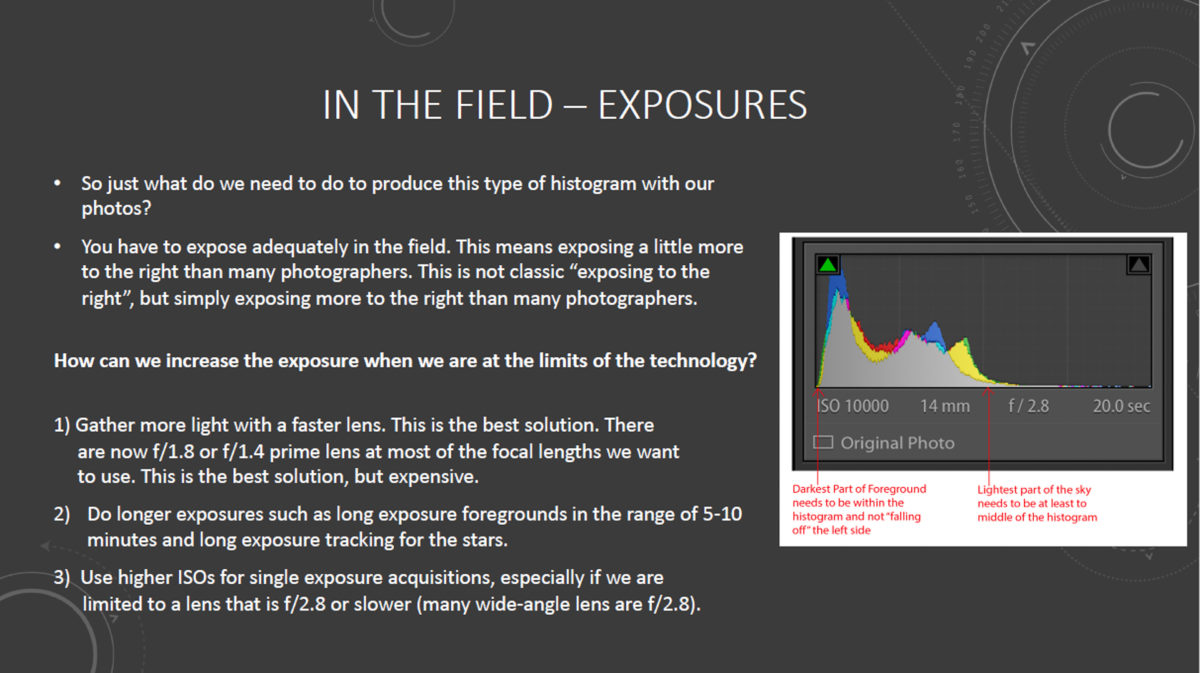
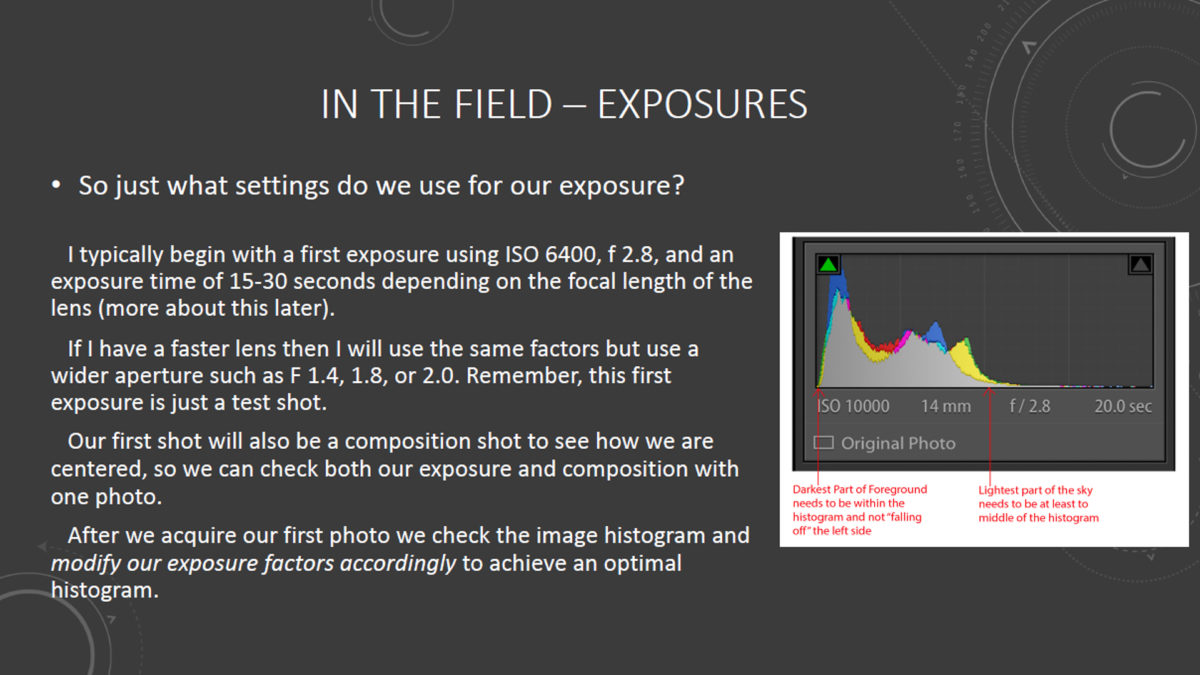
My dream camera will probably not be achieved in my lifetime, but I believe that it will indeed exist someday.  I cannot say what form it will take, nor what technologies will be required to enable it’s functionality.  Perhaps an implant in the brain will be required. For what I imagine to be the ultimate camera is akin to simply(?) digitizing the mental image formed by all of those pesky neurons in our brains, and the ability to transfer the resultant data to any device (or person, perhaps) of our choosing, activated on demand by our conscious thought. Imagine, the mental imagery that we record might be the amalgam of visual input from the eyes, augmented by the sensual inputs of our emotions, and colored by the historical perspective of our memories! Wouldn’t that be cool?
While we await the future, and all of the fanciful technology that it promises to drag along with it, we are still embedded in the present, and the technologies available to us in the here-and-now. Today we are faced with an enormous array of choices as we pursue our photographic interests. There are decisions to be made regarding digital or film cameras, lenses, formats, and peripheral equipment. Every person who picks up a camera and endeavors to take a worthwhile photograph will have his/her personal definition of the perfect camera, based upon their own personal photographic aims and expectations. This post is about my personal search for a camera that would fulfill my own photographic aspirations.
My first real camera (if you don’t count the childhood home-built “pinhole” cameras, or Kodak Brownie cameras), was a camera that I bought in 1968 in order to photograph a backpacking trip into the Sierra Nevada high-country. This was to be a three week trip, so my backpack would be weighted down by necessary provisions, thereby leaving me little allowance for a camera of any appreciable size. Knowing little about cameras at the time, I ventured into a camera store and explained my needs to the salesman. He sold me on this little beauty, called a Rollei 16.
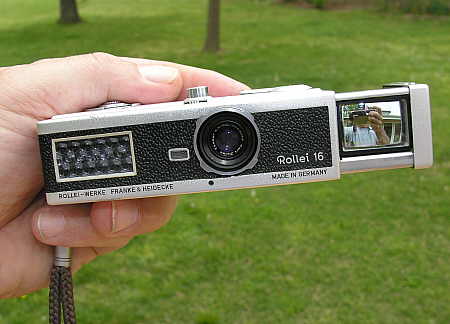
This seemed to be the perfect camera for the trip. The virtues of this camera were its diminutive size, along with the excellent optics produced by Carl Zeiss – Tessar. The salesman sold me the camera, a case, a bayonet mounted teleconverter, and 10 rolls of film. The total weight of these components was under 2 pounds. This camera had an automatic exposure system, via the selenium cell pictured on the left, and could focus as close as 8″ from the subject. While not true macro, it did allow for excellent close up shots. I took it with me on that backpacking trip, and exposed all ten rolls of film. I took the film in to the photo store to have it processed, and they told me that it would have to be sent to a special laboratory for processing, as it was a non-standard size film. “Oh,” I said. “How long will that take?” I asked. “About three weeks,” was the reply.
When the three weeks were up, I picked up the slides from the camera store, and asked the clerk for ten more rolls of film for the Rollei 16. He informed me that the film for the Rollei 16 was actually a type of double-sprocket movie film that was split in half and loaded into small, proprietary plastic cartridges, which were available direct from Rollei by mail order!  I went home and put the slides into my Dad’s slide projector, gathered my family around, and turned on the projection switch, anticipating the roar of the amazed crowd as they viewed my photographic masterpieces! Instead, I was greeted by the sound of creaking chairs as the audience struggled to get close enough to see the amazingly puny images projected onto the screen.  The size of the film was extremely small compared to even a 35mm format, as shown below.
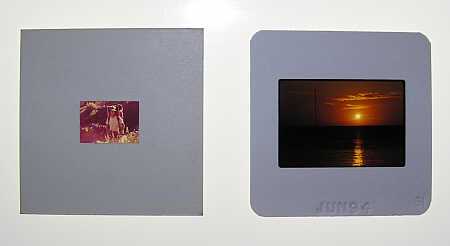
The mounted slide produced by the Rollei 16 is pictured on the left, and a slide from the 35mm format is pictured on the right. Besides projection problems, the small area of a negative precluded prints of any reasonable size. It is the same problem of scale that eventually went on to doom the future 110 film format. While the camera performed admirably for the purpose that I had intended, the lack of film availability and processing difficulties, along with the problems associated with the small film format led me to abandon it as a photographic tool. I only used it on that one backpacking trip, so it is perhaps my worst-ever camera purchase. On the other hand, it is worth more on eBay today that I paid for it back in 1968, so perhaps it is my best-ever camera purchase – who knows?
I learned some good lessons from that experience, and also intensified my desire to share what I experienced in my world with others around me. Photography seemed to be an excellent form of expression and documentation, so I began to study all I could find on the subject. I began using my Dad’s Nikon F to learn photographic techniques, and soon I purchased my own camera, a Minolta SRT-101. Soon I discovered that I wanted to take macro shots, so I bought a 50mm macro lens. Available lighting never seemed sufficient, so a strobe was added to the kit. For general nature photography, I found that I needed not one, but maybe two or three different telephoto lenses, which then forced me to add a tripod to my photographic kit. One day I read a book on wide-angle photography, and it intrigued me so much that I had to sacrifice a paycheck to buy a wide-angle lens. But my equipment bag runneth over, and I had no room to add the new lens to my ever growing photo kit. To lighten the load, I decided to buy a moderate wide-to-telephoto zoom lens, to replace the multiple single-focal length lenses that I carried. When a friend who had requested that I take some publicity photos of him complained that the resulting images were not sharp enough for the purpose, I added an 85mm portraiture lens.
Eventually, I graduated to a Minolta XK w/AES Finder, which was Minolta’s foray into the professional “systems camera” realm. In addition to everything above, a motor drive was now part of the photo kit, as well as an array of focusing screens for various and sundry purposes. Ultimately, my scuba diving interests intersected with my photographic interests, and the resultant madness eventually led to scenes such as the one below, where it takes a truck to haul the photographic equipment of just three photographers!

Enough, already, enough! I’ve had it with having to lug tons of equipment in order to get a photograph. Wouldn’t it be nice if some camera company would engineer an all-purpose camera that was not dependant upon a mountain of peripheral accessories in order to take the most frequently encountered shots? When Olympus announced it’s new line of cameras dubbed ZLR’s (Zoom Lens Reflex), I was intrigued. The concept of an all-inclusive camera, wrapped around a quality fast zoom lens, integrating on-board flash and an integral motor drive was a step forward in photographic technology, one that dovetailed nicely with my photographic style, which was quickly gravitating towards compact, general-purpose, and portable cameras. After allowing a sufficient amount of time to allow this genre of camera to mature and prove itself, I took the plunge and purchased an Olympus IS-3 Zoom Lens Reflex camera, as shown in the following photo-
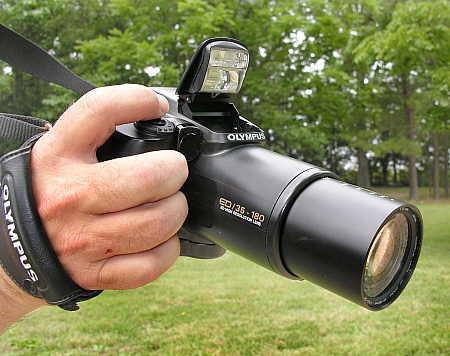
This camera incorporates a fast, high quality 35mm-180mm zoom lens, an on-board flash, motor drive, various user selectable focusing and metering methods, along with full manual control. The lens features true macro focusing capabilities, and produces images with excellent sharpness and resolution, and very low distortion. While this camera might not compete well in benchmark tests against more traditional single lens reflex (SLR) cameras, the portability of the camera, as well as the inclusion of all major modes of shooting in one easy to transport package, more than makes up for it’s shortfalls relative to it’s SLR cousins.
The main shortfall of this camera for field use is the size and weight of the unit. While a 180mm telephoto is considered to be a long range for a prime lens, it has too short a reach for a good many nature shots. To solve this problem, Olympus optical engineers designed a dedicated add-on teleconverter for this camera, which transformed the lens to a 300mm telephoto unit. But the addition of this auxiliary lens element added a great deal of weight and length to the camera, as seen in this next photo.
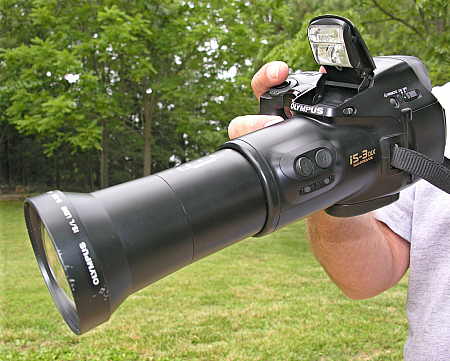
This camera proved to be a pleasure to use, and I captured many good photographs with it, however, it also grew to be a large, cumbersome kit to lug around everywhere I went. The rule of thumb for a handheld telephoto shot is that the shutter speed should at least match the reciprocal of the lens focal length. With the 300mm teleconverter, this would call for a shutter speed set at 1/300th of a second, preferably faster. When this is not possible to accomplish, a tripod must be used to avoid loss of picture sharpness due to camera shake. So a tripod became a necessary accessory in the use of the teleconverter.  My camera kit thus became camera, teleconverter and tripod. Portability went out the door, and as a result, it began to be a piece of equipment that was left on the shelf at home more often than not. But, in it’s own way, it was a step closer to my goal of owning a portable, all-inclusive, full-featured camera, ready to capture most images I would want to take.
Entering The Digital Era
In 1999, Retta and I decided to sell the trawler Lorelei that we had been living on for the past five years. Our plan was to sell the boat, and then begin our search across the country for a place to sink down roots. We knew that having a photographic record to jog the memory would be a valuable tool in deciding where to live, and having digital images of our vessel would help us in creating a web site dedicated to marketing the boat. This was the motivation behind the purchase of our first digital camera, a simple Kodak 1.1 mega pixel point-and-shoot camera. My experiences with this little camera were instrumental in selling me on the advantages that digital photography had to offer, and also served to highlight the disadvantages that existed in the consumer digital camera offerings. Here are a few disadvantages I encountered as I surveyed the consumer cameras available at the time.
Price – in the earlier days of consumer digital cameras, cost was a major consideration. The simple 1.1 mega pixel Kodak camera sold for $500, plus accessories. The price of these cameras rose geometrically with any increase in pixel count, and professional grade digital cameras were priced in the thousands of dollars.
Ease of use – the early digital point-and-shoot cameras did an excellent job of providing easy automatic exposures under most common situations. But any deviation from automatic settings required time-consuming and clumsy navigation through layers of menu trees in order to change default settings. This, in my opinion, is one of the primary shortcomings of most compact digital cameras. There are certain camera functions that I like to control on a shot-to-shot basis, such as exposure compensation, metering method, flash settings, and the like. The SLR style camera has evolved over time to place these all important camera controls at the photographer’s fingertips. Watch an experienced photographer manipulate his camera, and you will see a similarity to a musician playing a fine instrument. An excellent camera allows the photographer the ability to fine-tune camera settings in the blink of an eye, enabling him/her a greater chance of capturing that once-in-a-lifetime image. If you examine the majority of consumer digital cameras on the market today, you will find that ability sorely lacking.
Quality optics – one thing will always be true in the world of cameras, be they film-based or digital, large or small, complex or simple. An image can only be as good as the quality of the lens admitting light into the camera. No matter how many whiz-bang features a camera has, if the optical quality of the lens is inferior, the image will follow suit. Because of this fact, I have come to believe that the photographer should shop for the highest quality lens that fits their needs and budget, and then purchase the camera which operates that lens. Consumer grade digital cameras have been pretty disappointing to date on this point, especially those offerings coming from consumer electronics companies, as opposed to the offerings from the traditional camera manufacturers.
In the seven years that have elapsed since I acquired the Kodak consumer camera, much has changed in the digital camera landscape. The change that has had the largest effect on me is the development of a new category of digital camera, called a prosumer digital camera. These cameras are an attempt to produce a camera with professional grade quality and features, but one that is aimed at the advanced amateur market. These cameras depart from the traditional SLR format, yet retain many of the features that have made that format so popular today. But the defining feature for me is that the form factor these cameras take follows along with my long time search for a full-featured, compact and portable camera with high quality optics. When I finally got a chance to see the Nikon CP8800 VR, pictured below, I was sold.
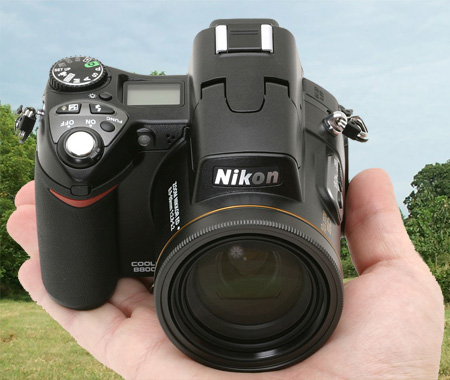
In one lightweight, palm sized package, Nikon has produced a camera with a 10X optical zoom, which has the 35mm equivalency of a 35mm-350mm zoom lens built in. The lens is produced to the usual high quality Nikon specifications, and features a vibration reduction (optical stabilization) system, which reduces or eliminates the need for a tripod in most situations, even when shooting in the full telephoto range of the lens. The optics of this camera produce astounding macro shots, and the speed on the lens, at f2.8, is quite fast for a 10x zoom. To see an example of the power this type of camera brings to the field photographer, see my previous post The Power of 10X Optical Zoom VR Mega-Pixels.
An important aspect of this camera was the thought that the Nikon engineers put into the camera controls. There are buttons on the lens barrel to control focusing and lens VR options, as well as numerous other control buttons and dials situated strategically around the camera body. Functions such as exposure compensation, flash settings, focus lock, exposure lock, ISO and white balance are quickly adjusted with the push of a button or the spin of a dial. Rarely will the photographer have to wade through the extensive menu structure of the system to change common settings on the fly.
At 8 mega pixels, this camera will produce image files of sufficient size to meet any of my requirements, and the large pixel count allows for a decent measure of creative cropping, without sacrificing image quality.
The camera contains several wonderful features, such as automatic exposure bracketing, automatic flash bracketing, and my favorite, BSS, or best shot selector. In this mode, the camera will take three shots in quick succession, and automatically select the best of the three for saving, and reject the other two. By combining BSS with VR, you have two powerful tools for nature photography – VR to compensate for minor camera movement, and BSS to compensate for minor subject movement. The result will be a higher percentage of “keepers.”
There are negative aspects to this type of camera to go along with the positive. The amount of time that the camera takes to write data from the sensor to the Compact Flash card is sluggish. While setting the camera to burst mode allows motor-drive like sequences of frames to be exposed, the camera cannot be counted on to cycle and be ready for the next shot quickly, thereby limiting its functionality for action and sports photography. And neither the electronic viewfinder (EVF) nor the digital display can match the ability of an SLR to provide a clear, bright image for focusing or composing your photograph.
I read a post on the Pure Florida blog that FloridaCracker has recently purchased a prosumer digital camera produced by Sony, the Cybershot DSC-H5, which features a 36mm-432mm equivalent, optically stabilized zoom lens, as well as a host of other features. He is currently learning the features of the camera, and has started to post some of his images for us to see. I will be anxious to follow his progress with the Sony as he learns of both it’s quirks and strengths.
In conclusion, it has been a long journey from my early foray into photography with the tiny Rollei 16, to the present day photography that I undertake with the Nikon CP8800, and I am certain that this camera will be just another step along the way to my “dream camera” that I have described in the first paragraph. I have a feeling that the best is yet to come with my photographic equipment. Now, if I could only learn how to take a decent picture!


 Using this type of printer is simple. Either pop the camera’s memory card into the printer’s memory card-reader slot and print directly from the card, or connect the printer to your computer (via USB) and print from within any imaging application.
The results are indistinguishable from an 8″x10″ enlargement ordered from a photo lab, since they are using the same types of printer technologies to produce the prints that you order. The cost for an 8″x10″ print (using the P440) is $1.60/print, factoring in the ribbon cartridge and the special dye-sub paper that is required.  Printing an 8″x10″ is quickly accomplished in a four-pass printing process, which leaves a clear protective coating on the finished print.
Using this type of printer is simple. Either pop the camera’s memory card into the printer’s memory card-reader slot and print directly from the card, or connect the printer to your computer (via USB) and print from within any imaging application.
The results are indistinguishable from an 8″x10″ enlargement ordered from a photo lab, since they are using the same types of printer technologies to produce the prints that you order. The cost for an 8″x10″ print (using the P440) is $1.60/print, factoring in the ribbon cartridge and the special dye-sub paper that is required.  Printing an 8″x10″ is quickly accomplished in a four-pass printing process, which leaves a clear protective coating on the finished print.
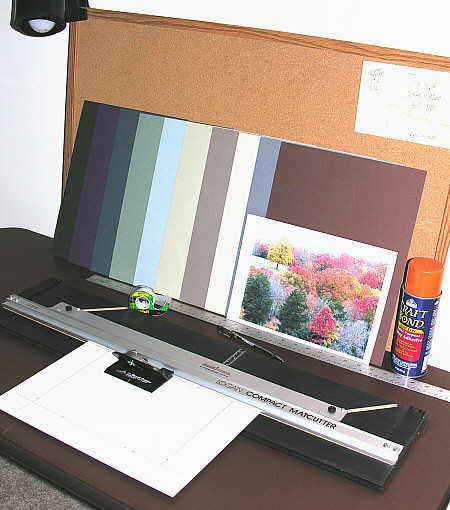 Here you can see the few simple tools and materials needed to mount, mat and frame your finished 8″x10″ photograph. First, mat board in a color that compliments your picture and frame is necessary. I purchase 11″x14″ mat board from Internet art supply storefronts, where an assortment of various colored boards can be purchased at a steep discount from normal prices.  By buying the mats this way, I can buy them for about 40 cents each, and I can usually find an appropriate color to fit my needs.. A mat cutter is essential to be able to produce a fine, bevel-cut mat edge, in whatever custom size and style you choose to use. A straight edge/ruler for measuring mat opening layouts is necessary, and spray adhesive is used to cement the photograph to a backing board so that it does not warp and curl beneath the mat.
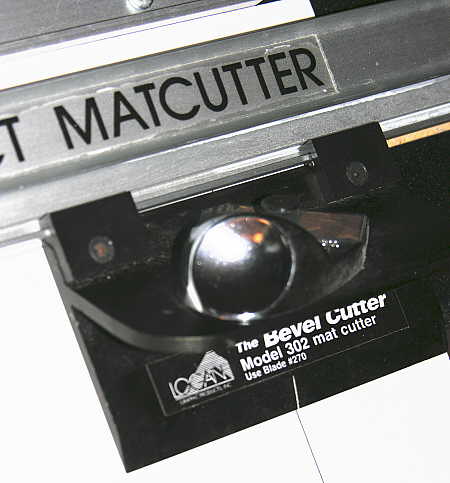 The mat cutter is composed of a few simple parts, one being the cutter assembly shown above. The cutter rides along a track that keeps it moving straight and true, and the 45 degree slant to the blade produces a nice beveled cut. Once the photo is attached to the backing board, the pre-cut mat is placed over the photo, and the entire unit is placed within the frame of your choosing. Now, all you need to do is find an empty space on the wall to hang the mounted, matted and framed photograph on.
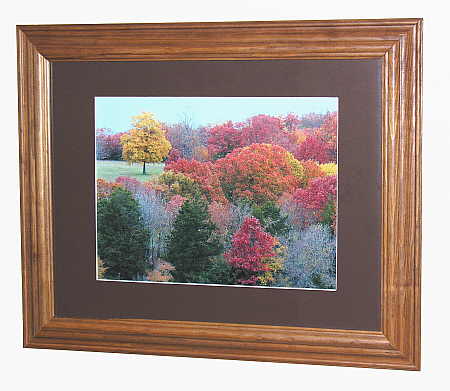 The total cost for the print shown above?

 FloridaCracker, the author of the informative and always interesting
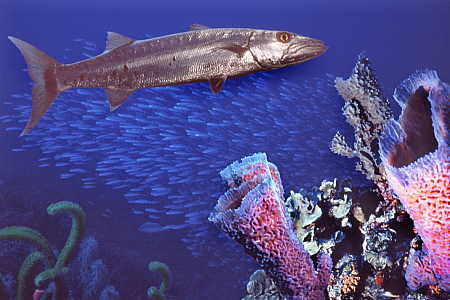
 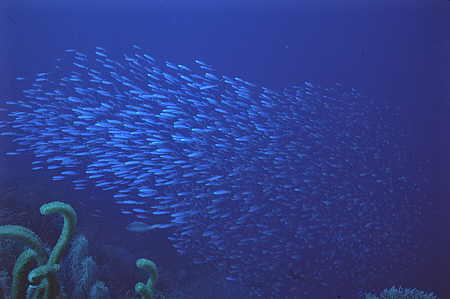 The first step in creating the collage is to find an interesting background. It is absolutely amazing to see how much the background of a photo affects the quality of the overall composition. The slide of the bait fish school above, taken off the island of Bonaire, is not a particularly compelling photograph. While it is technically adequate, it seems to lack a central subject. But as I studied it, I realized that it might make an interesting background for a future project, so I filed it away with the many other background slides that I was accumulating. After deciding to use the slide as a background for the project which resulted in the slide that begins this post, I decided to add other visual elements.
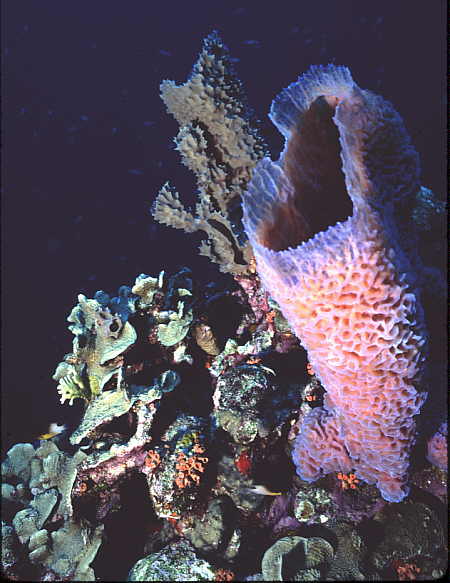 This slide of coral and a purple sponge was taken off the island of Cozumel, and it also is a technically adequate photo, but with no pizazz. Maybe this would work in my collage.
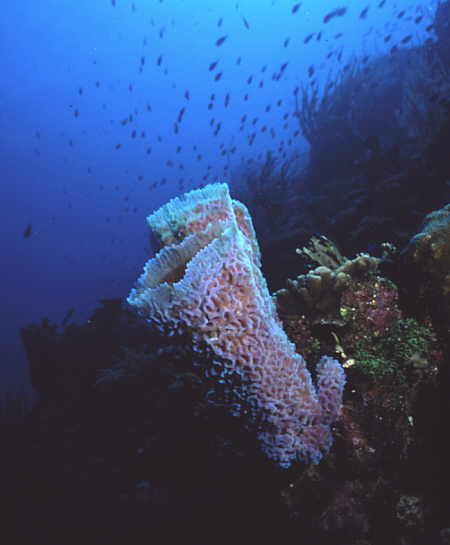 If one purple sponge is a good thing, then why not two? So off I went to find another slide of sponges, this one again from Cozumel, but taken a year later than the first. So now I had everything in place, except for a main subject. Searching through my slides, I came across the following mediocre picture of a barracuda.
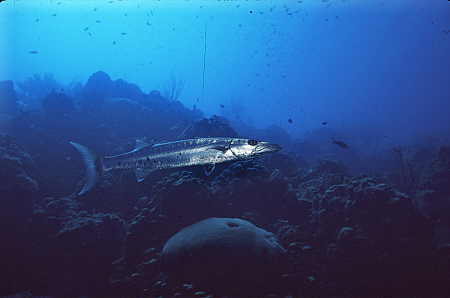 Without going into a detailed critique of this slide, I’ll just point out the obvious – it cries out for a better background. Since I had all of the other element already in place, I added the barracuda to my composition, adjusted the various layers to my satisfaction, and created the photo-illustration that begins this post. It is not the greatest composition in the world, to be sure, but it does manage to take some otherwise bland photographs, and blend them into a picture that is pleasant to view.
The second photo-illustration hanging on the wall is a collage that was assembled from various undersea life in the waters of the Pacific off the coast of California.
Without going into a detailed critique of this slide, I’ll just point out the obvious – it cries out for a better background. Since I had all of the other element already in place, I added the barracuda to my composition, adjusted the various layers to my satisfaction, and created the photo-illustration that begins this post. It is not the greatest composition in the world, to be sure, but it does manage to take some otherwise bland photographs, and blend them into a picture that is pleasant to view.
The second photo-illustration hanging on the wall is a collage that was assembled from various undersea life in the waters of the Pacific off the coast of California.
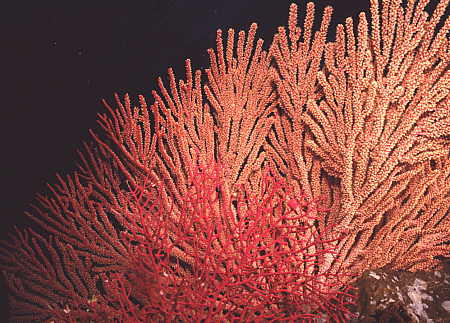
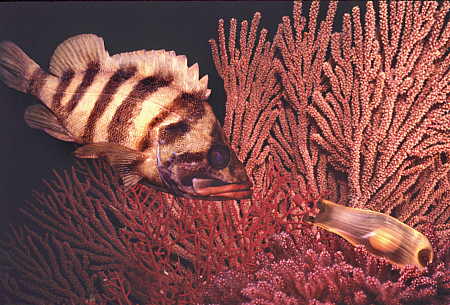 Again, I started with a slide taken from my collection of possible backgrounds, which in this case are some sea fans found at Anacapa Island.
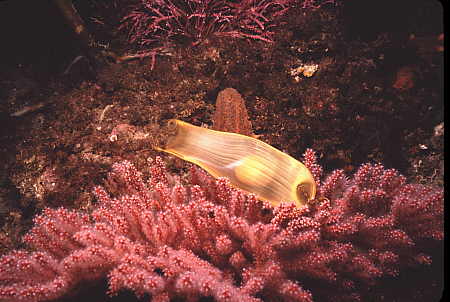
 The next element that I chose to add to the composition was an egg sack from a swell shark, which is a common small shark that inhabits the sandy tracts near shore.
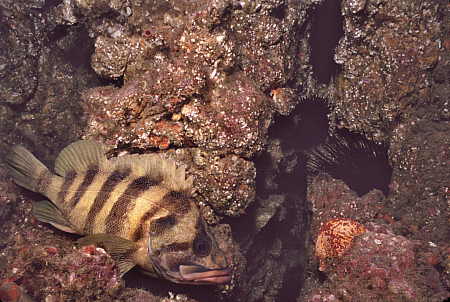
 The final element in the arrangement was the main subject, a treefish, which is a type of rockfish that was once common around the Channel Islands of California.
 Let me take this opportunity to stress one thing. These photo-illustrations are quite crude by today’s standards.  Never the less, the point to be made is that a photograph you might decide to toss just might be a “keeper” when you view it again in the context of a photo-illustration. Maybe it lacks a central subject, but would make a good background. Maybe it is a technically adequate photograph of a subject, with a terrible background. Don’t throw it away! If it is properly exposed, and if it is in sharp focus, put it away, and maybe some day in the future it will become an element in one of your prize-winning photo-illustrations.
NOTE: This would be a good spot to post my Photoshop policy – any photographs that you see on this blog are undoctored photographs (photos which have only undergone minor cropping, exposure and sharpening procedures, similar to what normally occurs in the darkroom process), unless I indicate otherwise with the term photo-illustration. If I call an image a photo-illustration, then it is understood that anything goes!
Let me take this opportunity to stress one thing. These photo-illustrations are quite crude by today’s standards.  Never the less, the point to be made is that a photograph you might decide to toss just might be a “keeper” when you view it again in the context of a photo-illustration. Maybe it lacks a central subject, but would make a good background. Maybe it is a technically adequate photograph of a subject, with a terrible background. Don’t throw it away! If it is properly exposed, and if it is in sharp focus, put it away, and maybe some day in the future it will become an element in one of your prize-winning photo-illustrations.
NOTE: This would be a good spot to post my Photoshop policy – any photographs that you see on this blog are undoctored photographs (photos which have only undergone minor cropping, exposure and sharpening procedures, similar to what normally occurs in the darkroom process), unless I indicate otherwise with the term photo-illustration. If I call an image a photo-illustration, then it is understood that anything goes!

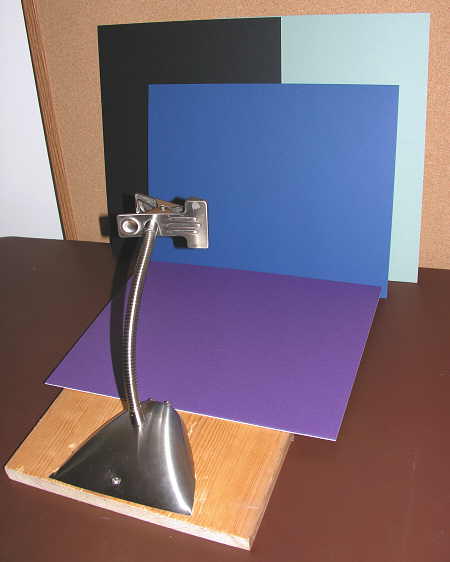 I had an old flexible goose-neck clamp-on table lamp sitting unused in a closet, so I took my trusty tin-snips to the shade side of the lamp, cutting it in half. I proceeded to flatten out the remaining part of the shade, creating a base which I attached to a piece of 1×12 board. Now, I had a sturdy clamp at the end of a long flexible arm, all secured to a base capable of supporting many items suitable for macro photography. Finding an old folding table and cork bulletin board in my “photolab” office closet, I created the setup you see above. The cork board in the rear will allow me to pin up any background that I desire. Shown in the picture are several different colored pieces of matte board. Since I cut my own mats, I have a large choice in background colors to choose from. The purpose for all the colors, as you will see, is to create a background that is substantially different from the subject matter that you are photographing.
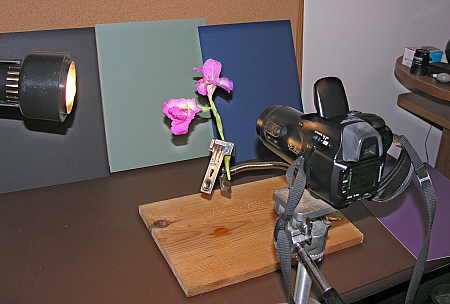 To test out the new SDHBPMS, I grabbed a gladiola from the flower vase in the kitchen, and popped it into the stand. I selected the black matte board to use as the background, and set my camera up on a tripod and composed the picture in the camera’s monitor. My technique was to set the camera self-timer to 10 seconds, press the shutter to allow the camera to precalculate exposure and focus, and then use a simple hand held lamp to paint the subject with side lighting. This resulted in the following photo, which is what the macro stand setup was intended to achieve.
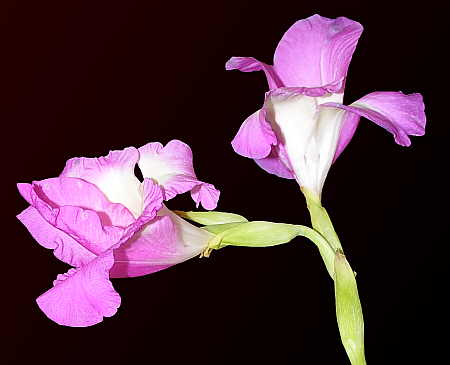 The goal of the contrasting background is to allow the magic wand tool of your photo editing software to easily and quickly isolate the subject. The technique is simple. Using the magic wand, select the background color. Keep adding to the selection with the magic wand tool if necessary, until all the background is selected. Now simply invert the selection. There you have it – a simple method of isolating a subject. If you have chosen a good contrasting background color when you shoot the photo, this process will be quick and accurate.
Once you have isolated the subject from the background, you can easily change the background to transparent. Now you will have an image of the gladiola, for example, that is surrounded by transparency. This is great! With this image you can do many things, simply and easily. How about adding a different background to it, as I did below?Â
The goal of the contrasting background is to allow the magic wand tool of your photo editing software to easily and quickly isolate the subject. The technique is simple. Using the magic wand, select the background color. Keep adding to the selection with the magic wand tool if necessary, until all the background is selected. Now simply invert the selection. There you have it – a simple method of isolating a subject. If you have chosen a good contrasting background color when you shoot the photo, this process will be quick and accurate.
Once you have isolated the subject from the background, you can easily change the background to transparent. Now you will have an image of the gladiola, for example, that is surrounded by transparency. This is great! With this image you can do many things, simply and easily. How about adding a different background to it, as I did below?Â
 This background is from a photo in a previous post entitled
  The point is, if you are the type of person who enjoys tinkering, and also likes the hobby of photography, you might want to consider constructing your own home-brewed macro photography stand, as I have done. In the meanwhile, I’ll let you ponder the size of the macro stand that I built to create the following photo-illustration-
 Â
Â

