
The Sony A7Rii has proven itself to be quite popular in the field of night and astro-landscape photography, in part due to its excellent low light performance and high resolution 42 megapixel full frame sensor. But the camera has earned a fair share of criticism for its confusing and unwieldy menu structure. With hundreds of menu choices scattered among six top-level menu tabs and dozens of sub-menu pages, it can be a daunting task to find the specific settings you want to change. Making changes quickly is nearly impossible by simply wading through the cumbersome menu structure. Sony provides four methods to help overcome this problem:
- The Quick Navigation Menu (invoked with the [DISP] Button)
- The Function Menu (invoked with the [Fn] Button)
- Custom User Modes [1] and [2] on the Shooting Mode dial
- Custom Key assignments
Of the four methods listed above, the one most effective in simplifying use of the Sony A7Rii is item 4, Custom Key assignments. Unfortunately, many A7Rii owners do not take full advantage of the flexibility and speed the Custom Key settings can provide.
In this post I will share my Sony A7Rii system settings and Custom Key assignments, along with the reasoning behind my choices. Because the majority of my photography occurs at night, I have chosen to optimize the Sony A7Rii settings for night imaging, while still allowing easy access to camera features I find important for daytime photography.
Quick Navigation Screen
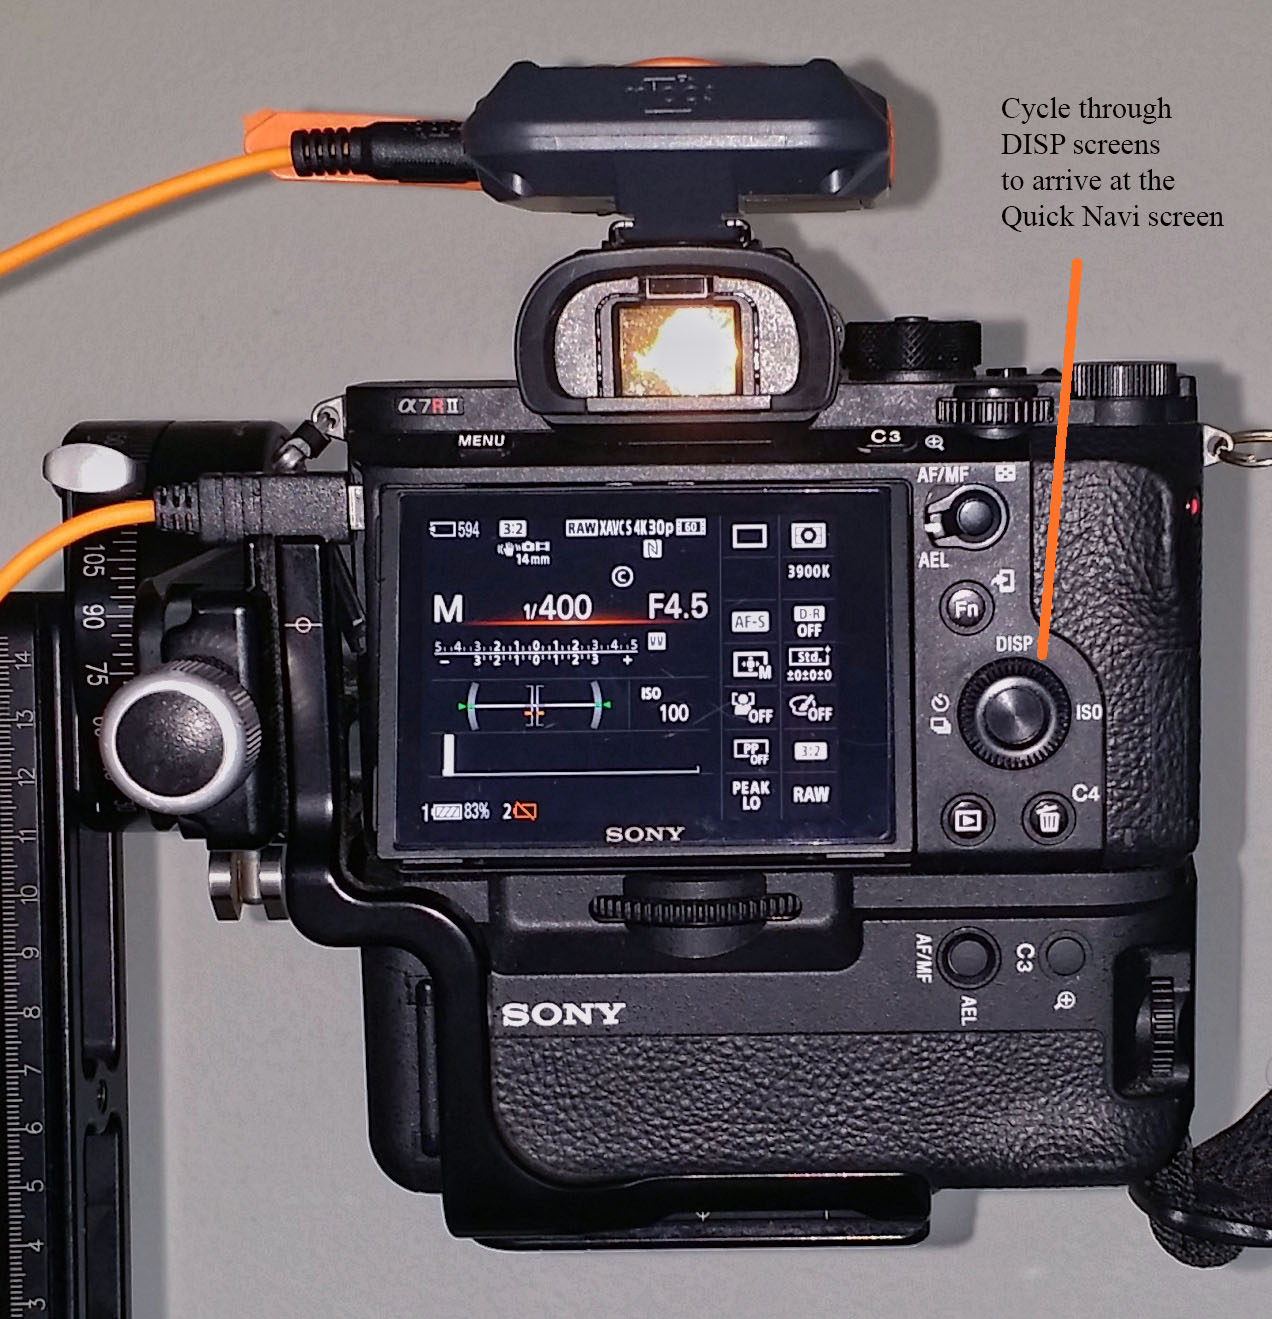
Sony includes the ability to cycle the [DISP] button to a Quick Navigation screen, shown above. From here you can access and adjust several shooting parameters, however you cannot select what predetermined settings appear on the screen. Sony has made that decision for you, and further, the task of adjusting settings via the Quick Navigation screen are neither intuitive nor easily accomplished. A touchscreen LCD would make this feature extraordinary, but as it stands today, it is not very useful and I rarely use it.
[Fn] Function Menu
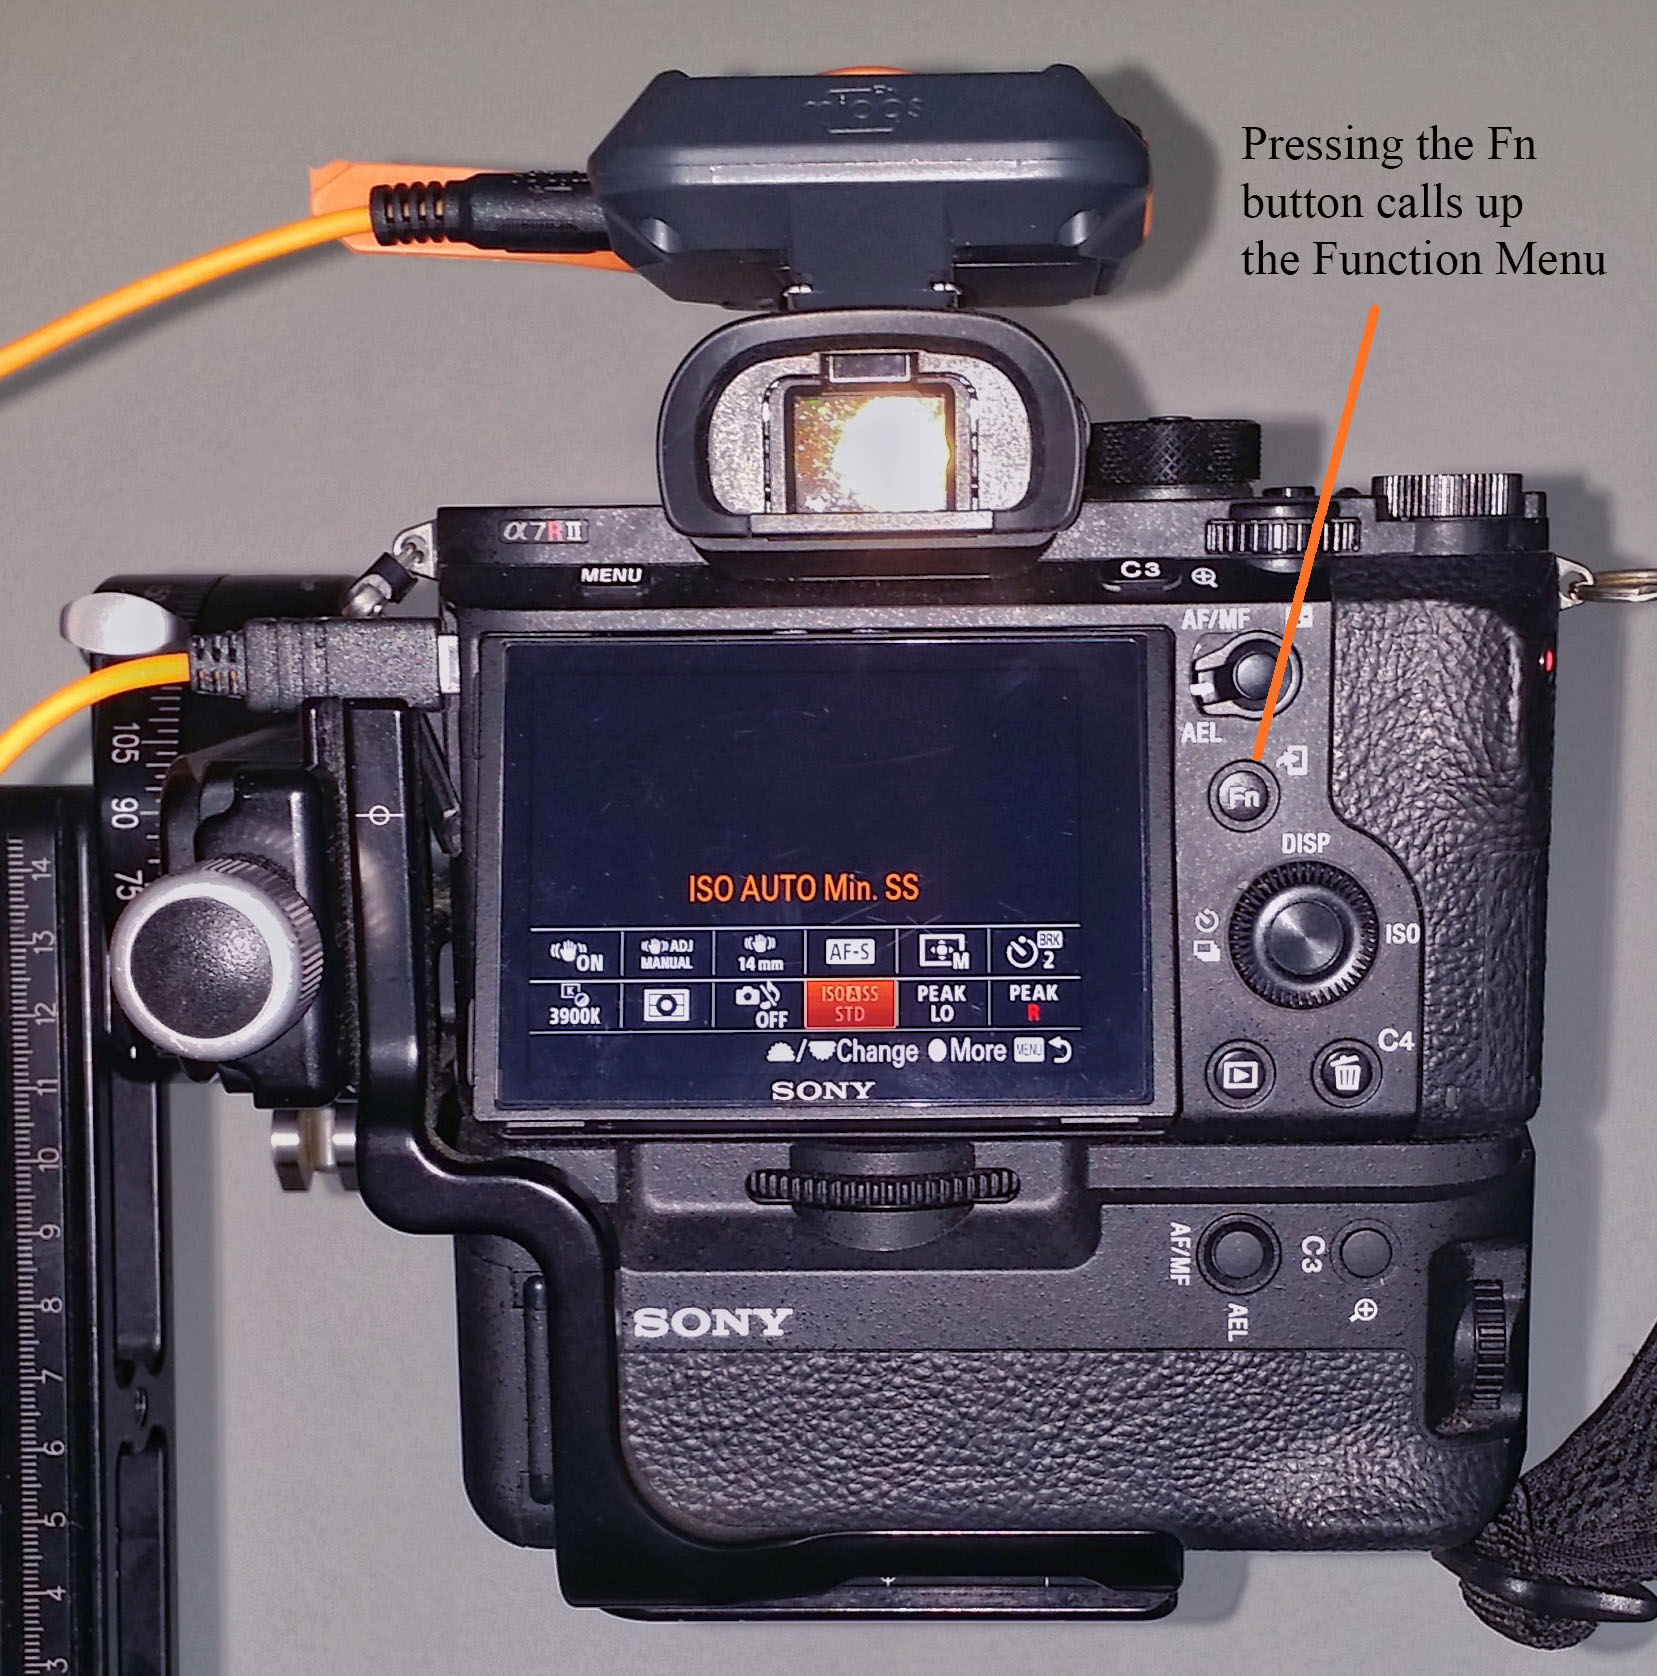
Sony also includes a Function Menu, where you can place twelve settings on a screen that appears at the press of the [Fn] button. The functions that can be placed in each of the twelve available slots is quite limited, however. It is a step in the right direction, but not an optimal solution regarding ease of use. I find the Function Menu to be a good location to place functions I use frequently in daytime photography, while reserving the Custom Key assignments for those functions I use most often at night.
Customized User Memory Banks on Mode Dial
Another feature Sony included in the A7Rii is a programmable User Mode [1] and User Mode [2] on the Shooting Mode dial. There are four additional user memory banks, called [M1], [M2], [M3] and [M4] available for each User Mode [1] and User Mode [2], making ten memory banks available to the photographer in all. It sounds good on paper and spec sheets, but the implementation by Sony leaves much to be desired. The User Memory Mode has so many limitations that I find it impractical to use.
First, only a small number of menu parameters can be saved, namely, those that occur in the Camera Settings Tab. If you want to save parameters from the Custom Settings Tab or the Setup Tab however, you are out of luck. The net result is that you can never bring the camera to an exact “known” state by using the User Memory Modes. This pretty much defeats the purpose of custom User Memory Modes, in my opinion.
Second, for some strange reason, Sony decided that the [M1] through [M4] Memory settings should be stored on the SD card, which means all the custom settings you assigned to these memory locations disappear each time you format the SD card. Compared to my Panasonic GH4 for instance, which saves the entire camera state into user memory for instant recall, the Sony system has proven itself ineffective for my needs. The main issue I have is that one can never be sure that all camera settings are as expected when switching to a User Memory bank.
Custom Key Settings To The Rescue
One way to cope with the clumsy menu interface, limited Quick Access Menus, and a useless User Memory system is to assign the most commonly used settings to Custom Keys on the camera body. This is the approach I have taken, and it is one feature of the Sony A7Rii that simplifies and speeds up camera usage considerably.
It makes sense that a photographer would assign the most frequently used settings to Custom Keys and make menu selections appropriate for the type of imaging the camera is used for. Since I shoot primarily at night, I tailored my Custom Keys to fit my camera usage. The button assignments and menu settings I have arranged over the past two years reflect my usage of the Sony A7Rii, which is my night photography workhorse. While your assignments and settings will probably differ from mine based on your photographic requirements, I am sharing my settings, along with comments, so you can see the thinking behind my choices, and perhaps tweak my suggestions to suit your particular photographic needs. Before jumping into the Custom Key and Menu settings, let’s start with three important issues – back button focusing, power saving and Bright Monitoring, because all three of these issues directly relate to your Custom Key settings.
Back Button Focus
The auto focus system on most digital cameras is activated by default with a half-press of the shutter button. Back button focus reassigns the auto focusing initiation to a button or function key on the rear of the camera body, instead of the usual half-press of the shutter. The benefit of using back button focus are discussed at length here and here. While I do not use auto focus for my night photography, I use it frequently in daylight shooting, so I have set up my Custom Keys and menu choices to implement back button focus.
Power Saving
A major complaint photographers share regarding the performance of the Sony A7Rii is short battery life compared to Canon or Nikon DSLRs. Mirrorless systems are shrinking the size of the camera body, and with that comes smaller batteries with less capacity than their DSLR siblings. Additionally, the power hungry Electronic Viewfinders (EVF) in mirrorless systems are a source of power usage that DSLRs do not experience, since they are equipped with optical viewfinders.
I have mitigated the battery life issue in two ways. First, I added a battery grip to the Sony A7Rii, which instantly doubles the battery life. Second, much of the Sony A7Rii power drain photographers have been experiencing comes from menu settings that have been made without regard to energy usage. By making intelligent choices about camera settings that affect power consumption, the A7Rii owner can influence battery life significantly. For example, by changing the default settings for the LCD monitor and EVF behaviors, the battery life of the A7Rii can be extended dramatically.
The default behaviors of the finder (EVF) and monitor (LCD) on the Sony A7Rii presents a potential for rapid energy depletion if not carefully managed. In default mode the LCD is powered on and the EVF is off. When the photographer looks into the EVF, a sensor detects the proximity of the eye (or any other object) and turns off the LCD and turns on the EVF. The LCD will come back on and the EVF will shut off when the eye is taken away from the EVF eyepiece. After a predetermined interval of inactivity, the camera will go into power saving mode and shut down both the LCD and EVF.
Under most circumstances this system works well. The problem relating to energy consumption occurs when the eyepiece sensor detects the proximity of something other than the photographer’s eye, and switches to EVF ON mode. This can happen, for instance, by forgetting to switch off the power before placing the camera into the camera bag. The sensor detects the camera bag, and in response, powers ON the EVF. Because the camera bag is continually detected by the eyepiece sensor, the power saving feature of the Sony A7Rii never switches the EVF off, thereby draining the battery rapidly. Another common scenario for this system to go awry is when the camera is carried by a neckstrap or chest harness. The eyepiece sensor will continually detect the proximity of the photographer’s body, and the camera will not go into power saving mode, resulting in rapid battery drainage.
Another power drainage issue with the Sony A7Rii results from the default behavior of the LCD/EVF during camera usage. While the camera is in use, the default settings result in the LCD being on. Night photography often requires very long single exposures, or a large number of consecutive time-lapse exposures. With default settings, the LCD monitor remains powered on for the duration of the exposure(s). Both of these problems can be overcome with the settings I describe.
The Custom Key assignments and Menu Settings I recommend will result in the following LCD/EVF behavior. First, the automated eyepiece sensor switching is disabled during LCD use, so that the photographer makes the choice of which display to use. The camera will default to using the LCD monitor, and the camera will switch off the LCD after the power saving interval has elapsed. Pressing the [Down] Button toggles between the LCD and EVF. When the EVF is selected, the EVF will only turn on when the eye is in proximity to the eyepiece. So when the camera is idle, there is no power being utilized by the display system at all. This results in large energy savings during the course of a night.
Second, these settings now allow us to shut both the LCD and EVF off during long exposures or multiple time-lapse exposures. This results in tremendous energy savings during these types of exposures.
One more important setting that affects power usage is the Remote Control menu setting. This setting activates the IR sensor on the front of the camera, which will always be “looking” for an IR signal. As a result, the camera never goes into power saving mode when Remote Control is set to ON.
The specific settings required to achieve these battery saving objectives will be described in the relevant Menu settings and Custom Key assignments later on in this post.
Bright Monitoring
Bright Monitoring is one of the most important yet overlooked and/or misunderstood features of the Sony A7Rii for night photography. Perhaps this is because it does not even appear anywhere within the massive Sony menu system, and is covered by a mere sentence or two buried deep in the Sony A7Rii User Manual. In fact, the Bright Monitoring function is usually found by Sony owners by word of mouth, or by stumbling upon the function while assigning Custom Keys. Two highly respected guidebooks I own for the Sony A7Rii do not even mention Bright Monitoring at all! Here is what Sony has to say about Bright Monitoring, which sheds little light on what Bright Monitoring actually does, and when you should use it:
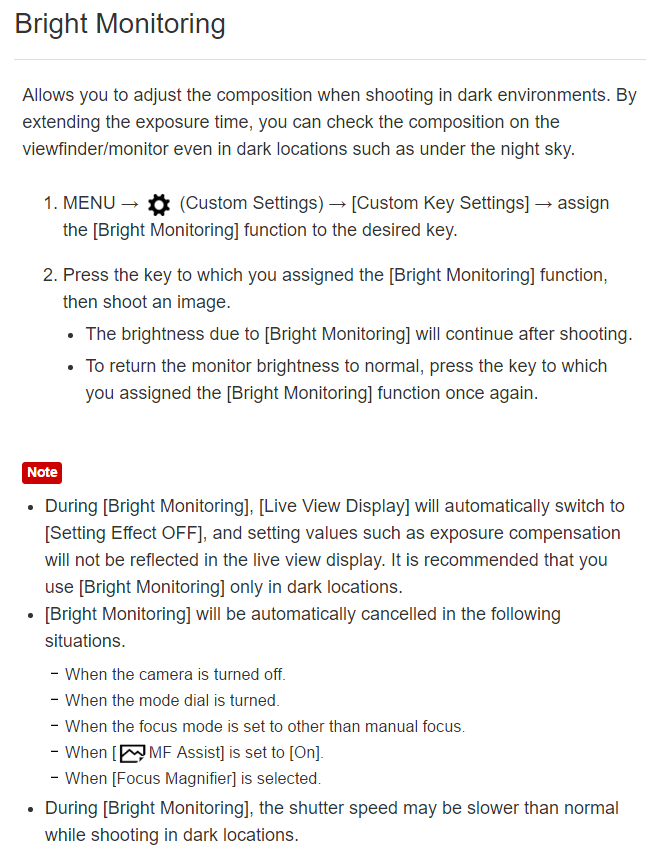
What exactly is Bright Monitoring? The name might suggest that Bright Monitoring simply boosts the brightness setting of the display, but this is incorrect. Bright Monitoring actually over-samples the usual Live View display, but at a much slower refresh rate. When Bright Monitoring is used in dark conditions (as in night photography), the display builds up the brightness of the image displayed on the screen by accumulating photons over a longer period of time than usual, offering a Live View image that seems to  “see in the dark”. Bright Monitoring is highly effective for composing the image in a dark environment. Many night photographers are citing Bright Monitoring as a valuable feature that soon becomes indispensable in their work. By including Bright Monitoring as a Custom Key assignment (which is the ONLY way it can be accessed), a very important night photography composition aid can be unlocked on the Sony A7Rii camera.
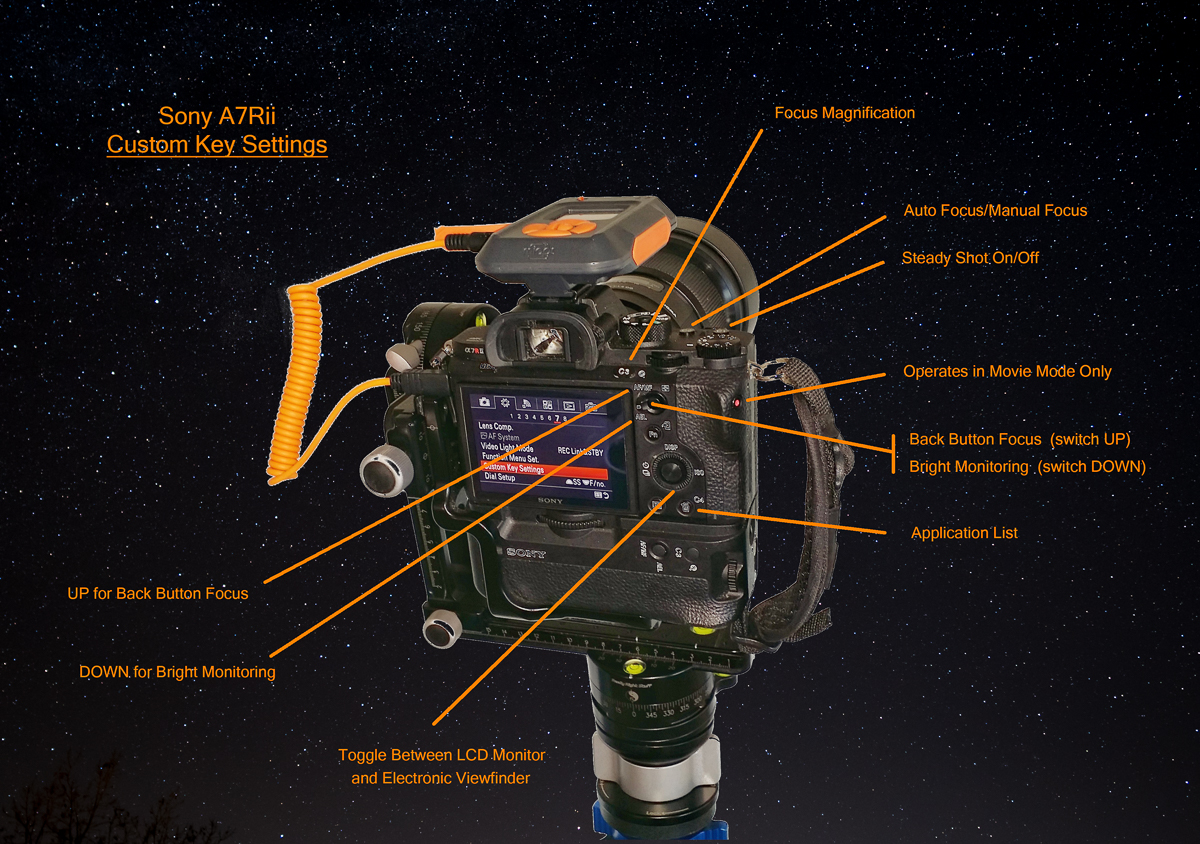
My Custom Key Settings For Night Photography
The Custom Key Settings can be assigned by navigating to Tab 2 (Custom Settings), Page 7 in the Sony Menu system. The Custom Key Settings are subdivided into Page 1 and Page 2. Here are my Custom Key assignments, with explanatory remarks.
Custom Key Settings – Page 1
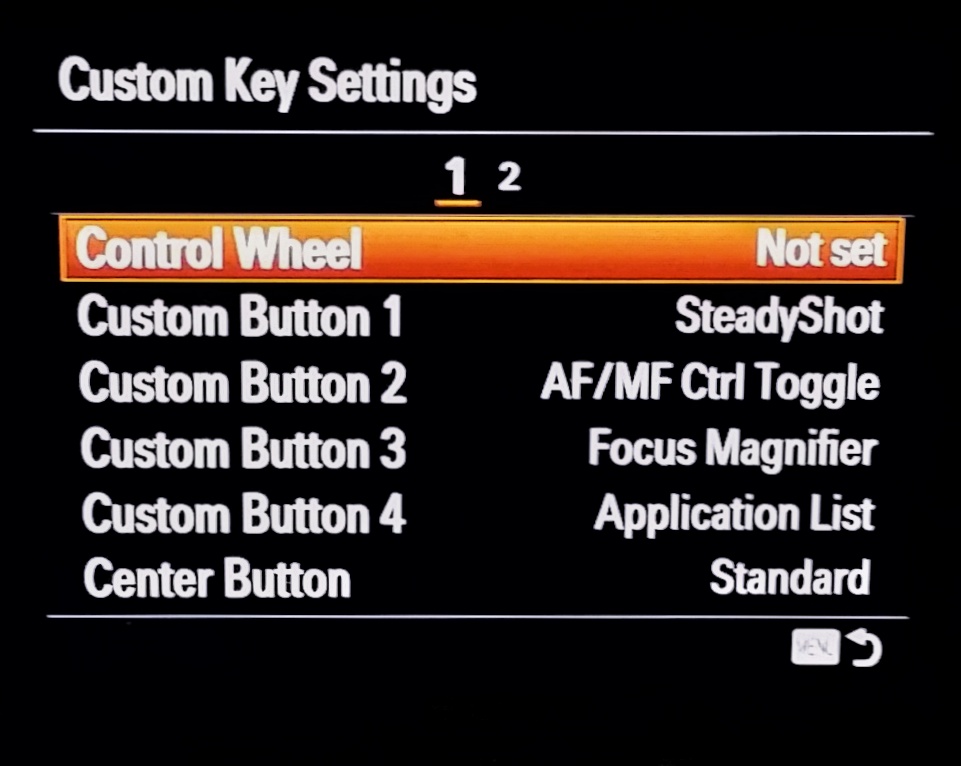
Control Wheel – Not Set
I do not customize the Control Wheel at all. I have found that it is easy to change settings by accident when the Control Wheel is inadvertently touched while using the camera in a dark environment, so I leave the default setting of the Control Wheel alone.
Custom Button 1 [C1] – SteadyShot
Although most of my photography is accomplished using a tripod, where using In-Body Image Stabilization [SteadyShot] can actually degrade an exposure, I still want to be able to shoot off-tripod quickly, without having to wade through menus to turn SteadyShot on or off. By assigning this fuction to [C1], I can immediately access the SteadyShot feature of the A7Rii.
Custom Button 2 [C2] – AF/MF Ctrl Toggle
For night photography I always use manual focus mode, but in daytime I switch between auto and manual focus often. Simply pressing [C2] instantly toggles between auto and manual focus.
Custom Button 3 [C3] – Focus Magnifier
An important skill in night photography is the ability to achieve sharp focus while operating in a dark environment. Precision focusing is aided by the ability to quickly magnify any portion of the composition to visually adjust focus. Assigning the Focus Magnifier function to the [C3] button allows the me to zoom in on the image at 5X or 12.5X  magnification, which greatly simplifies the task of attaining sharp focus.
Custom Button 4 [C4] – Application List
Sony has incorporated an API (Application Program Interface) into firmware on the A7Rii, which gives third-party developers some limited abilities to create apps that can be purchased and installed into the camera system. While I am excited about the potential of after-market apps, the implementation of the idea by Sony has been a disappointment. While some apps are better than others, I have generally found them to be of limited use. My hope is that the poor initial implementation of downloadable apps by Sony does not kill this wonderful concept before it has a chance to mature. Having said that, I do use the Sony Play Memories Remote Camera Control app often. Controlling the camera via WiFi and reviewing the images immediately after capture on a large, bright tablet device is a powerful tool that I turn to intermittently during a night of shooting. By assigning the Application List to the [C4] button, I can easily switch to using my tablet device for camera control.
Center Button – Standard
The button in the middle of the control wheel is called the Center Button.  I generally leave it unassigned, but use it occasionally when I would like to temporarily assign functions to a button for aiding in special projects or techniques.
Custom Key Settings – Page 2
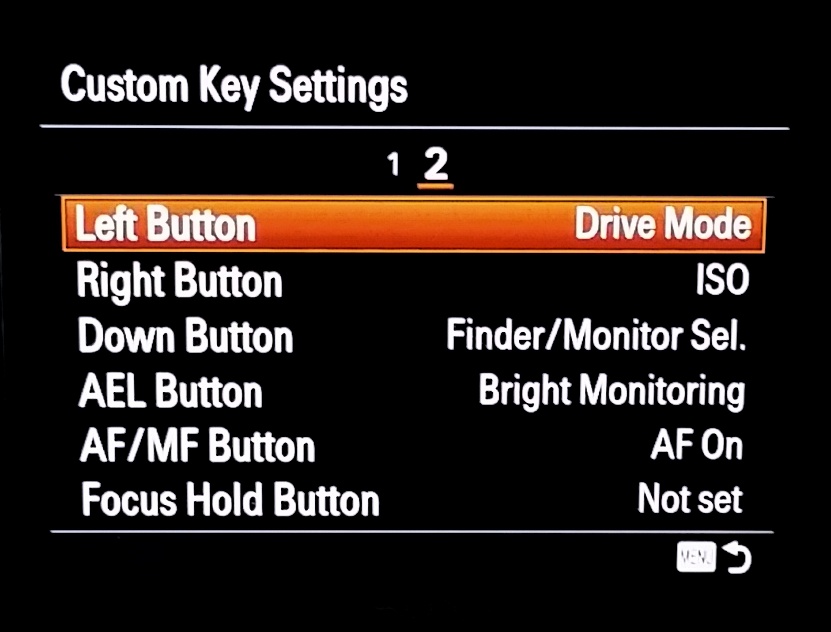
Left Button – Drive Mode
I change Drive Modes frequently during the course of the night, and since the camera body is labeled with a Drive Mode symbol next to the Left Button, I leave the default setting as is.
Right Button – ISO
I change the ISO frequently during the course of the night, and since the camera body is labeled “ISO” next to the Right Button, I leave the default setting as is.
Down Button – Finder/Monitor Select
By assigning Finder/Monitor Select to the [Down] Button, I can control which display I want to use, based on my needs at the moment.
AEL Button (switch in DOWNÂ position) – Bright Monitoring
Refer to Bright Monitoring previously discussed for the details of Bright Monitoring.
AF/MF Button (switch in UP position) – AF On
See the previous discussion of Back Button Focusing. Â This button is perfectly situated to press for auto focus, either while the camera is hand-held or when it is perched on a tripod.
Focus Hold Button – Not Set
The Focus Hold Button is found only on specific lenses, none of which I own.
Menu Settings
The menu structure used in the Sony A7Rii consists of six top-level menu tabs, with each tab containing numerous sub-pages. The top-level tabs are:
- Camera Settings
- Custom Settings
- Wireless
- Applications
- Playback
- Setup
Under each top-level tab are up to 9 sub-pages of menu choices. In describing my selections, I will use the form [2-5] for instance, which designates Tab 2 (Custom Settings) – Page 5. I have included only those menu settings that have a direct affect on night photography.
Tab 1 – Camera Settings
[1-1] Â Quality – RAW
My color-managed workflow philosophy is simple – (1) capture as much useful data as possible in the field, at the highest resolution, greatest bit-depth and broadest color space offered by my equipment; (2) maintain the quality of this image data throughout the editing and printing process; (3) make my own decisions regarding image quality, color temperature, sharpness, etc. and not hand this over to a jpeg algorithm concocted by my camera’s manufacturer. Shooting in RAW is necessary to achieve this goal.
[1-5] White Balance – C.Temp – 3900ºK
Many photographers use [Auto White Balance] for normal daytime shooting, and are tempted to keep this setting for night photography as well. Although shooting RAW image files allows you to alter the white balance of an image in post-processing, there are advantages to designating a specific color temperature in camera at the time of capture, rather than changing it later in post-processing. The image displayed by the LCD monitor or EVF screen is actually a jpeg representation of the RAW sensor data, which uses the white balance setting to derive the jpeg image. By setting the color temperature in camera close to that which actually exists in the scene, the monitor image will more closely resemble the actual scene. Another reason to set a specific color temperature is so the initial image previews generated by the RAW processing software (Lightroom, ACR, etc.) closely match what existed in the scene, since the previews are also jpeg representations of the RAW data, as modified by the white balance set in camera. I set my white balance to 3900ºK for astro-landscape photographs, because I have found it consistently produces a sky color pleasing to my eye. For urban nightscapes, I will usually set the color temperature to 2700ºK if sodium vapor fixtures provide the predominant ambient light.
[1-5] RAW File Type – Uncompressed
The Sony A7Rii was originally introduced with only one RAW file type – 12-bit compressed RAW files. The compression algorithm Sony implemented is a “lossy” compression scheme, which means some of the RAW data gets thrown out with file compression.
With a Firmware 2.0 Update, Sony added an optional 14-bit uncompressed, “lossless” RAW file format. Why the change? It turns out the two-stage compression scheme used by Sony has a nasty side effect – problems with haloing and artifacts along high-contrast edges. While most photographs do not exhibit adverse effects from the compression algorithm, high-contrast edges are commonplace in night photography, and are seriously affected by Sony’s compression algorithm. Due to the outcry from the photographic community, Sony released the 14-bit uncompressed, lossless RAW file option in late 2015.
In a way, the inclusion of the 14-bit uncompressed RAW file type is a mixed blessing. On the one hand, the problem of compression artifacts has been eliminated, but at the cost of greatly increased file size:
- 12-bit compressed “lossy” RAW file – 40MB file size
- 14-bit uncompressed “lossless” RAW file – 80MB file size
The advantage of using the new, 14-bit uncompressed RAW format is tempered by the doubling of the RAW file size, which not only increases storage space requirements, but also the computational power required of the editing equipment in use, especially when considering that many astro-landscape techniques involve the layering of a large number of images within editing software.
There is a way to mitigate the problem of a doubled RAW file size, while still obtaining the benefits of a 14-bit uncompressed, lossless RAW file. It turns out that by converting the Sony 14-bit uncompressed RAW files into DNG format files on import into Lightroom, the resulting DNG files are half the size of the 14-bit uncompressed RAW files, so that we end up back at the 40MB per file. The compression algorithm used by Adobe in the 14-bit conversion is lossless, unlike the compression used by Sony for the 12-bit compressed RAW files. So by converting to DNG, we get the benefits of lossless compression and retention of all image data captured in the field.
- 14-bit uncompressed, lossless native RAW file – 80MB
- 14-bit compressed, lossless DNG file – 40MB
There are, however, costs and benefits to converting native RAW files to DNG. For Adobe’s take, see this article, and for Wikipedia’s article, see this entry.
[1-5] Creative Style -Â Neutral
There are various Creative Style presets available on the Sony A7Rii including Standard, Vivid, Neutral, Portrait, Landscape, B&W, Clear, Deep, Light, Night, Autumn, Sepia and Sunset. Each allow further +/- tuning for Contrast, Saturation and Sharpness. The factory default setting is Standard, but I have switched to Neutral instead, and here is why.
The Creative Style setting is used by the camera in two ways; 1) to adjust the jpeg image seen on the LCD / EVF, and 2) process the jpeg file (if shooting jpeg). If capturing RAW images, the Creative Style setting will be written to the EXIF data, but ignored when creating the RAW image file. So if I am shooting RAW files, why do I care which Creative Style is set? Because the camera applies the Creative Style to the LCD and EVF displays. Because I use the Sony A7Rii primarily for astro-landscape photography, where focusing (and confirming focus) on pinpoint stars is both vital and difficult, I want every advantage I can get. I have found that critical focusing at night is easier and more accurate with the Creative Style set to Neutral rather than Standard, perhaps because the camera software is not trying to sharpen or add contrast to out-of-focus stars before displaying the image on the LCD / EVF.
[1-6] Long Exposure Noise Reduction (LENR) – Off
I rarely set LENR to On. Heat buildup on the image sensor during long exposures causes the creation of LE noise, more commonly known as “hot pixel” noise. LENR uses a process called dark frame subtraction to remove hot pixel noise from a long exposure image, and while effective, it introduces limitations to the astro-landscape photographer.
Because the LENR process has the camera take a second shot of the scene, this time with the shutter closed, the camera is unavailable for use while the dark frame is taken and the image is processed. So a 30 minute exposure becomes 1 hour between shots, which is a lot of precious shooting time to sit by waiting for the camera to finish the LENR. Some of the techniques in use by astro-landscape photographers make the use of LENR impractical as well. To alleviate random (high ISO) noise from an image, many photographers have adopted a method of stacking up to a dozen sequential exposures, for the purpose of averaging out random, high ISO noise. Doubling the interval between each exposure increases the odds of failure in the stacking and aligning process. The successful stitching of panoramas can also be affected by the movement of the stars when there is a lengthy delay between shooting each panel of the panorama.
The good news is that there are great, simple methods of eliminating hot pixel noise from images in post processing, so there is really no need to use in-camera LENR.
[1-8] SteadyShot – Off
SteadyShot (Sony’s term for image stabilization) is designed for hand-held camera use, and may actually introduce image softness when active while shooting from a tripod. Since all my night photography is tripod based, I set SteadyShot to Off. To make it easy to quickly switch from hand-held to tripod use, I have assigned SteadyShot to Custom Button [C1]
[1-8] Color Space – Adobe RGB
My philosophy has been to capture the maximum amount of useful data my equipment is capable of, and maintain the quality of that data throughout my workflow whenever possible. The Adobe RGB Color Space is the widest gamut available with the Sony A7Rii, so that is my preferred choice. The wider gamut can always be rendered to a narrower gamut, such as sRGB as necessary later on.
Tab 2 – Custom Settings
[2-1] Zebra – 100+
The Zebra Pattern is a visual highlights warning system that shows a zebra stripe pattern on portions of an image that are exposed to the percentage specified in this menu option. The selection of 100+ means that the Zebra Pattern will overlay any overexposed portion of the image. It serves the same function as “blinkies” do in image review, but is active in the display prior to taking the exposure. It is a valuable tool used to identify exactly where clipping will take place. The histogram shows whether highlight clipping is occurring somewhere in the image, but highlight clipping is expected and desirable in some instances, such as in street lamps. Zebra Patterns help the photographer see where the clipping occurs in an image, and to make appropriate adjustments if necessary.
[2-1] Manual Focus Assist – Off
When Manual Focus Assist is set to ON (by default), whenever you turn the focus ring the image in the display is magnified 5x, to aid in precision focusing. At first glance this might seem useful, but in night photography it is not. When focusing at night I like to zoom in to maximum magnification (12.5X) at some exact spot in the frame. It is easier to start with the entire image on display and move the focus box to the desired position, then magnify, than it is to magnify first and try to scroll around hunting for the desired spot within the image. That is why I set Manual Focus Assist to Off.
[2-2] Auto Review – Off
I leave Auto Review off because much of my night photography involves taking many exposures in quick succession, either for image stacking, star circles, or stitched panoramas. In these scenarios, I do not want any delay between exposures. It is only a matter of pressing one button to review the image, so there is really no penalty for setting Auto Review to Off.
[2-2] Peaking Level – Low
I like to set the Peaking Level to Low to aid with focus. My primary use for focus peaking is with focus stacking situations, to visualize which zone is in focus at the moment.
[2-4] Finder/Monitor – Monitor (Manual)
See the previous section above regarding Power Saving. Setting this to Monitor (Manual), along with the assignment of Finder/Monitor Select to the [Down] Button, allows me to toggle the display from the LCD to EVF, or turn off the LCD during long or multiple exposures.
[2-4] Release Without Lens – Enable
Because some of the lenses I use are fully manual lenses, such as the Rokinon series of wide angle lenses, it is necessary to set Release Without Lens to Enable, otherwise the shutter of the Sony A7Rii will not operate.
[2-5] Auto Focus With Shutter – Off
I have implemented Back Button Focusing by setting [Auto Focus With Shutter] to Off here, and by assigning Auto Focus to the [AF/MF] Button in the Custom Keys Settings. See the previous section on Back Button Focusing for additional details.
[2-8]Â Movie Button – Movie Mode Only
When operating the camera controls by touch in the darkness of night, it is easy to press the red [Record] button on the side of the camera by mistake. Changing this to Movie Mode Only disables the [Record] button unless the Mode Dial is specifically turned Movie Mode.
Tab 6 – Setup
[6-1] Monitor Brightness – Manual (-)2
I turn the LCD Monitor Brightness to the lowest setting for three reasons. The monitor will more closely resemble what the camera will record, the monitor will consume less power, and the glow from the LCD is less distracting to those photographing near you. Lower LCD brightness might also help retain night vision, but I have not seen evidence of this from any other sources, so just call it a hunch of mine.
[6-1] Viewfinder Brightness – Manual 0
For the most part, I only use the EVF at night for critical focus, and for that purpose I want a bright display, but not blindingly so. The default setting of 0 seems to be ideal for night focusing with the EVF.
[6-2] Display Quality – High
Until some trusted source can provide me with a valid reason to set the Display Quality to Standard rather than High, I see no reason to accept anything less than the highest quality available in the Sony A7Rii.
[6-2] Power Save Start Time – 2 Min
I find that 2 minutes of idle time before the Power Saver kicks in is a good compromise between power savings on the one hand, and the convenience of the display remaining on for a usable duration on the other.
[6-3] Remote Control – Off
I use a wireless remote/intervalometer or WiFi connected Remote Control App to operate the camera, and therefore never have a need to use the IR Remote Trigger provided by Sony. I leave the Remote Control setting Off. Be aware that if you set Remote Control to On, the camera will not enter Power Saving mode, and your battery will drain quickly. Only set the Remote Control to On for the duration you intend to use the IR Remote, and turn it back Off afterward.
[6-4] USB Connection – PC Remote
I have discovered through trial and error that keeping the default USB Connection setting on Auto can lead to intermittent misoperation of several popular brands of intervalometers. Apparently, the multi-functional USB port provided on the Sony A7Rii can sometimes get confused when in Auto mode. The quick fix is to just set the USB Connection type to PC Remote, and the problem seems to disappear.
Conclusion
The Sony A7Rii is a powerful camera for night imaging that continues to grow in popularity among night photographers, yet many are unaware of the significant impact various camera setup parameters have on their usage of the camera at night. I have encountered owners of Sony A7 Series cameras who have shied away from customizing the various buttons and screens of the camera, particularly in the field of night photography. I wanted to share this post so you could see how I tailored the Sony A7Rii to my usage preferences, so that you might start thinking about how you could customize your own camera to reflect your usage habits.
Please feel free to comment with any tips and tricks you may know regarding the setup and configuration of the Sony A7Rii. Much of what I have learned has come from paying attention to lessons others have generously shared along the way.


Bright Monitoring is a WOW!! of a find!! Someone at Sony (or someplace) saw people framing in live mode cranking up the ISO to view what a +++++!!! I put your settings on my camera and tested in my living room with no lights but a street light coming in from behind and a dark outside through a half circle window. The Monitoring is equal to a 30 sec ISO 100 shot when I was using my 50mm f/1.8 lens. Some things to mention it only works in MF (it is dark so you will be there anyway), ISO/SS/f/# have no effect on it’s brightness, you can capture an image if left on BUT use the settings needed for the shot.
I just got the A7RM2 (already had a A7S) and noticed the red noise on the LCD, not seen on my A7S, and thought not a night camera – set PP to PP2 for a cleaner view and capture (I was having problems focusing in the dark with the noise and images were not sharp). I do not think any other camera maker has this option!!! Thanks for the setting info, your work is awesome!!!
Thank you Ed. The latest firmware update for the A7Rii now allows you to assign a Custom Button to “Live View Display”. When the assigned button is pressed, a screen pops up allowing you to choose from “Setting Effects On” or “Setting Effects Off”. Setting Effects Off” appears to perform the same function as Bright Monitoring, with a couple of twists. First, Bright Monitoring can be turned on with just one button press, while Live View Display takes three to activate. Second, it appears that Bright Monitoring turns off after a period of inactivity, while Live View Display does not. I have not had a chance to experiment fully with the ability to use the Live View Display while out in the field, so I can’t say which is ultimately better to use, or what the trade offs might be, but when I know more, I will update this post.
What a thorough piece of work. So informative and helpful. Thanks.
This is absolutely superb! I’m at a loss for words except that this is one of the best I’ve ever seen for my A7Rii. Thank you so much!
Hi Hal. I know that this post is not exactly recent, but there is something I’ve wanted to ask: Since you have made all these settings specifically for astrophotography, how can you easily change everything back in the field in order to shoot normal landscapes, shy of having a second camera body? Thanks in advance for your reply!
I’m sorry, but I have not explored the possibility of quickly reverting back these settings due to the fact that I only used the A7Rii for night photography. I have since moved to a Pentax K1 system, so I no longer have the Sony to experiment with to answer your question.