
Regular readers of this blog, after perusing the title of this post, might conclude that I have a wildlife feeder fixation.  These readers would be correct – I do have a dogged determination to keep my wildlife feeders reliably operating at all times. There is something very gratifying to me in seeing turkey or deer from my window on a regular basis, which is why I go through all of the fuss and bother keeping the feeders operating properly. And fuss and bother it is, indeed. The feeders that I have used all seem to have a common trait – they are built cheaply and lack any semblance of durability. Perhaps this is because feeders are mostly used by hunters for only brief periods of time each season, and therefore manufactures don’t feel the need to produce a high-quality product, or perhaps it is because I have just not stumbled upon the right manufacturer yet. In any case, I will probably end up having to write many posts about my episodes in keeping the feeders running. It just might be the nature of the beast, as they say.
The first post was on my experiences with battery life and solar charging.  The second post was on the topic of general feeder maintenance. You might recognize the following photograph from the general feeder maintenance post-
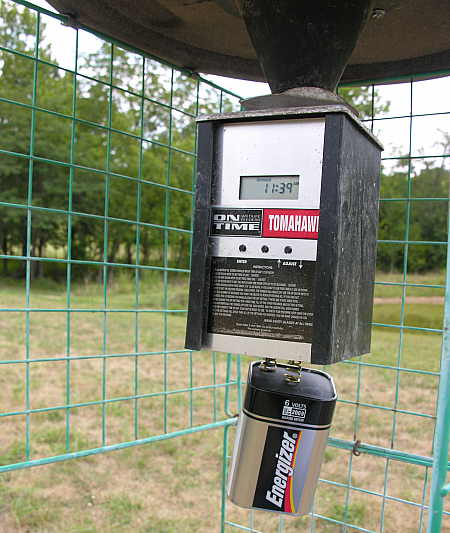
This was the type of feeder timer/motor unit that I had been using in one of the feeder stations. There were several things I did not like about this device. Changing the battery was a task that required three hands, an abundance of dexterity, and a little bit of luck to accomplish.  When the battery was changed, the timer unit would have to be reprogrammed with start times and feeding durations for each of the feeding times you desired to set in a day, and the current time would have to be reset as well. Setting all of these parameters was a tedious chore, due to the design of the user interface. A major annoyance was the lack of a “test” button. As the battery weakened, there was sufficient power to run the programming circuit, but insufficient energy left to spin the motor. Without a test button, there was no way to determine the condition of the battery. But the worst problem with this unit was it’s lack of durability.
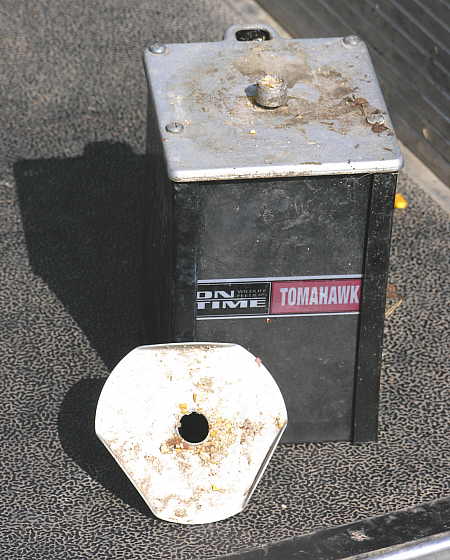
The photograph above shows a broken spinner plate. I had replaced the spinner plate on this unit once already, and the fact that the replacement spinner also broke is testament to the inferior quality of this feeder unit. With all of it’s other shortcomings, I decided to replace it with a different brand this time around.
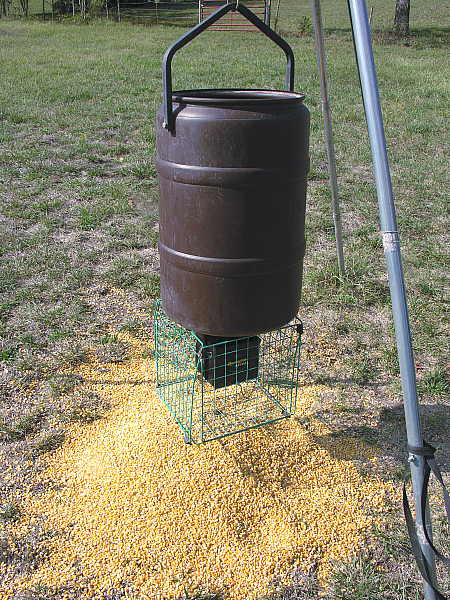
Before I could install the timer/motor unit on the feeder barrel, I had to empty the contents of the feeder onto the ground. After removing the old unit, I drilled new holes into the barrel using the template provided with the new feeder unit, and then bolted the new timer/motor assembly onto the barrel.Â
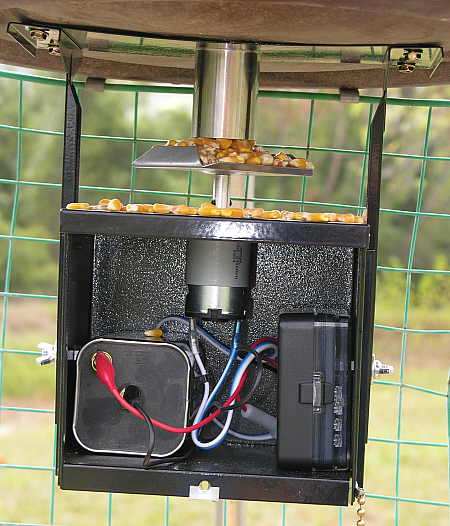
This is the new housing for the timer/motor unit. Unlike the previous unit, which was constructed primarily of plastic parts, this unit is built with powder-coated steel, and feels much more sturdy than the one it replaces. Also unlike the old unit, this one is designed in a manner that makes battery replacement a quick, simple affair. There is ample room inside for the battery, motor and controller module, and the housing is weather-proof. The spinner plate, hub and motor shaft are constructed from heavier material than the previous unit was.

The controller module shown in the photograph above has several features that I like. First, it is encased in it’s own weather-proof housing, providing a redundancy of moisture protection. Second, the duration of each feed dispensing cycle can easily be adjusted by turning the dial on the upper right. There is a test button located at the upper left. Unlike the old unit, this one does not require re-programming each time you change the battery. The cycle duration is controlled by the duration dial, and the feed dispensing times are set by placing the pegs (stored along the two sides) into the circular dial at the desired feeding hours. The entire unit is protected by an in-line fuse, so that a jammed spinner plate (from debris in the feed) will not burn out the motor.
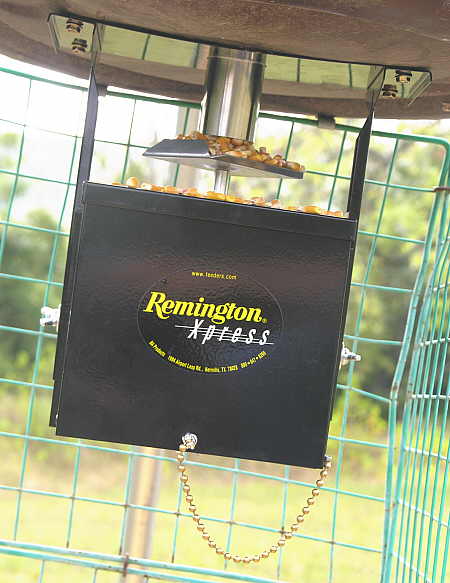
There is one other feature of this new feeder unit that I like. On the old feeder, access was through a plate located on the underside of the unit. Entry required the use of a screwdriver, and the four tiny screws always seemed to end up on the ground, especially during the cold winter months, when one’s fingers aren’t the most nimble of tools to work with. If you look at the picture above, you will see that the access door of the new feeder is in the front, and is secured with one large thumb screw. The thumb screw is attached to the housing with a ball-chain, so that it cannot fall to the ground if it is dropped.
I am hoping that this new timer/motor unit will help to alleviate some of the problems I have been experiencing in my quest for the “perfect” wildlife feeder. As you may have guessed, I’ll keep you posted.


Man, that looks like a lot of work! Good thing you’re so mechanically-minded, or it would cost you a fortune in maintenance workers!
I know it’s probably worth it, though, when you get to see the purty animals so often 😉
Mrs. S – the work’s not so bad, but it is frustrating to always have to be repairing the equipment. If only someone could direct me to some kind of automatic feeder system that has stood the test of time, I would be eternally grateful.
Hal, you should mention the brands of feeder’s you’ve tried in your posts.
Many companies subscribe to feeds and alerts when they’re products or trademarks show up on the web, so they can read what people are saying about them (I do this for my company and pass info along to the appropriate people).
In any case, I’m always fascinated to see more operational details of your farm!
I like the way you adapt and overcome obstacles on your farm.
I work in the manufacturing industry and I must say, it isn’t just animal feeders that are being made cheaply these days. It is everything. Sadly, we are a disposable society with too much disposable income. I’ve finally decided that if I want something that is going to last, I have to design and build it myself.
I have a feeder similar to yours with BA’s digital timer. That part works fine. The problem I have is the corn or pellets (tried both) hang up at the bottom of the barrel and won;t come down the tube to the spinner. Have you experienced this and have you found a cure?
Thanks,
Dan
Dan – I have experienced this also, and found a solution that works for me.
First, I only use deer corn, as opposed to regular feed corn. The deer corn goes through a more thorough cleaning process, which removes the debris that can cause a feeder to clog.
Second, I install conical funnels on the inside of the barrels, which helps to prevent the corn at the sides of the barrel from clumping up.
Third, I seal any openings, fasteners, etc. with silicone sealant so that the corn stays completely dry. Any moisture that enters the barrel will not only cause the corn to clump up, but will rot the corn also.
Fourth, I give a little more clearance between the funnel and spinner plate than the manufacturers of the feeders usually recommend.
Hope this is of some help.