
FloridaCracker, the author of the informative and always interesting Pure Florida blog, inquired in a comment yesterday about two photographs that are to be found hanging on the wall in the background, as I hang precariously suspended, upside-down in Retta’s inversion chair. The two photographs depict fish that I shot with a Nikonos underwater camera while scuba diving some 16 years ago. Or should I say, the two photo-illustrations, because those prints on the wall are digital collages that I created back in the early days of my experimenting with scanned slides and Adobe Photoshop.
Before I show you how I created these collages, I would like to point out what was involved in creating these simple works some 16 years ago. First, the hardware that was in use back then was abysmally slow by comparison to today’s standards. Second, the shear size of the digital files required to generate a decent result from a film recorder (which was used to create the working negative of the finished product) overwhelmed the amount of RAM that standard operating systems and PC hardware could provide. The trials and tribulations of such endeavors are outlined in a previous post, Bridging The Generation Gap, but for the purposes of this post, I’ll just say that it used to take my computer 7 minutes just to open up 1 image file. The creation of just one of these collages usually involved at least a month of manipulation on my part, whereas today, with the tools and hardware that are available, the same result could be achieved in a matter of hours, if not minutes. So now that I have apologized, sort of, for the amateurish results of my labors, here’s how it was accomplished.
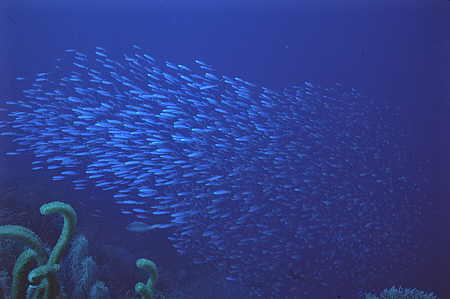
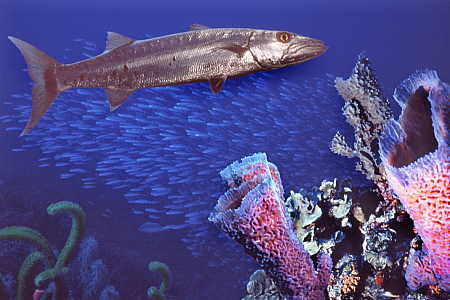
The first step in creating the collage is to find an interesting background. It is absolutely amazing to see how much the background of a photo affects the quality of the overall composition. The slide of the bait fish school above, taken off the island of Bonaire, is not a particularly compelling photograph. While it is technically adequate, it seems to lack a central subject. But as I studied it, I realized that it might make an interesting background for a future project, so I filed it away with the many other background slides that I was accumulating. After deciding to use the slide as a background for the project which resulted in the slide that begins this post, I decided to add other visual elements.
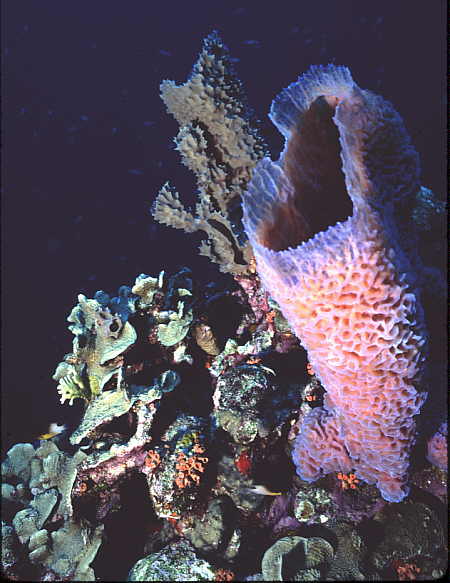
This slide of coral and a purple sponge was taken off the island of Cozumel, and it also is a technically adequate photo, but with no pizazz. Maybe this would work in my collage.
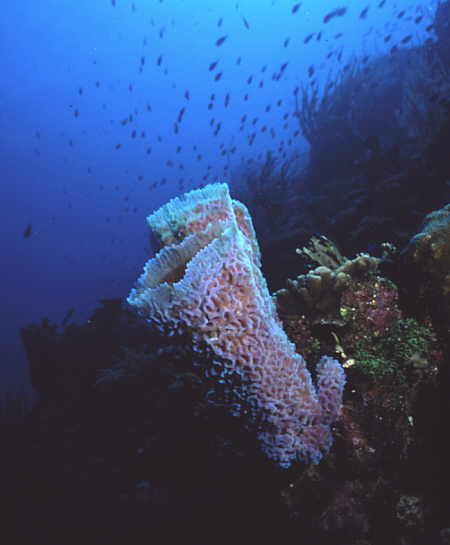
If one purple sponge is a good thing, then why not two? So off I went to find another slide of sponges, this one again from Cozumel, but taken a year later than the first. So now I had everything in place, except for a main subject. Searching through my slides, I came across the following mediocre picture of a barracuda.
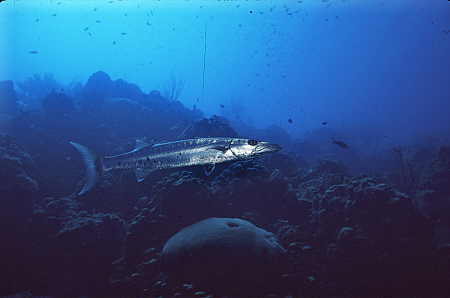
Without going into a detailed critique of this slide, I’ll just point out the obvious – it cries out for a better background. Since I had all of the other element already in place, I added the barracuda to my composition, adjusted the various layers to my satisfaction, and created the photo-illustration that begins this post. It is not the greatest composition in the world, to be sure, but it does manage to take some otherwise bland photographs, and blend them into a picture that is pleasant to view.
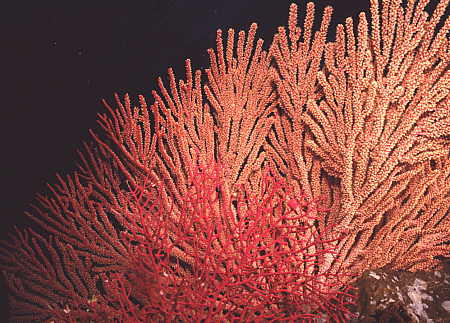
The second photo-illustration hanging on the wall is a collage that was assembled from various undersea life in the waters of the Pacific off the coast of California.
Again, I started with a slide taken from my collection of possible backgrounds, which in this case are some sea fans found at Anacapa Island.
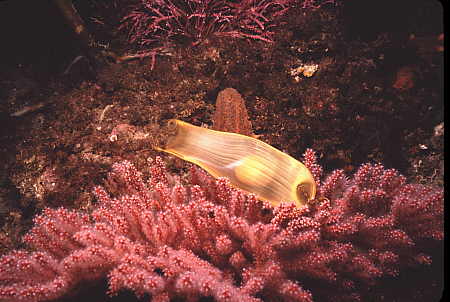
The next element that I chose to add to the composition was an egg sack from a swell shark, which is a common small shark that inhabits the sandy tracts near shore.
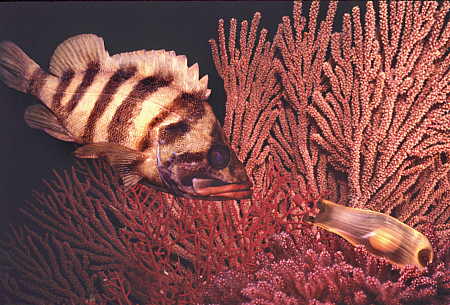
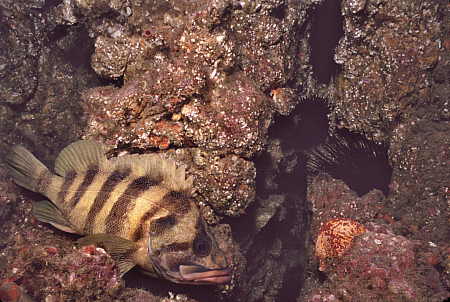
The final element in the arrangement was the main subject, a treefish, which is a type of rockfish that was once common around the Channel Islands of California.
Let me take this opportunity to stress one thing. These photo-illustrations are quite crude by today’s standards.  Never the less, the point to be made is that a photograph you might decide to toss just might be a “keeper” when you view it again in the context of a photo-illustration. Maybe it lacks a central subject, but would make a good background. Maybe it is a technically adequate photograph of a subject, with a terrible background. Don’t throw it away! If it is properly exposed, and if it is in sharp focus, put it away, and maybe some day in the future it will become an element in one of your prize-winning photo-illustrations.
NOTE: This would be a good spot to post my Photoshop policy – any photographs that you see on this blog are undoctored photographs (photos which have only undergone minor cropping, exposure and sharpening procedures, similar to what normally occurs in the darkroom process), unless I indicate otherwise with the term photo-illustration. If I call an image a photo-illustration, then it is understood that anything goes!


I hadn’t even noticed the pictures in the previous post, but once you showed them up close in today’s post, I really enjoyed them! They seem to have a ‘pop-up’ quality in the layers that you don’t see very often anymore, and I really enjoy. Plus, the colors are gorgeous and I thought for sure must be enhanced somehow, but you are telling me otherwise!!! Perhaps I’ll have to take up under-water tourism. Hrm.
Oops, definitely not the fish I thought it was from a distance, but still a neat shot and great explanation of the process.
I’ve always been a big fan of Ansel Adams and I would be willing to bet that had he been alive today, he would have been into digital photography and manipulation in a big way.
Although I dabble in photography, I know little about digital merging of various elements. How do you get rid of the backgrounds in pictures that you want only certain elements like fish so that they can be pasted in another background?
Ed – I agree with you about Ansel Adams. I had the good fortune to be able to attend a summer workshop in Yosemite back when he was conducting them. He spent a lifetime perfecting his “Zone System” for image creation, and all that he perfected can now be accomplished with the simple click of the mouse utilizing the Photoshop levels command.
Regarding the elimination of image backgrounds, one method can be seen in my previous post “Can You Stand It?”, which can be found here:
http://www.mitzenmacher.net/blog/?p=434
There are various methods of removing the background that use the painting and selection tools found in most image editing programs. There are also stand-alone masking programs created specifically for this task, as well as Photoshop plug-ins that will achieve the same result. Isolating a subject from it’s background is a common task for graphic artists, and detailed procedures can be found at many fine digital imaging sites by searching “image masking” or “image selection tools.” My experience leads me to believe that image masking is much more an art than science, and most graphic artists that do it well tend to keep their secrets close to the vest.