Low-Level Lighting (LLL) For AstroLandscape Photography

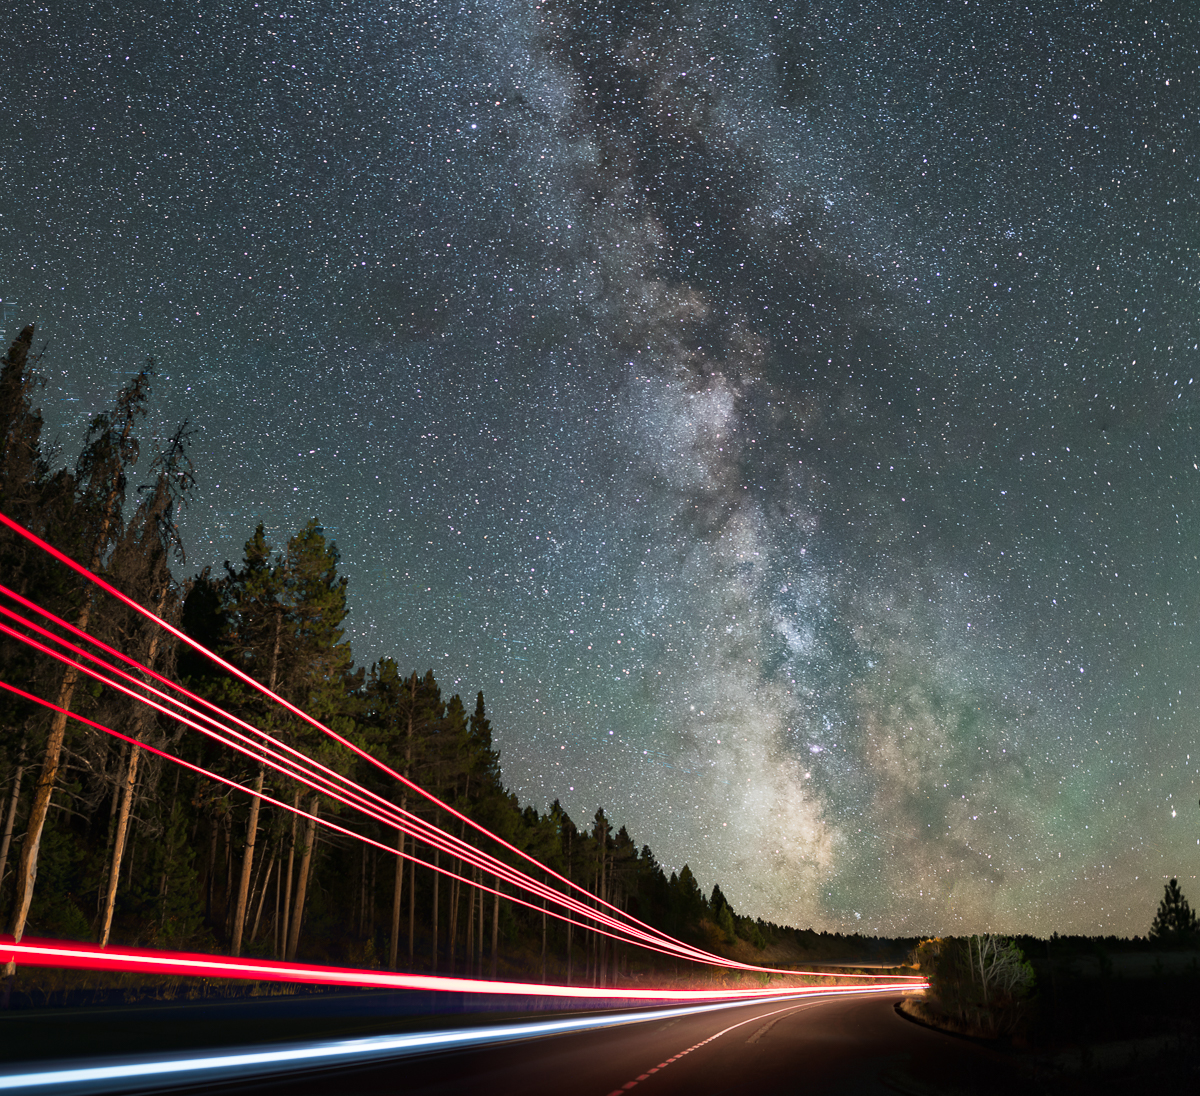
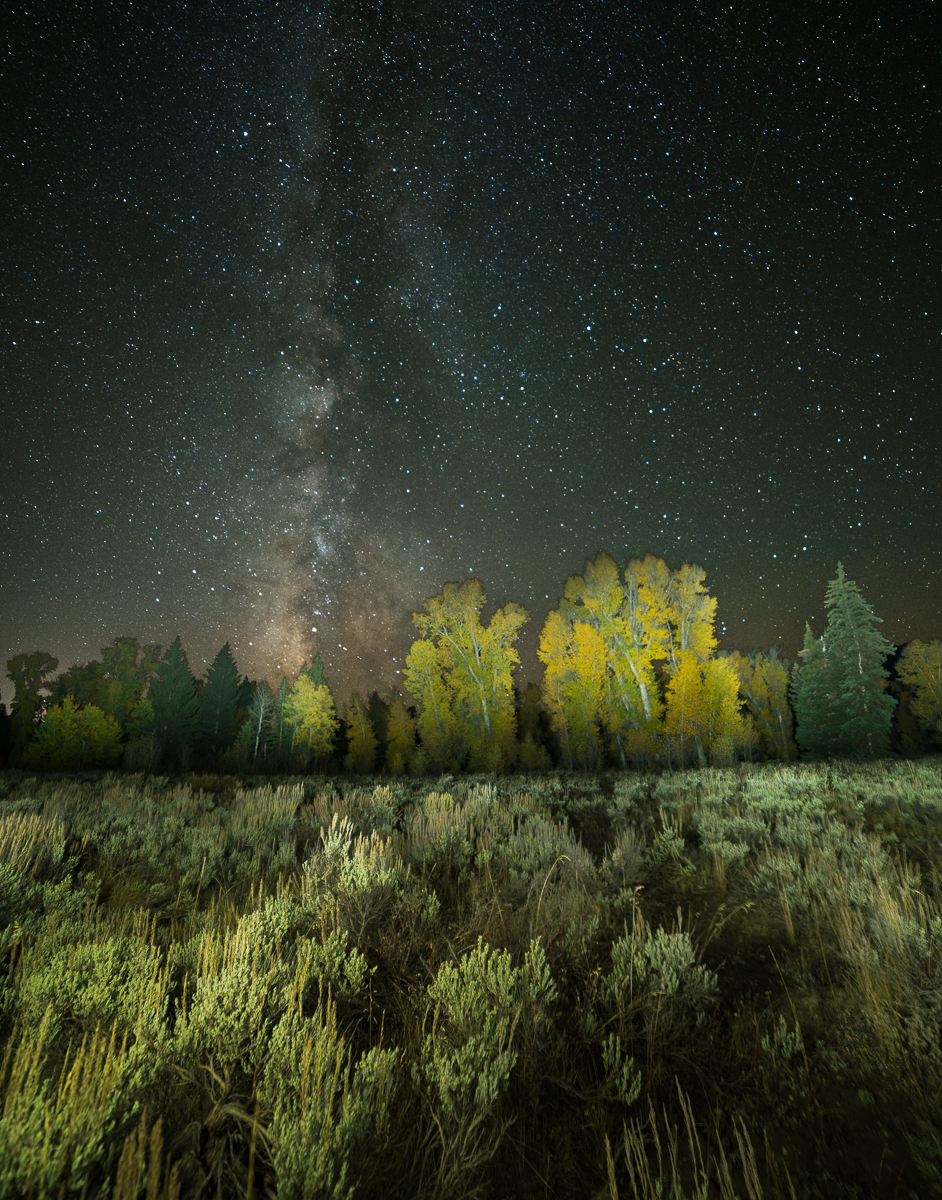
One of the things I find most interesting in my pursuit of nocturnal photographs is the challenge of incorporating varied light sources into a final, cohesive image. The image above, taken from the Jackson Lake turnout in Grand Teton National Park, is a blended image consisting of two exposures. The first exposure is a single capture of the Milky Way with the roadside trees lit using stationary low-level lighting (LLL). The second exposure (taken without altering the camera location) was the light trail caused by an RV passing on the road, which I blended into the first exposure to create the final image.

The issue of low-level lighting has recently come up in regards to the recent change in policy within Arches and Canyonlands National Parks towards night photography workshops in general, and light painting in particular. Royce Bair has a post explaining the issue thoroughly in his excellent blog, Into The Night Photography.  While these issues are being sorted out by the affected parties, I thought it would be useful for those not familiar with low-level landscape lighting to see what it is, and how it can be used.


What Is Low-Level Lighting?

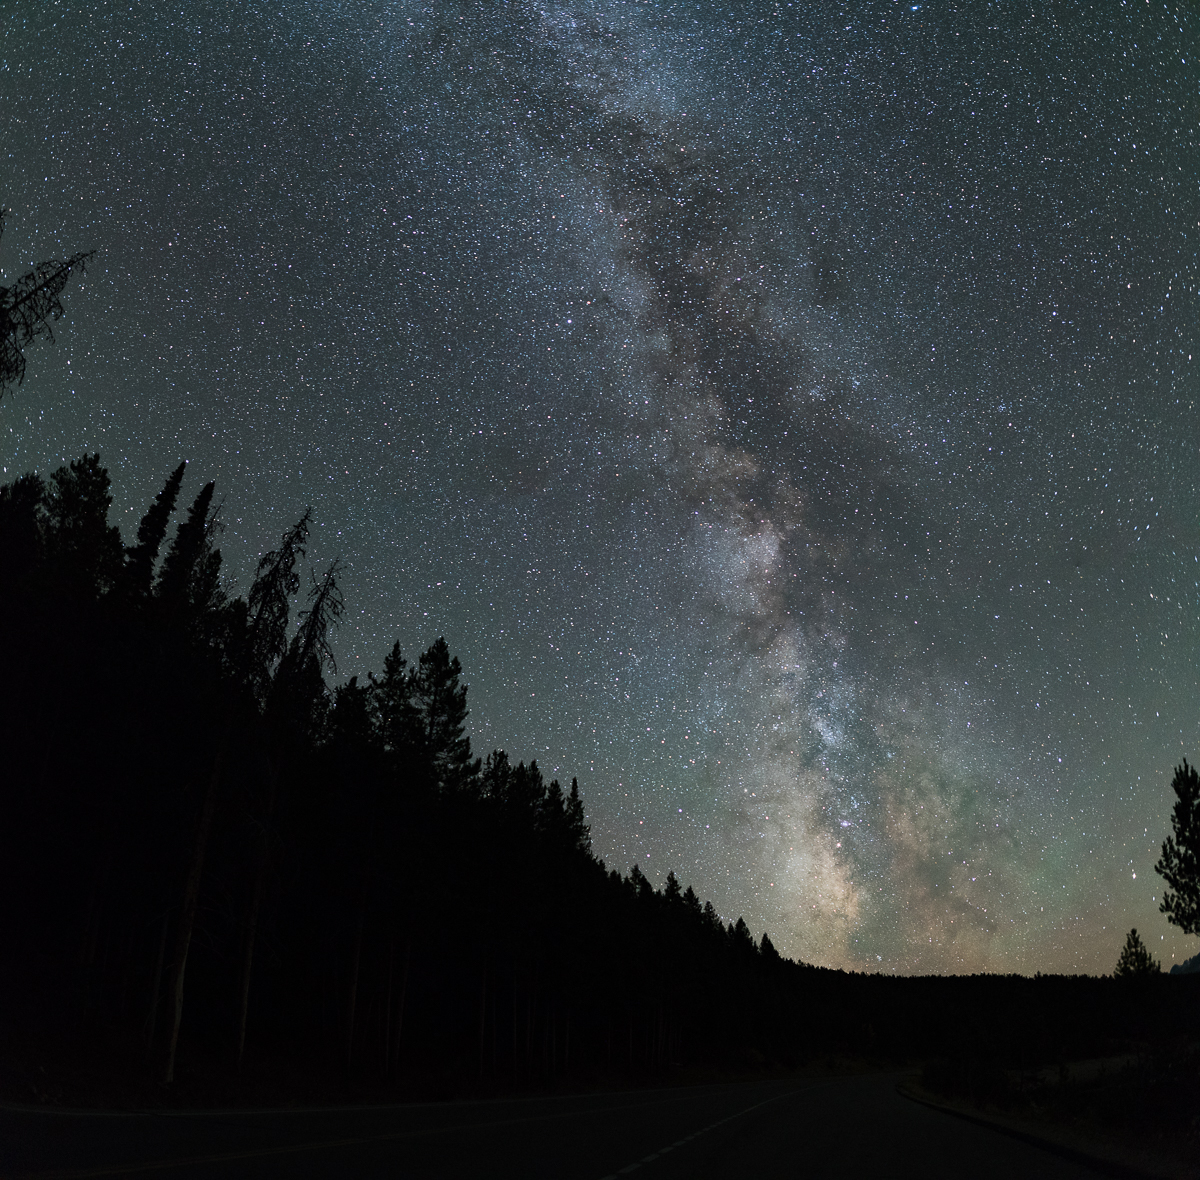
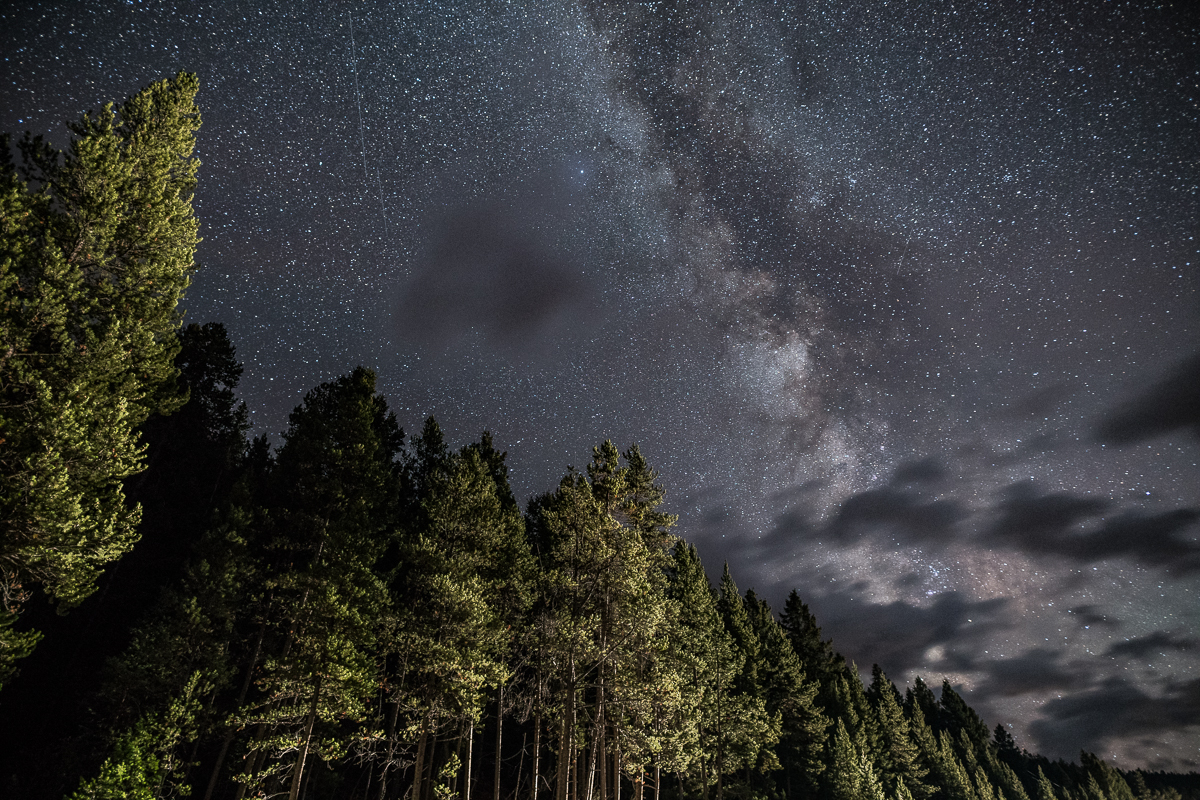
A common goal for astro-landscape photographers is to create an image that combines the beauty of the Milky Way with an interesting foreground subject. To capture an intense, dramatic Milky Way, one usually tries to find geographic locations away from sources of light-pollution, and typically around the time of the new moon. A proper exposure for the Milky Way under these conditions usually produces an image with a silhouetted foreground, as shown here:

What we want is a way to illuminate the foreground in a Milky Way image, to add interest, context and scale to the photograph. This can be accomplished in several ways, one of which is through the use of low-level lighting.

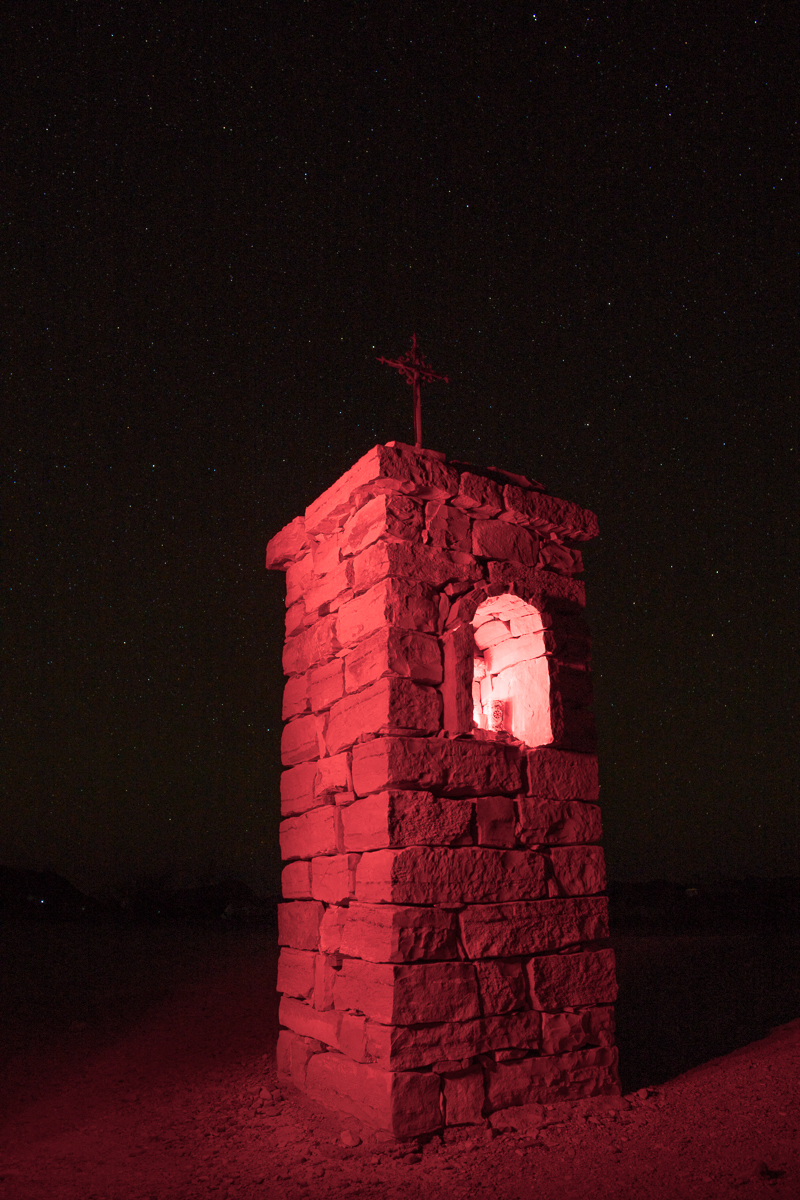
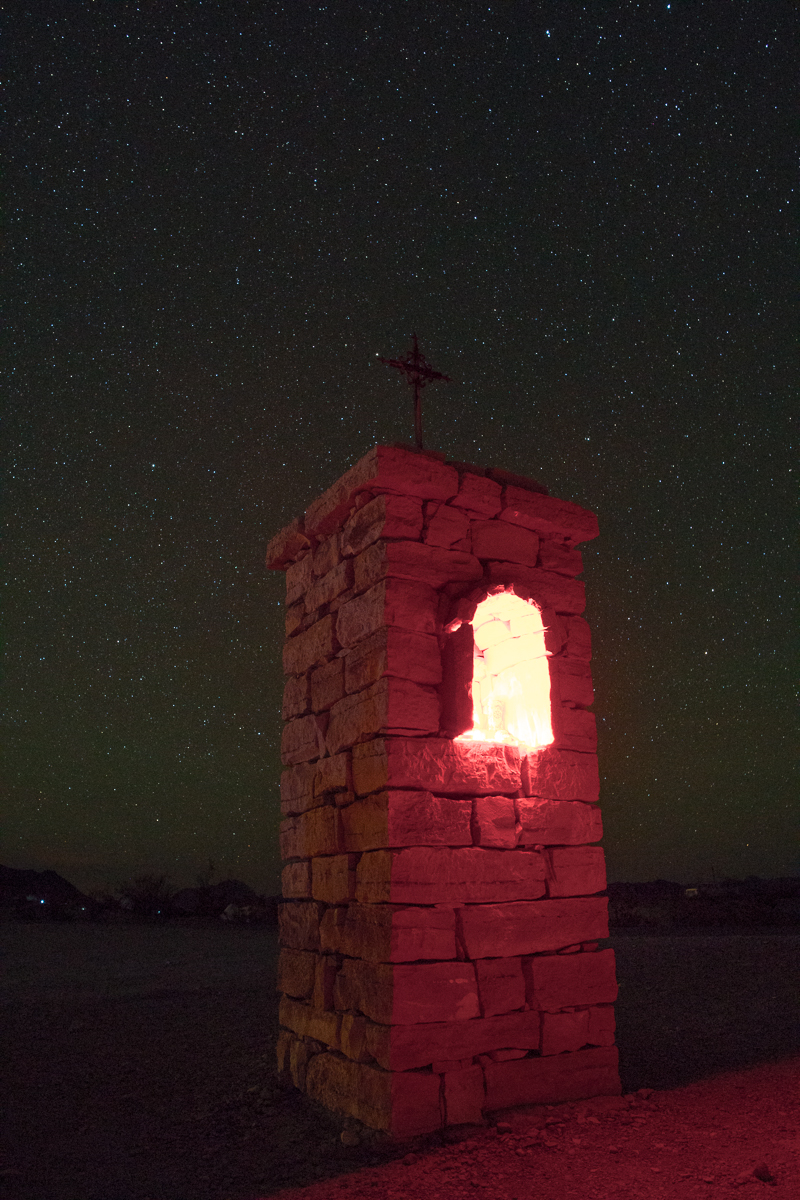
Low-level landscape lighting can be thought of as a foreground illumination technique that attempts to properly expose the foreground while the Milky Way is being photographed, using a dim, stationary, artificial light source that is kept on for the entire duration of the exposure. For those interested, a new informative website devoted entirely to the topic is lowlevellighting.org.

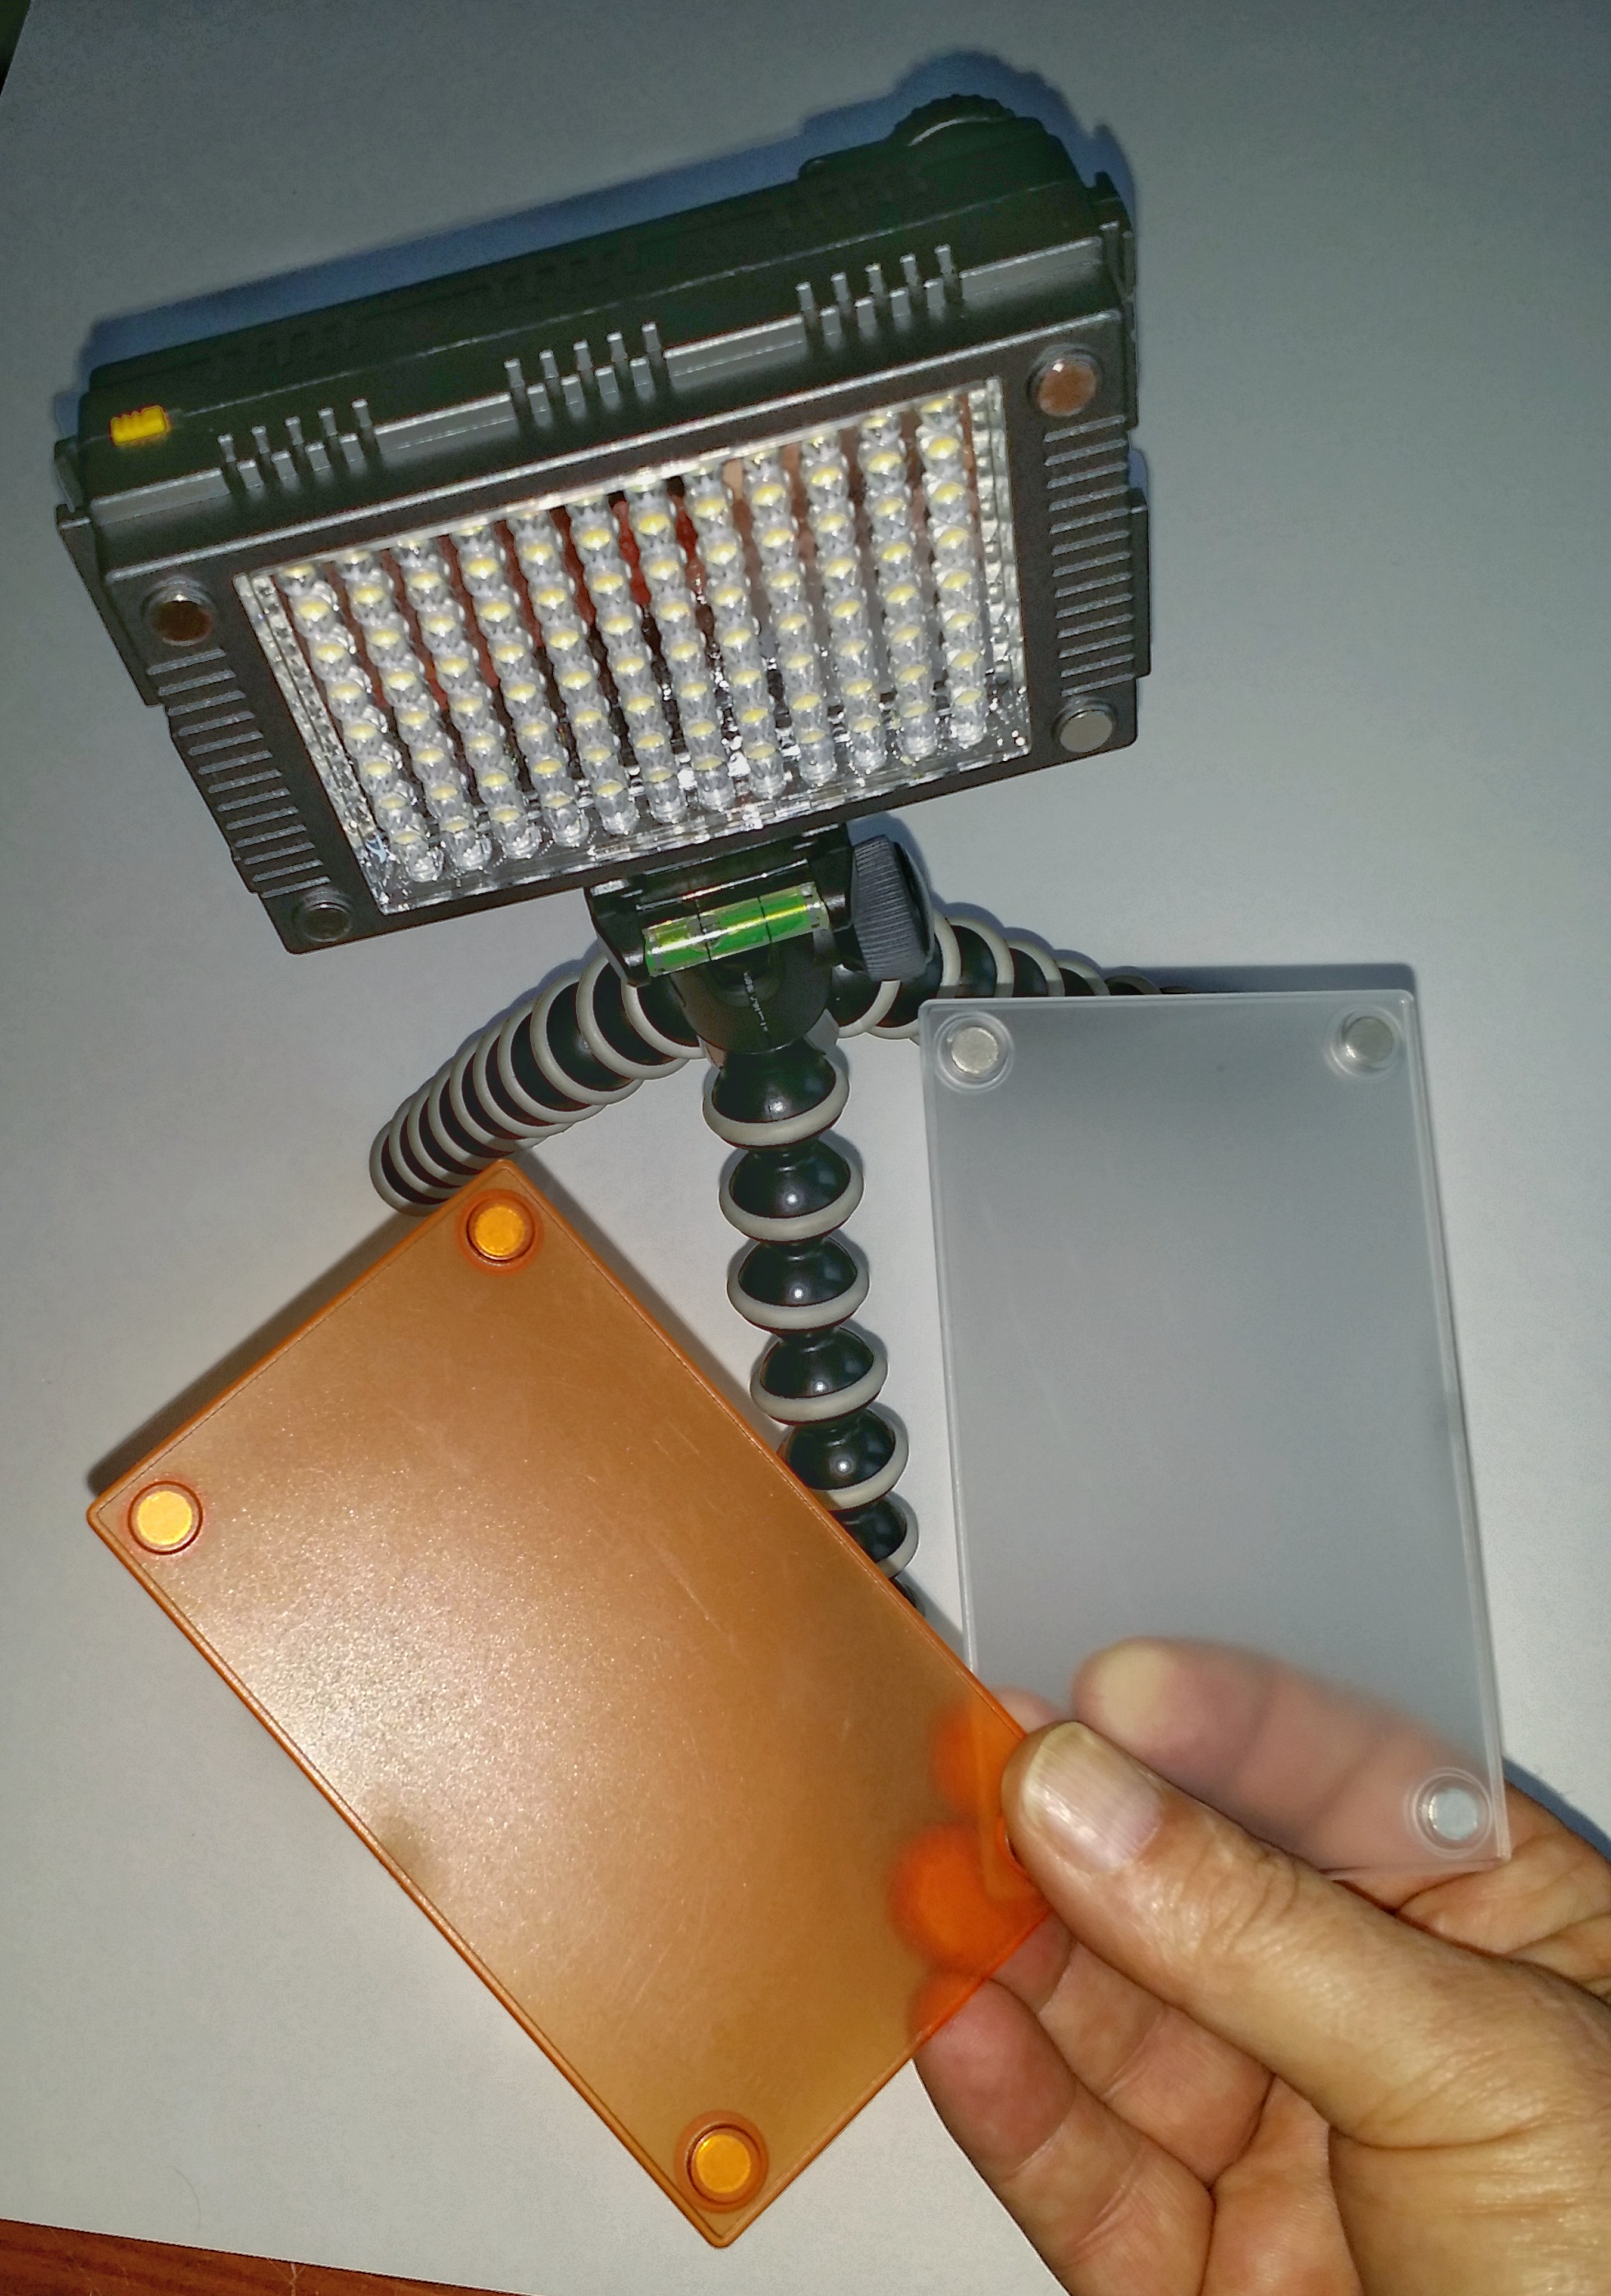
Here is an example of one such light source that I use. It is a knock-off version of the F&V HDV-Z96 LED Light Panel.  I have been using three of them without problem for two years. Included with the panel is a clear diffuser and 3200K warming filter. The filters pop on and off easily with embedded magnets. While the specs claim the panel uses 800 LX @ 1-meter Super Bright LEDs, I always use them at their lowest power setting, with both filters attached. Even at that, I usually have to move the lights much further back from the subject than where I initially placed them, in order to balance the light intensity with the exposure required for the Milky Way.

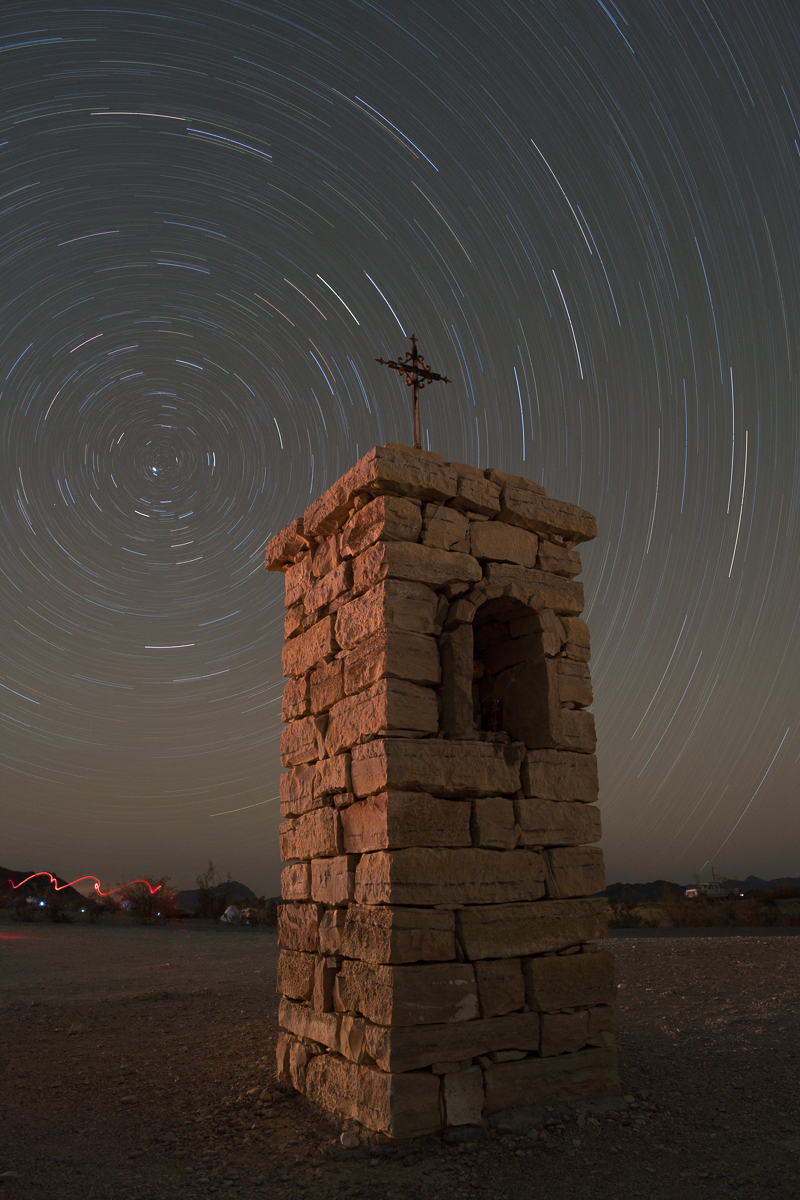
Here is a test exposure I made when setting up the light panels for the image that headed up this post. While the lights may look bright in this image, this shot was taken at ISO6400 for 15 seconds. To my naked eye, the added lighting was barely perceptible. Notice in the test shot above light has “spilled” down onto the roadway below the LED panels. Knowing this would become an editing problem later on, I decided to walk back down the road and fit each of my three LED light panels with a DIY barn door to block the spill.

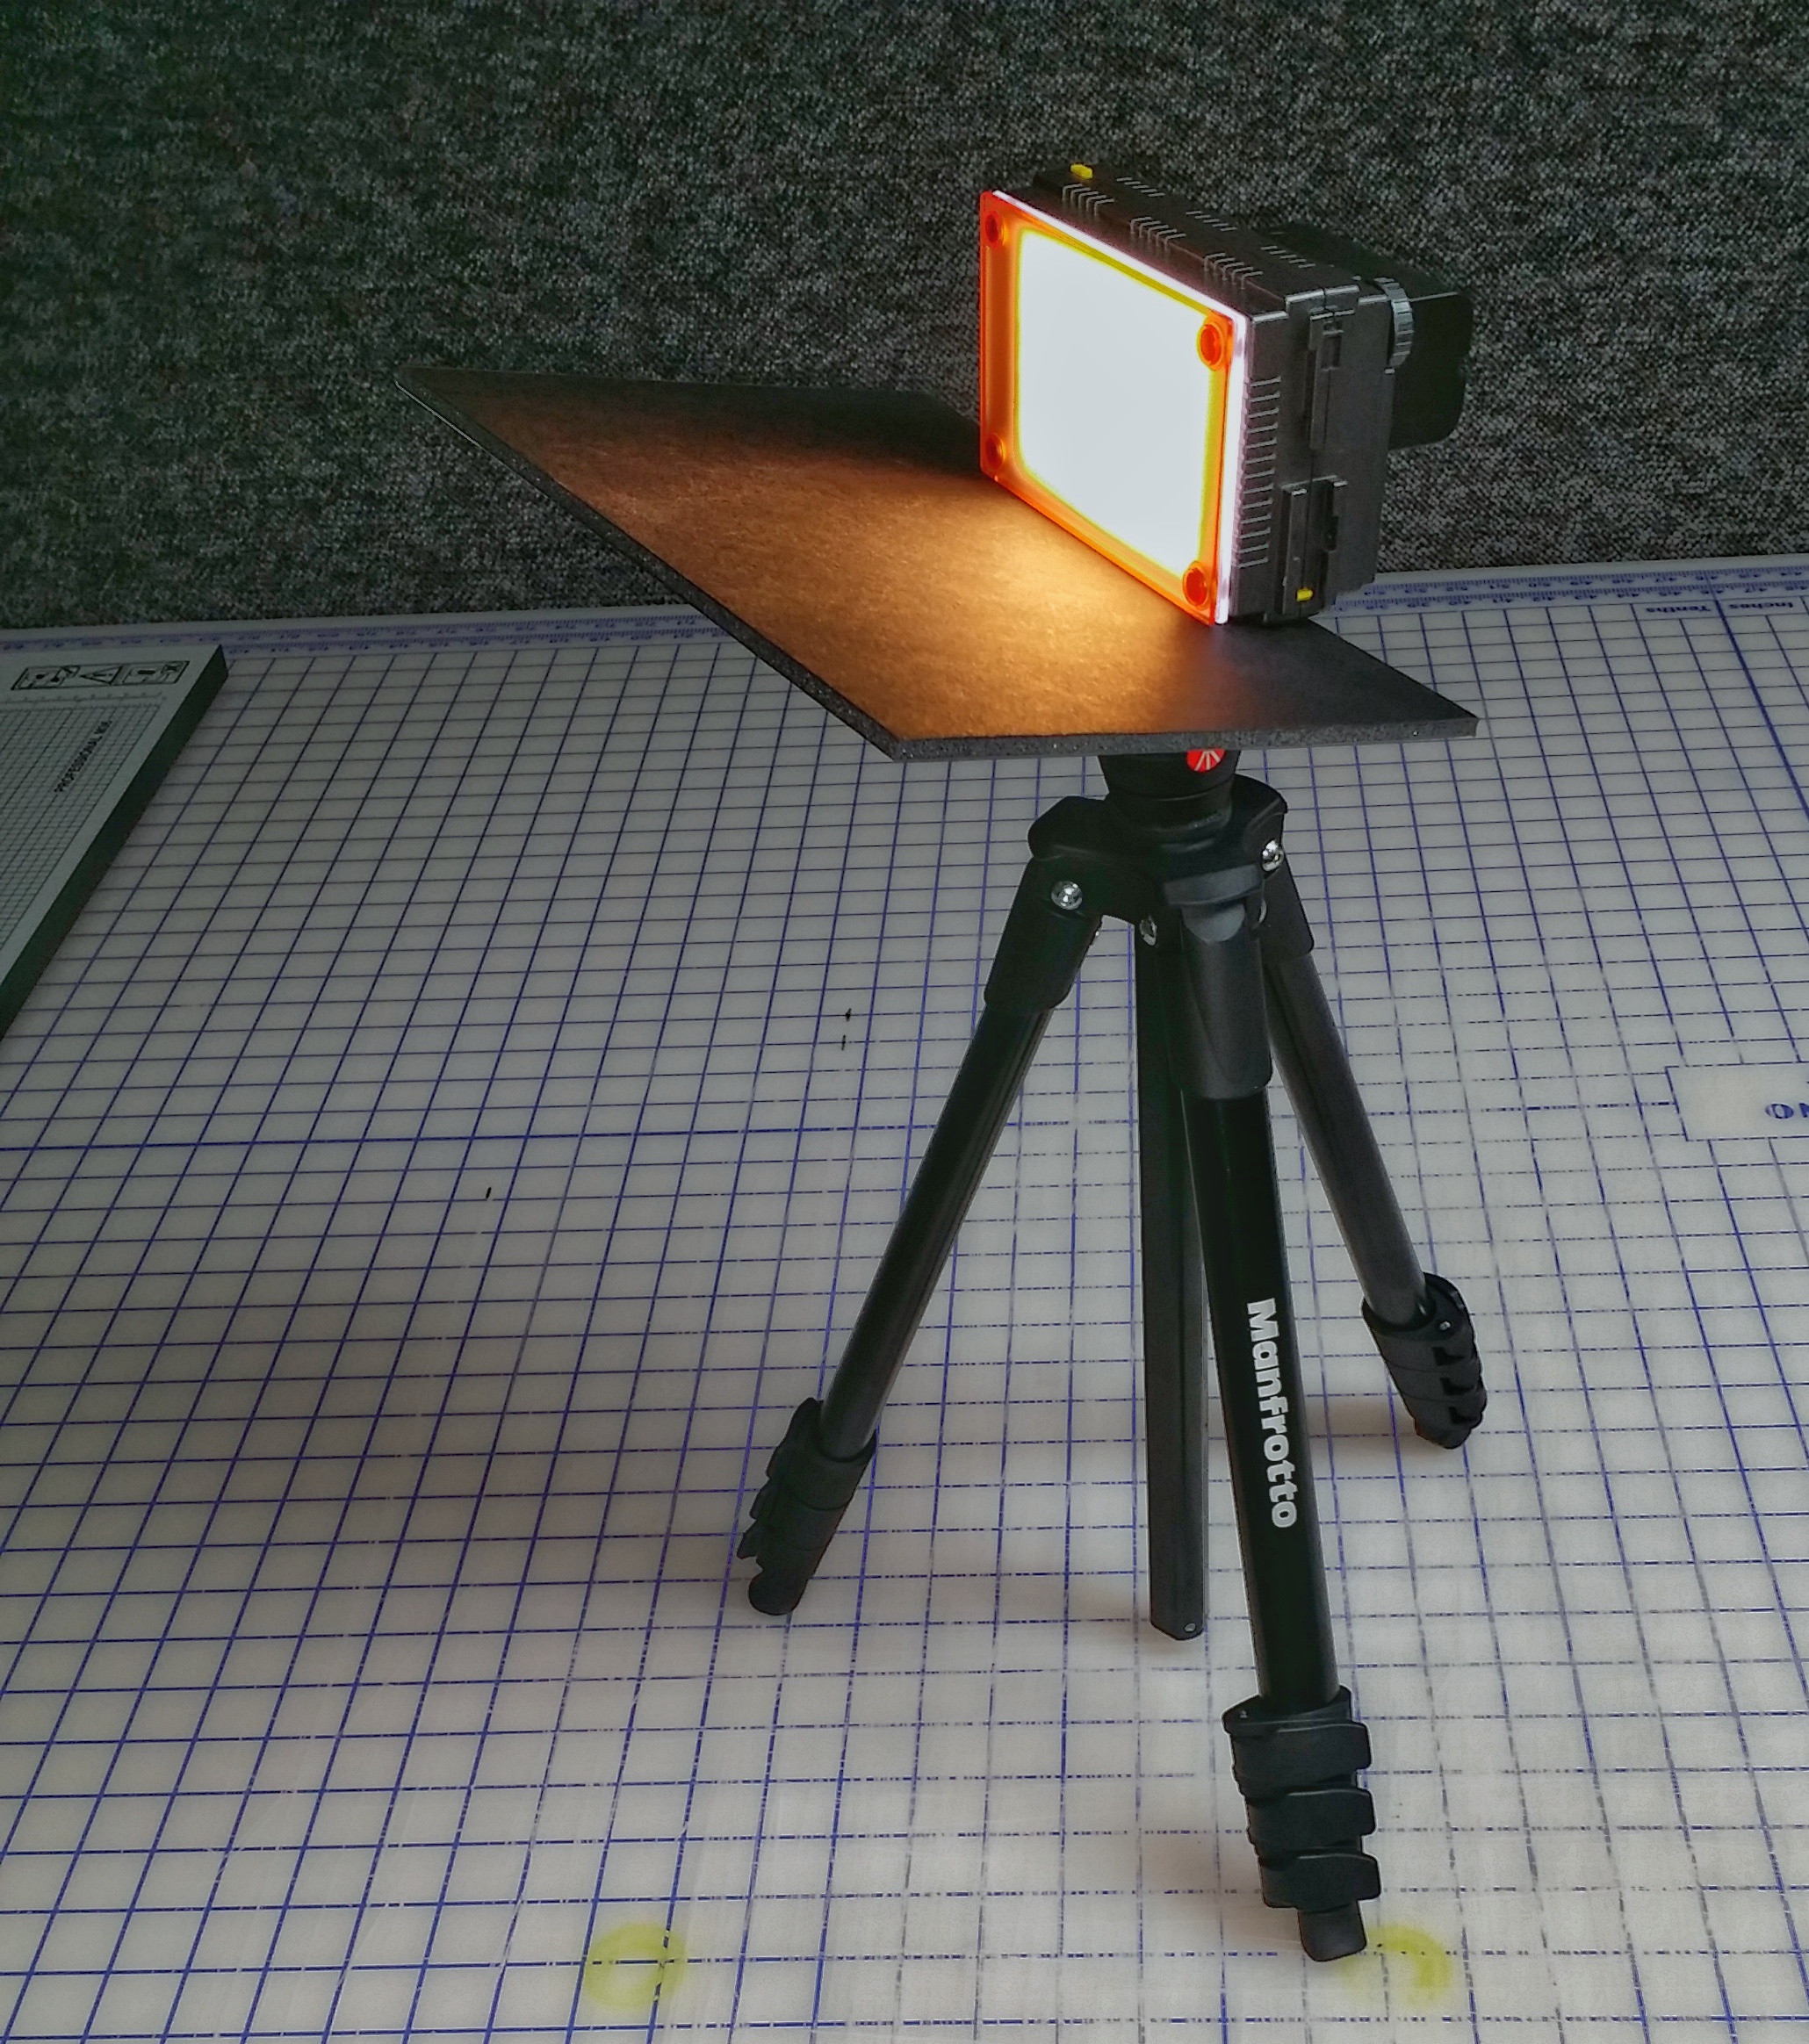
By sliding a piece of black foam core board between the LED light and the tripod, I created a barn door that allows me to cut out spill from the bottom of the panel.

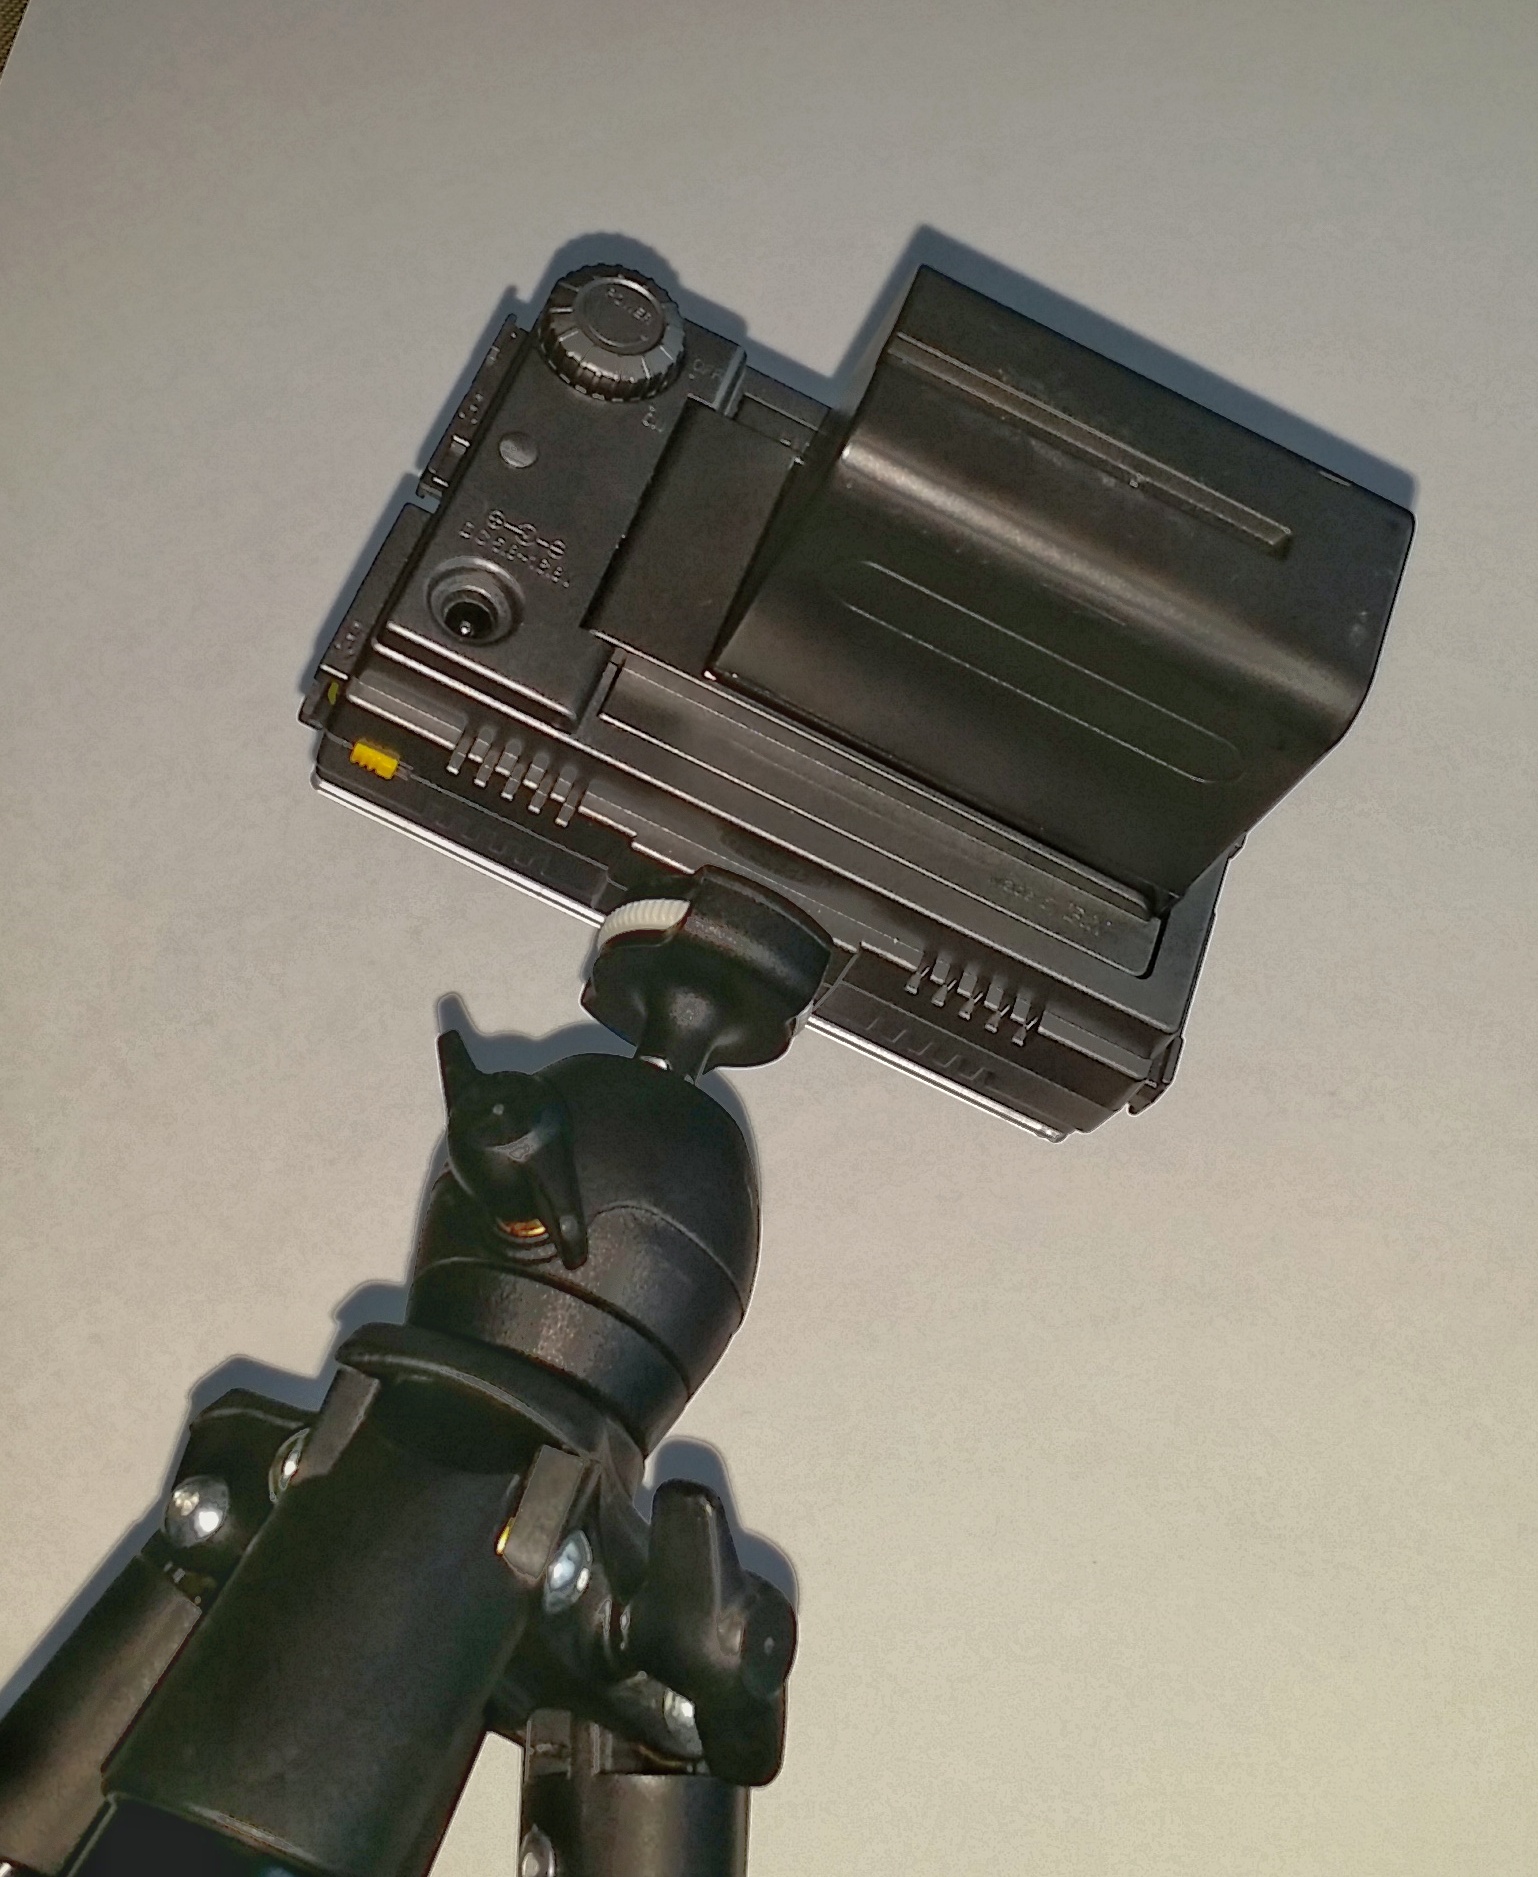
There are three ways to power this particular LED panel. There is a receptacle for a 12V power source, which I have no need for. I power my LED panels with these NPF970 Camcorder batteries, which usually allow me to utilize the lights for many long night sessions without having to bother with recharging.

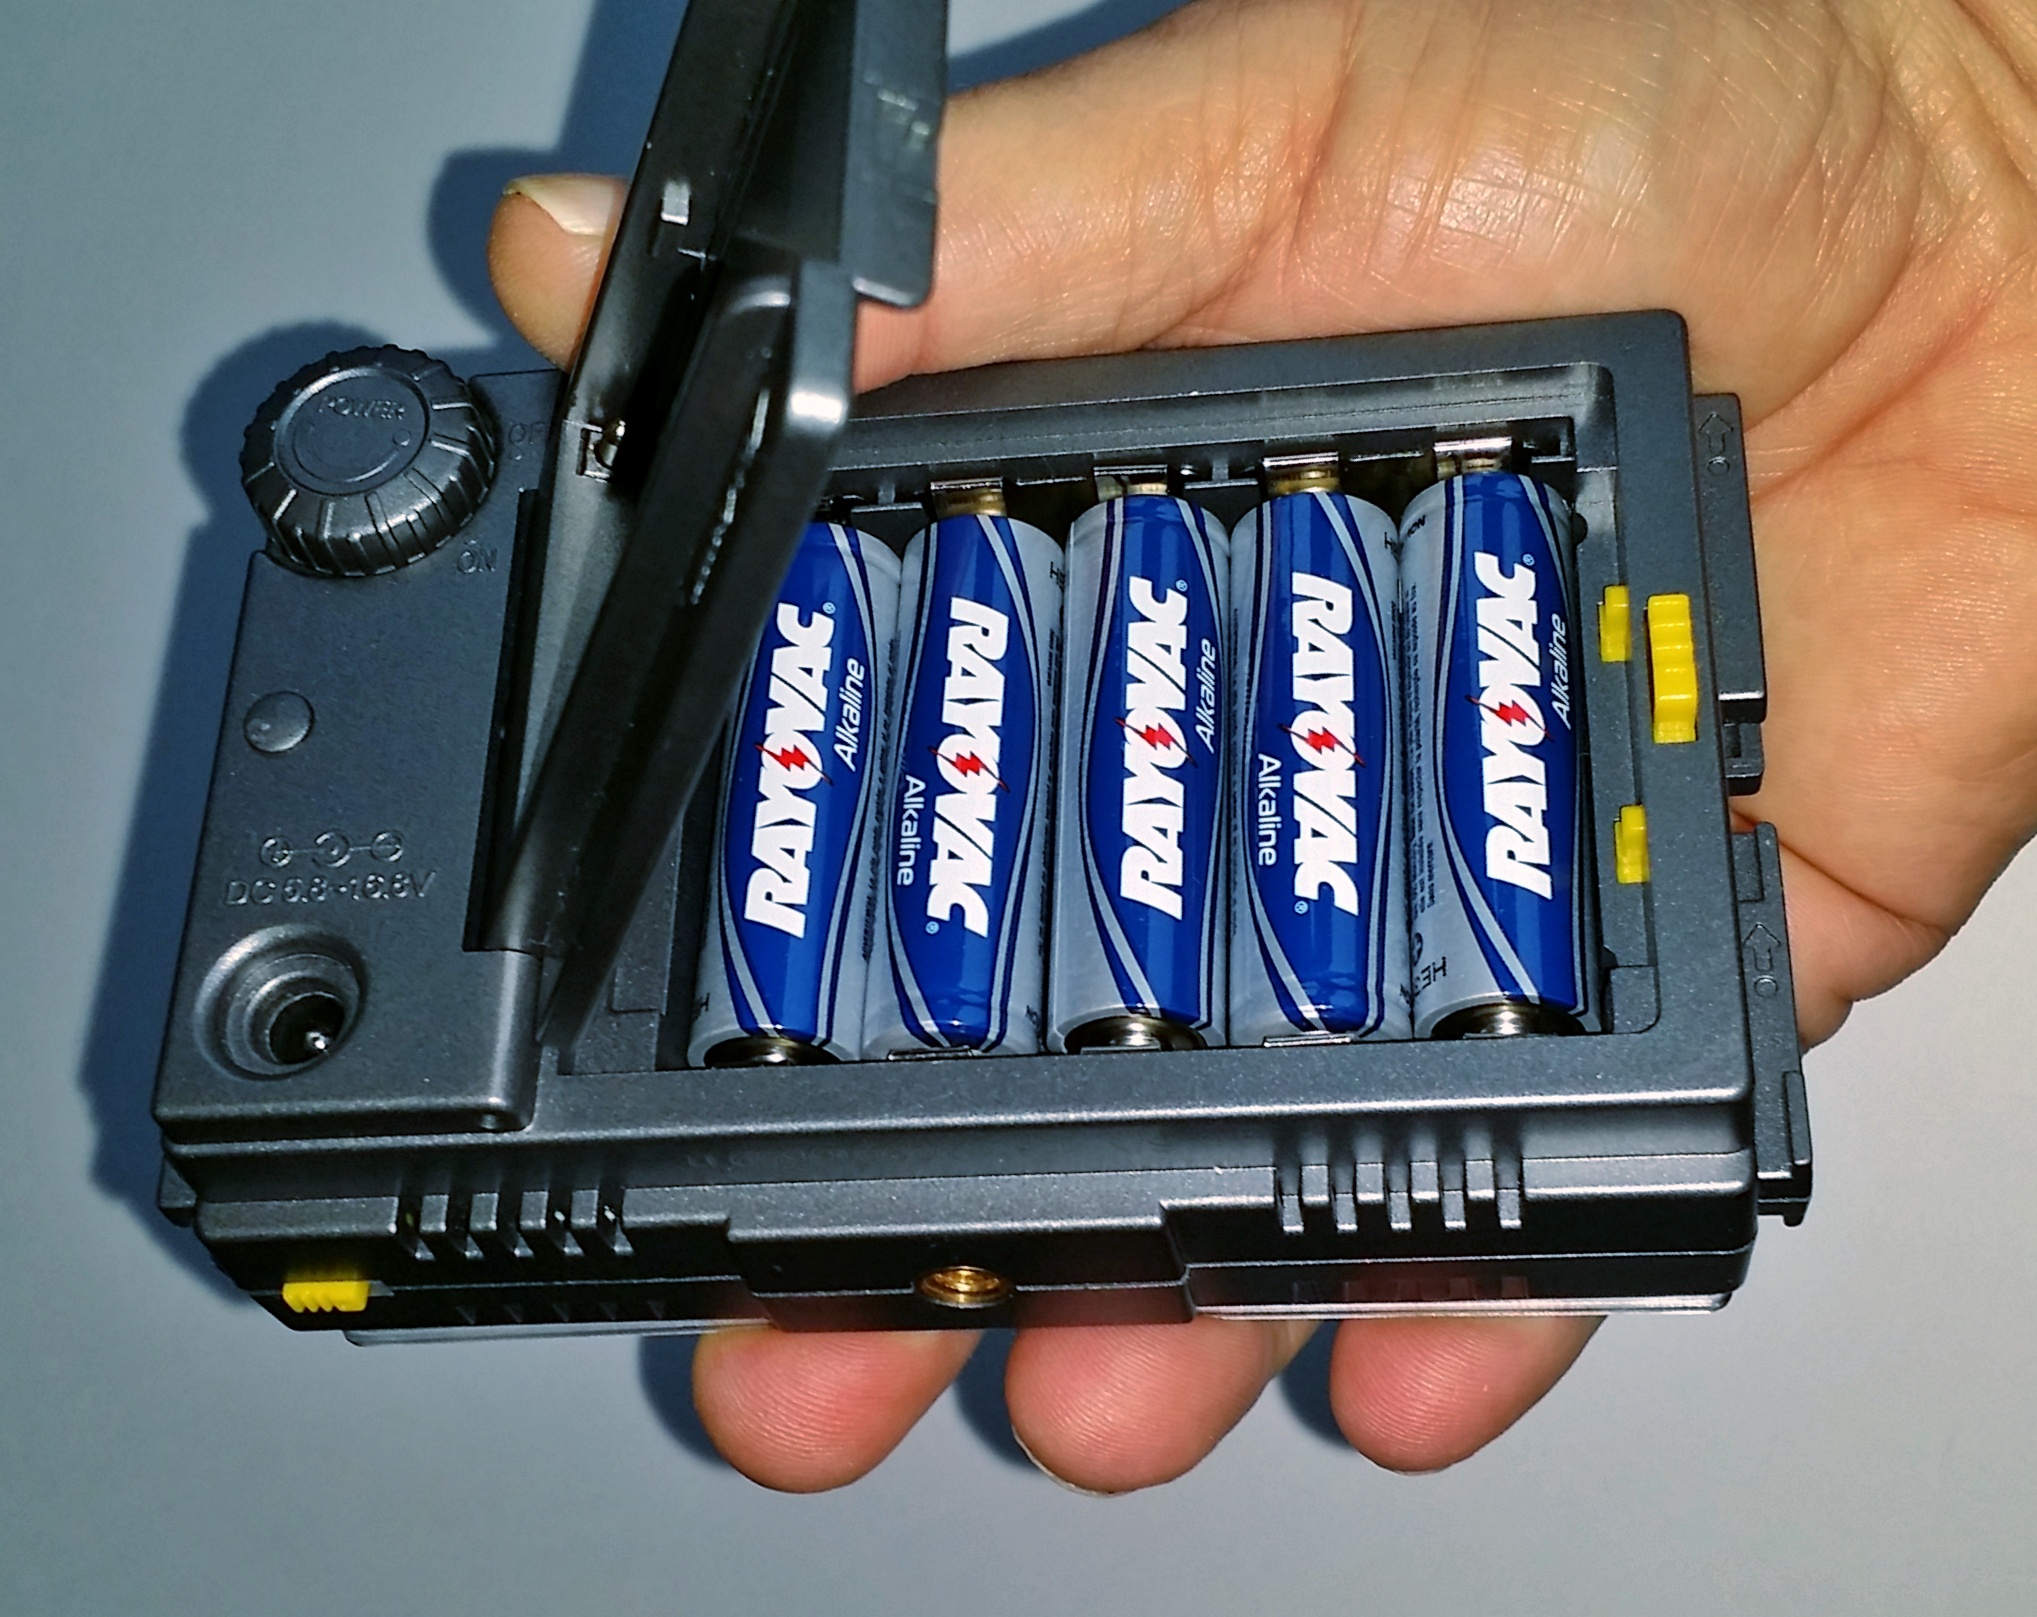
To save on space or weight, one can simply choose to use AA batteries instead of the camcorder style battery, at the expense of battery life.


Low-Level Lighting Is Not the Only Way to Illuminate the Foreground


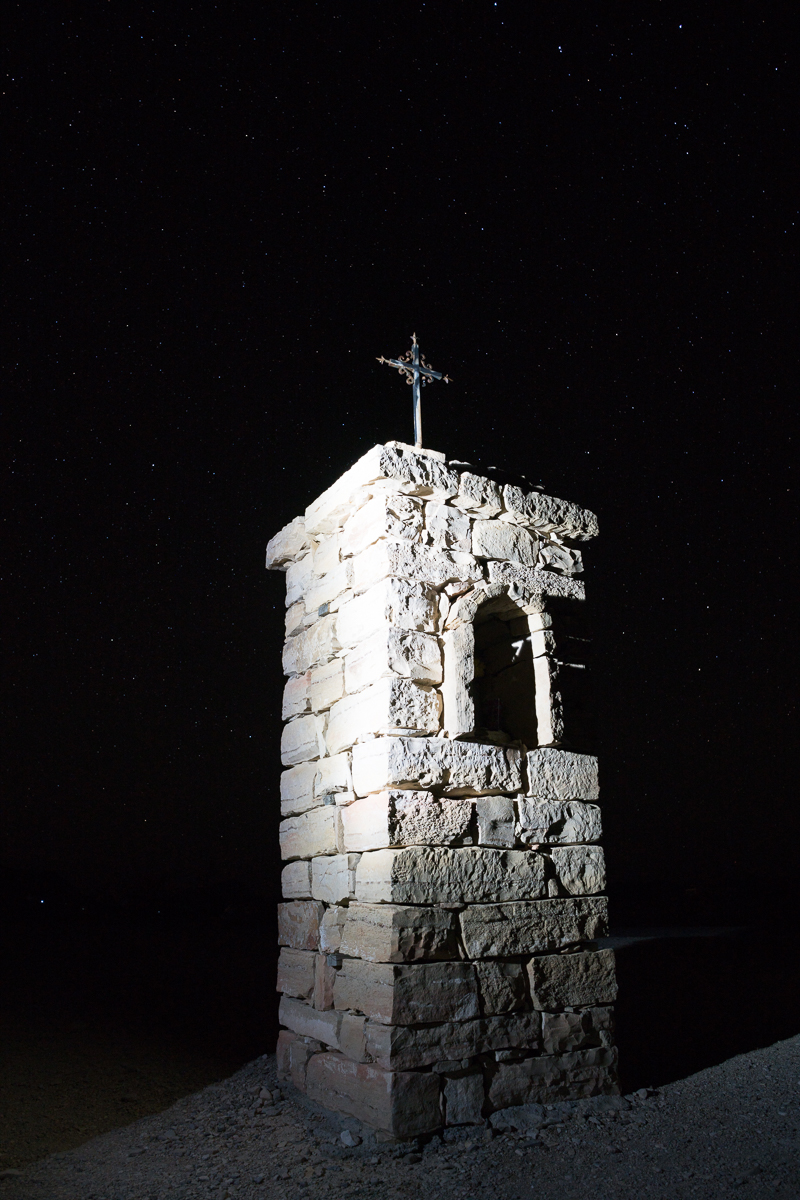
Foreground Lit Only By The Moon

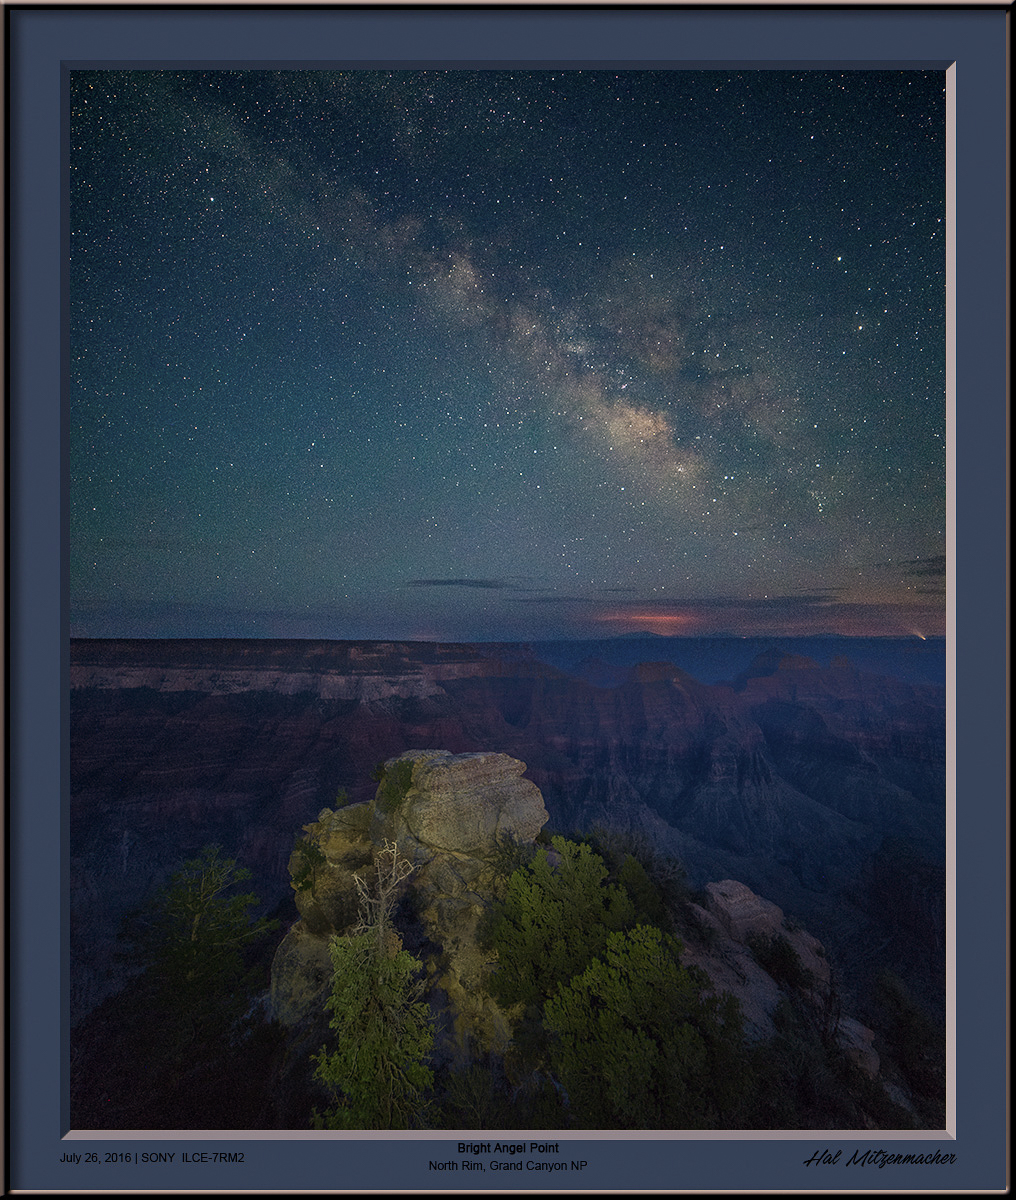
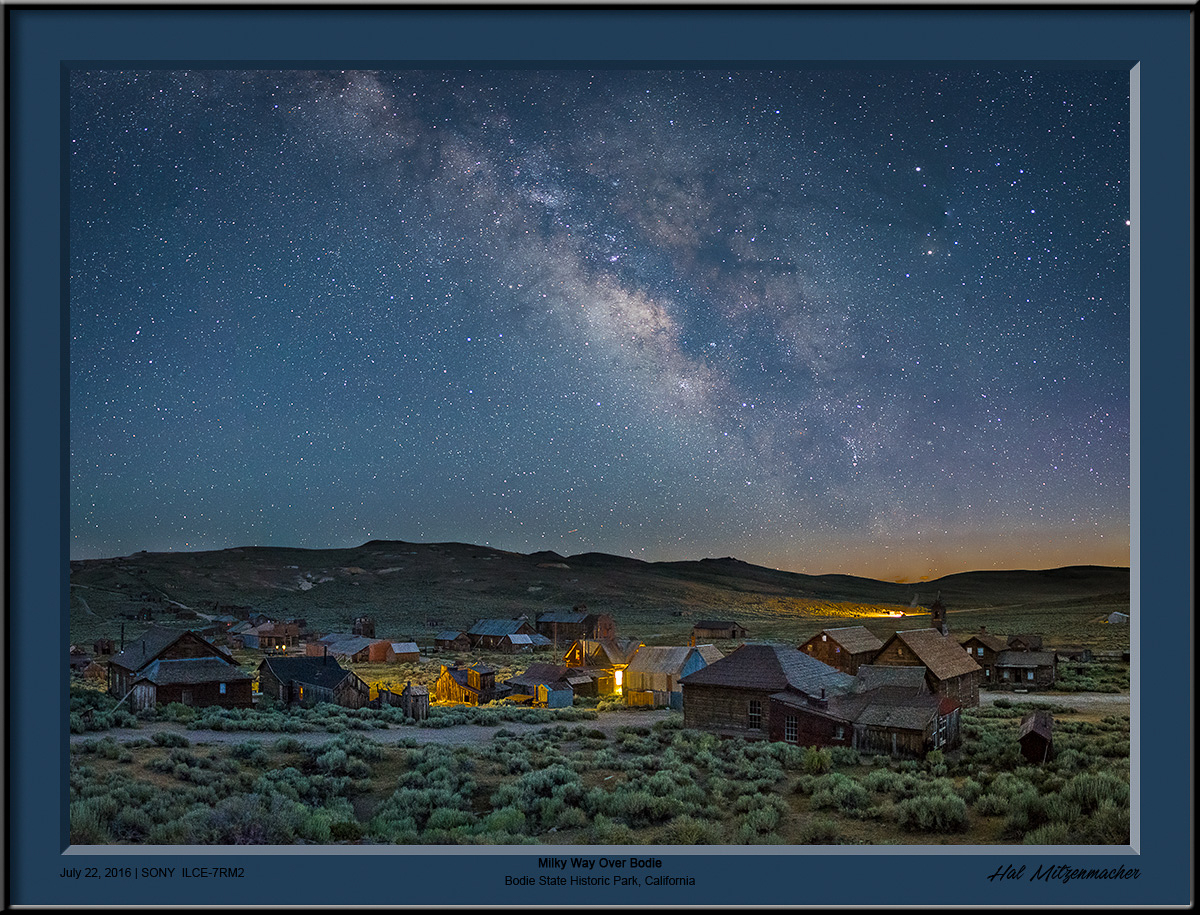
Low-level lighting is one way to illuminate the foreground, but not the only way, by any means. A great way to bring the foreground into prominence is to use moonlight to light the scene.  This image was taken overlooking the Bodie Ghost Town in the eastern Sierra of California. It was taken near the full moon, just as the moon was rising and beginning to cause the Milky Way to fade in intensity. In this case, the only artificial lights are the random fixtures located throughout the town.


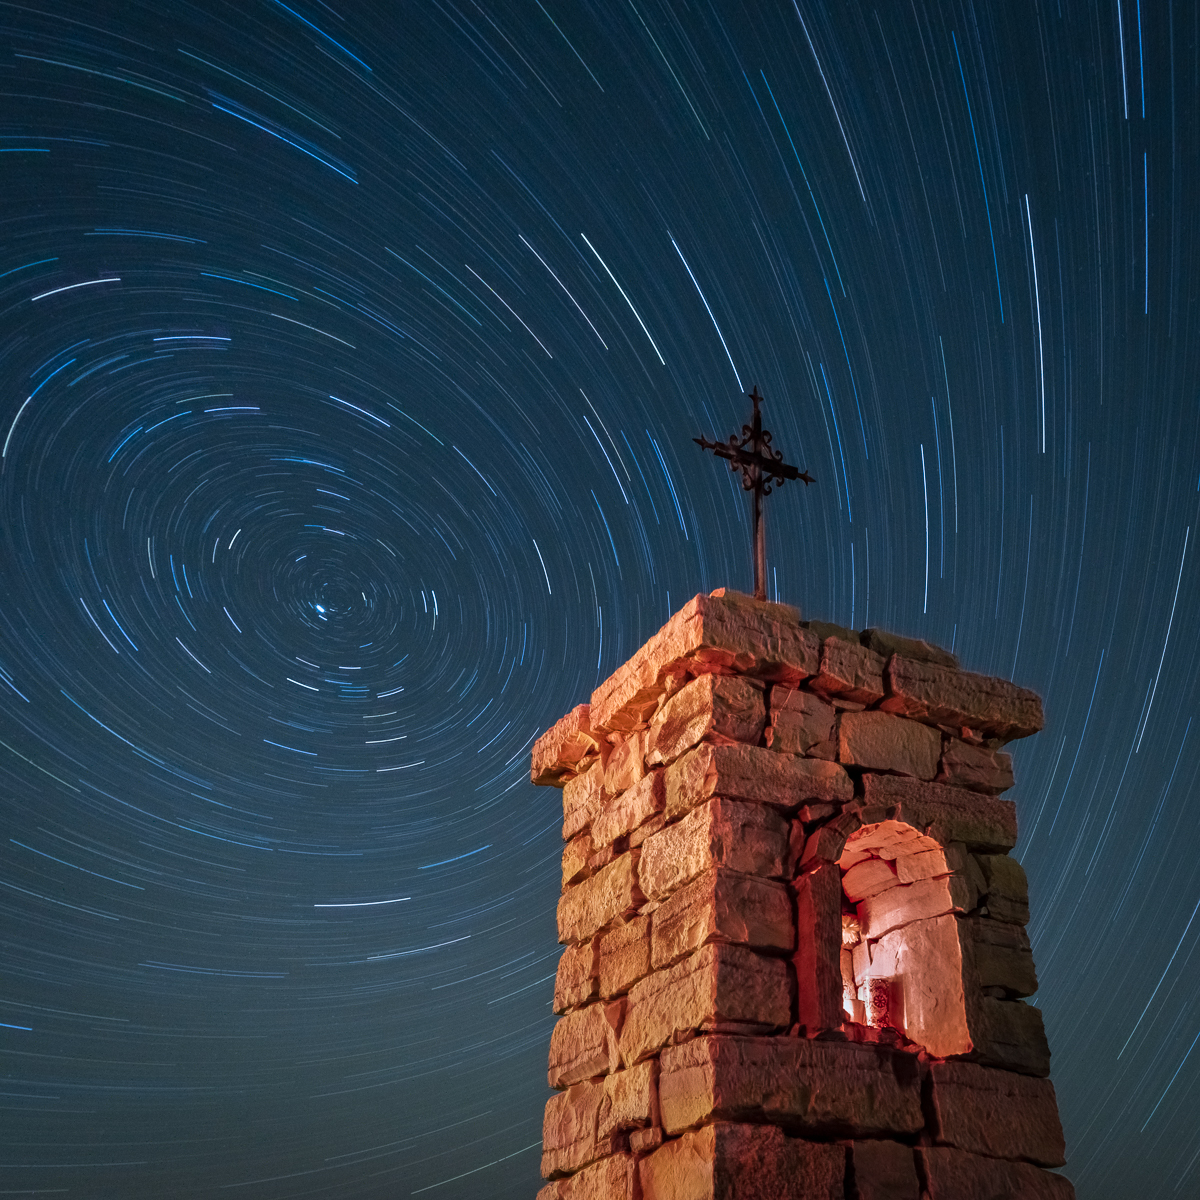
Foreground Lit Exclusively By Flashlight

This image could be considered the exact opposite of LLL. A powerful hand-held flashlight was used Instead of a low-level LED light panel. Rather than using a low intensity light for a long duration, this image uses a high intensity hand-held flashlight to paint the scene, but only for a brief portion of the exposure. This gives the photographer the ability to create a high-contrast and visually textured image. The effect creates a totally different mood than the somewhat flat, low-contrast light produced with the LLL technique.


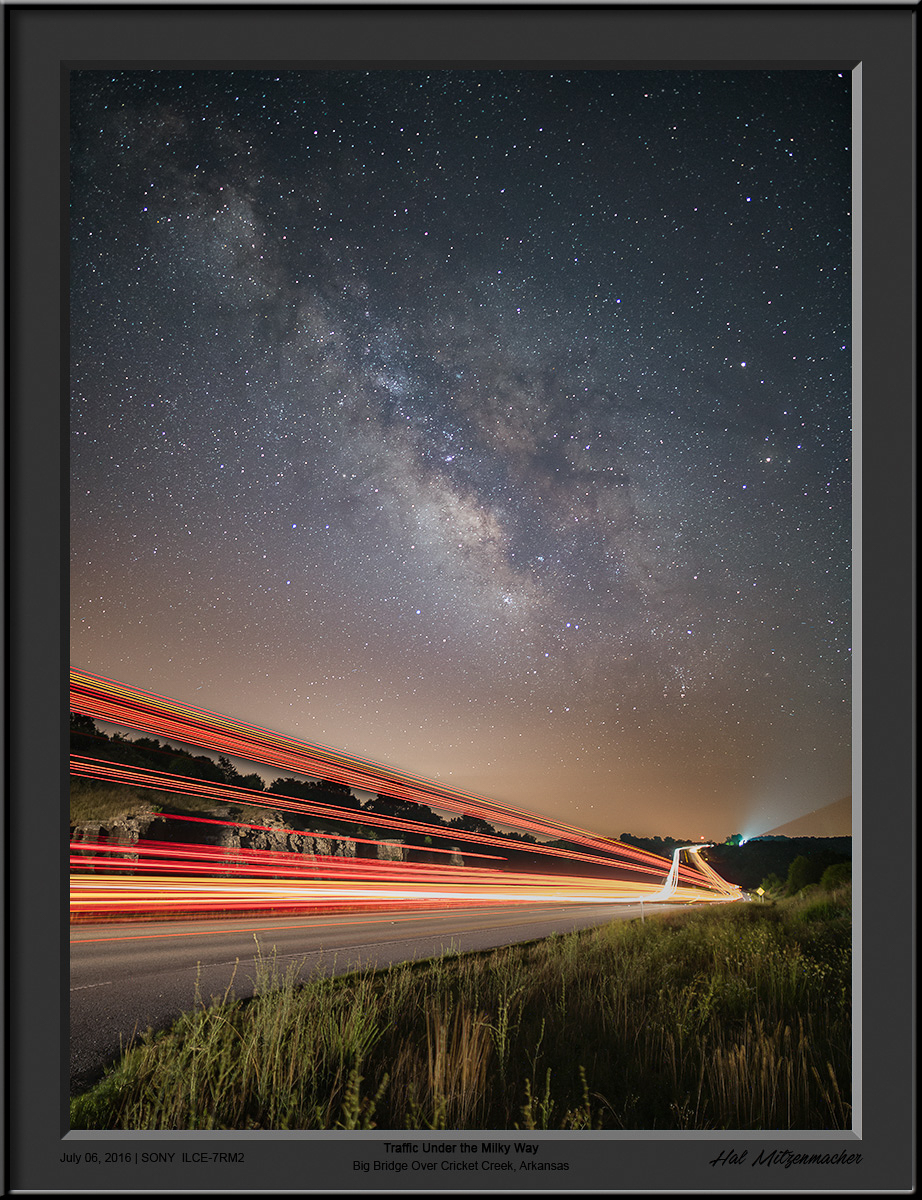
Foreground Lit Exclusively By Vehicle Headlights

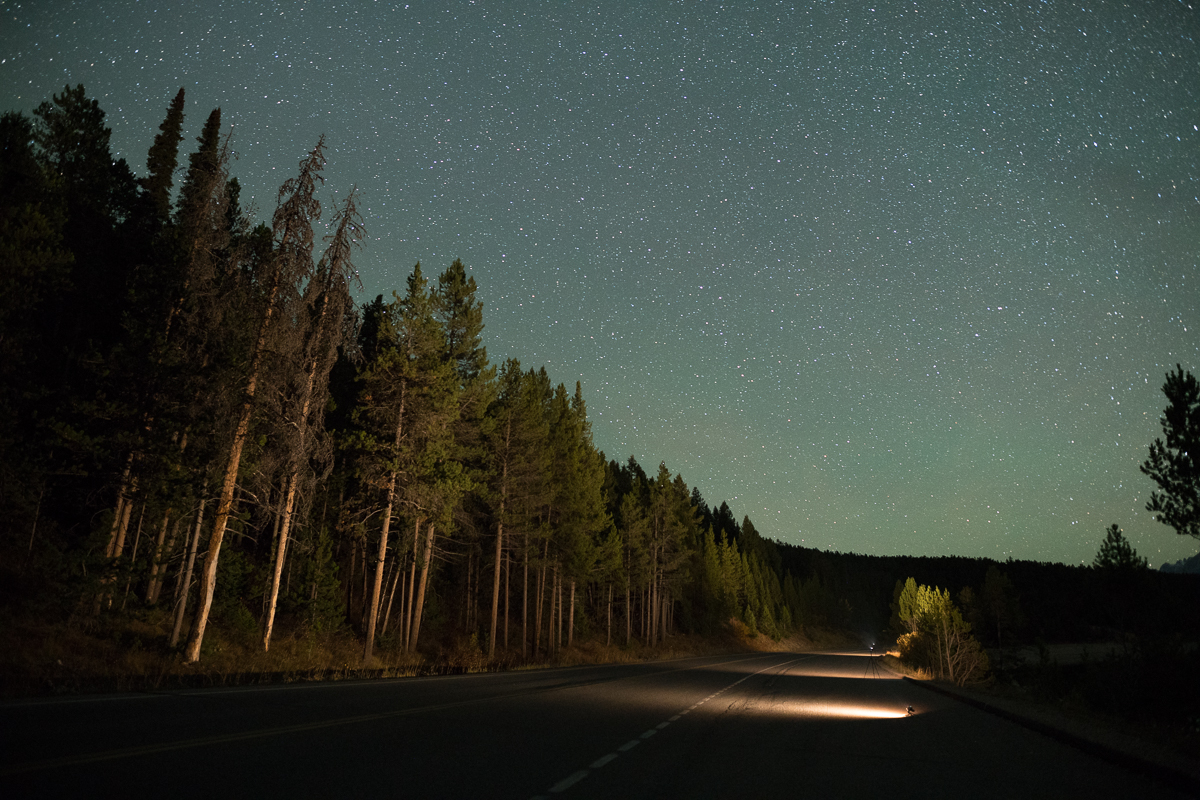
Another way to light the foreground, and a technique I find exciting, is to use the headlights of random passing motorists to provide the lighting that brings the image to life.  When I hear other photographers grumble about passing automobile headlights ruining their images, I begin looking for a way to capitalize on the situation. Many “happy accidents” in night photography are not accidents at all, but merely the by-product of a perseverant photographer. In the image above, when I realized that the deluge of passing automobiles would not abate for hours, I simply found a composition where the vehicle headlights would enhanced the image, rather than degrade it.


Foreground Lit With A Combination Of Moonlight and Flashlight

The image above shows the result of combining a just rising moon with a bit of hand-held light painting with a flashlight..  While the exposure settings of the camera were set with the background Milky Way in mind, the foreground was painted by a brief use of the flashlight, while the midground was illuminated by the just rising moon.


Foreground Lit With A Combination of Low Level LED Panel And Flashlight

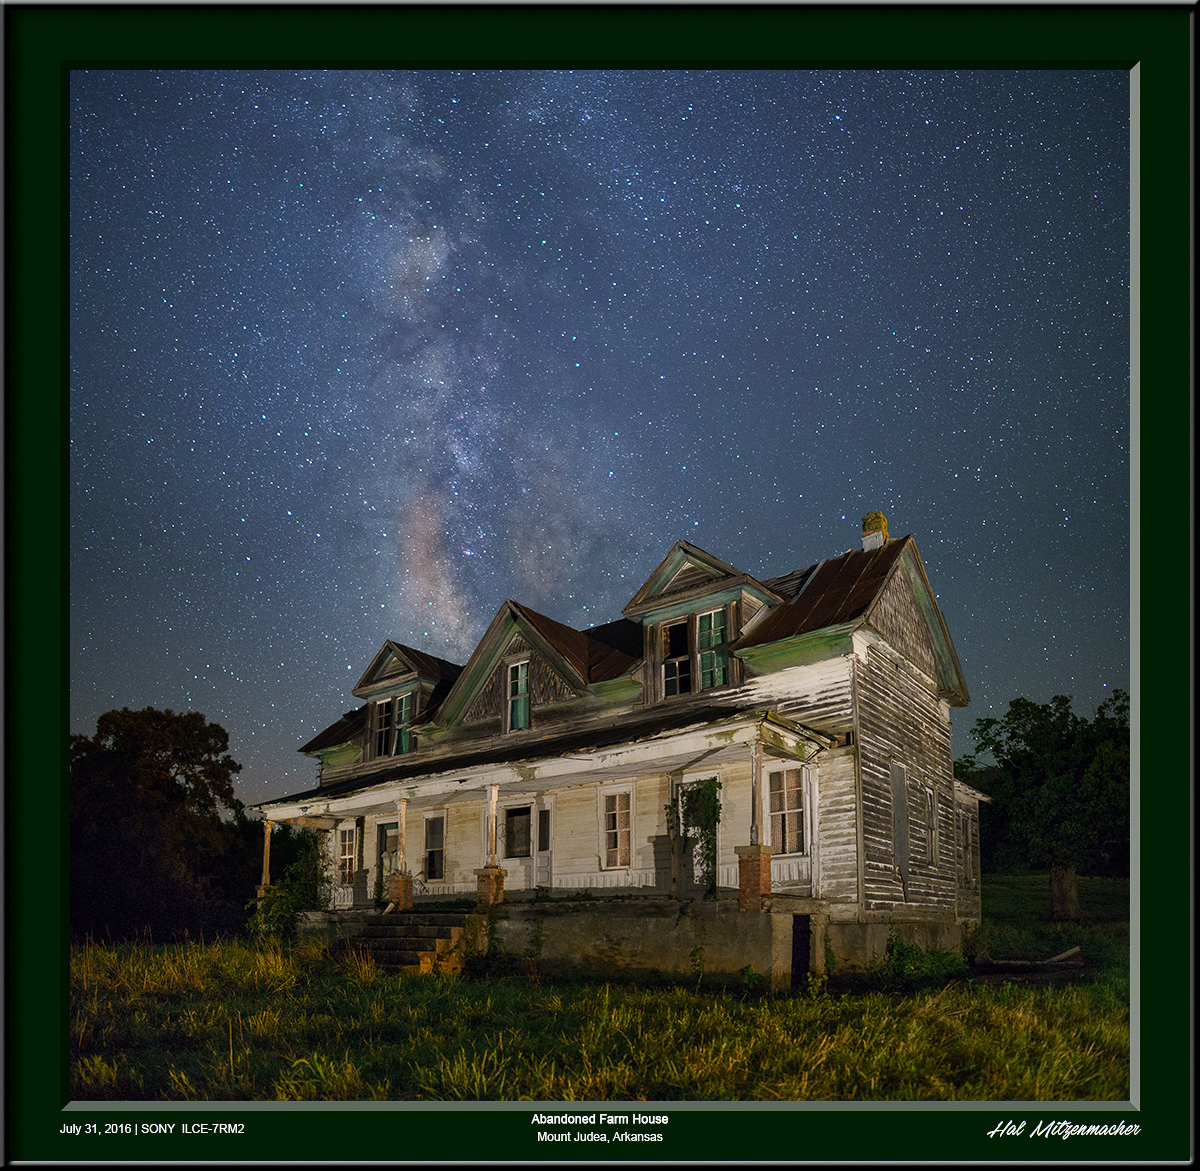
The image of the abandoned farmhouse and Milky Way above uses a LED light panel to provide a uniform low-level light for the farmhouse, balancing the exposure with that required for the Milky Way. As an addition however, to add interest and texture to the image, I used a high powered flashlight briefly during the exposure from off-camera right to add texture and depth to the grass.


Foreground Lit With Combination Of Vehicle Headlights and Flashlight

And finally, this image shows an exposure optimized for the Milky Way, with the use of automobile headlights to illuminate the bluff on the other side of the highway. A hand-held flashlight was used to add texture to the grass in the foreground.


Conclusion

Low-level lighting is a valuable tool in the arsenal of the night photographer. With changes to light painting policy that might be coming to public lands, it may become increasingly important to become proficient in various forms of nighttime landscape illumination.

In future posts I will expand on the pluses and minuses of various astro-landscape lighting techniques, and see how they each fit into a future where light painting may be severely or completely restricted in our National Parks. In the meanwhile, you now know what the concept of low-level lighting is, and can go from there.


ShuttlePRO v2 – My Lightroom Experience Redefined

editing-workstation

This is my image editing workstation. Unlike many photographers, I relish the hours spent in my digital darkroom, perhaps as much as I enjoy the hours spent capturing the RAW data that provides the basis for my final images. In examining my workstation, you might be tempted to ask “why four monitors?”  Because I couldn’t fit six on the tables!

Being a photographer as well as a blogger, I often encounter days where I am editing images for a blog post in Lightroom and/or Photoshop, writing the blog post in Wordpress, and researching the content of the post on the Internet, all simultaneously. With plenty of screen real estate, it’s fun and efficient to be a multi-tasker, but it can become a headache trying to manage multiple monitors without becoming a monitor “monitor”. This is where the ShuttlePRO v2 shines with Lightroom. Additionally, moving between Lightroom and Photoshop can be annoying, in that many common functions are invoked in different ways or with different keystroke combinations, depending on which program you are using at the moment, a situation that can be remedied with the proper use of the ShuttlePRO.  I will expand on these ideas later in this post.

ShuttlePro-mouse-keyboard

The ShuttlePRO v2 by Contour Designs is the device sitting to the left of the keyboard. It is substantially larger than the mouse on the right, but since the ShuttlePRO is stationary it utilizes less of a footprint in use than the mouse.

As an aside, on the right side of the keyboard is a stylus for a Wacom Intuos Pro graphics tablet that I find myself using less and less in my image editing work. The nature of how I work with images in post-processing has changed so much over the years, and the software I use has evolved so much, that a graphics tablet impedes my workflow now, rather than aiding it. The necessity for me to have pinpoint drawing control today is nearly non-existant, as I use layer blending modes, luminosity masking, and blend-if functions, which are not helped much with the use of a graphics tablet. The abilities of the ShuttlePRO type device are much more suited to my editing style and the way I use my software.

Anyhow, back to the subject at hand, the ShuttlePRO v2. Here is a close up image of the device, so you can see what it is:

ShuttlePro-v2

There are nine buttons across the top of the ShuttlePRO that are fitted with transparent key caps that pop on and off, so you can print custom labels for these buttons if you choose. There are four silver buttons towards the bottom of the ShuttlePRO, and in the center are two black buttons and two rotary dials. The center rotary dial rotates continuously in either direction, and the outer rotary dial is a spring-loaded jog/shuttle dial.  All of the buttons and dials are assigned keystrokes or functions of your choice, so the device can be tailored to the specific commands and keystrokes that are useful for your own particular workflow.

The software driver that accompanies the ShuttlePRO v2 is well designed, easy to use and customize, and does a great job of simply making the device work as intended, without getting in the way of the creative process involved in editing photographs. The driver keeps track of which desktop window the cursor’s focus is located, and utilizes the button assignments associated with the program running in that particular window. For instance, when I am working in Lightroom the ShuttlePRO uses the button assignments I have created for LIghtroom, but the moment I move the cursor to a Photoshop window, the ShuttlePRO immediately changes to the button assignments I have created for Photoshop.


My ShuttlePRO v2 Configuration For Adobe Lightroom CC

Now that you know what the ShuttlePRO v2 is and what it looks like, I’ll show how I have tailored it to work within my Lightroom setup. One thing many users of Lightroom do not know is that Lightroom presents the photographer with two different user experiences, depending on whether it is being used on a single or dual monitor system. Lightroom utilizes a second monitor about as well as any software I have encountered, with many options available for either monitor at any given time. But getting the two monitors to display the information you want, in the format you desire can take many clicks of the mouse, in several locations on each screen, to achieve the desired results. Switching this around on the fly becomes cumbersome, so my first assignment for the ShutterPRO was to try and streamline and ease the use of the two display monitors.

I have assigned the top two rows of buttons on the ShuttlePRO to control the display modes of the two monitors, with the top row of buttons controlling the left monitor, and the second row of buttons controlling the right monitor.

Dual Monitor 01

The top row of button assignments are for the left monitor, which is where the main Lightroom operations take place. By assigning the top row buttons to [GRID], [LOUPE], [DEVELOP], and [PRINT], I can immediately jump to any of these modes from wherever I happen to be in the program at the moment. By assigning the second row buttons to the right monitor [GRID], [LOUPE], [COMPARE], and [SURVEY] modes, I can immediately switch the second monitor to the view that is most appropriate for the work I am doing at the moment. Each monitor can be set independently of each other, so you can make maximum use of each monitor for whatever task is at hand. The magnification of the image displayed on each monitor can be changed by rotating the jog/shuttle dial at any time. Sometimes I find the Filmstrip Panel useful, but mostly it just gets in my way. I have set the far-right button on the second row to [Show/Hide] the Filmstrip Panel, so it can instantly be accessed or dismissed as desired.

Dual Monitor 02

When editing an image, sometimes it is helpful to work on the image zoomed in to 1:1, 2:1 or even greater, while being able to see the editing results displayed on the second monitor with the image at normal size. Other times it is useful to do just the opposite – with each monitor now controlled at any time by the push of a dedicated button on the ShuttlePRO, adjusting what you want to see on each screen is just a button push away,  As I have become accustomed to the button assignments and muscle-memory has taken hold, using the ShuttlePRO has become second nature. It is almost as if I just think about what I want each monitor to display, and it magically appears!

A very powerful feature of the ShuttlePRO is the way it handles all the adjustment sliders in Lightroom. There are various MIDI controllers on the market today that work in conjunction with Lightroom, such as the Behringer BCF2000. These MIDI controllers use either rotary dials or mechanical sliders to manipulate the slider controls within Lightroom. Some of these MIDI controllers have as many as 18 rotary dials for working in Lightroom. Controllers of that sort are unwieldy, expensive, and take up quite a bit of desktop real estate. Additionally, MIDI controllers require the use of additional controller interface software to work with your computer system.

The ShuttlePRO eliminates these problems by including the inner rotary dial on the device. Just hover the cursor over any Lightroom slider and rotate the inner dial – the slider in Lightroom will move either left or right, depending on the direction you rotate the dial on the ShutttlePRO. It couldn’t get much easier, and I find it much smoother to work in this fashion, rather than the mouse/slider combination I used to use in Lightroom, or using an expensive, unwieldy MIDI Controller device.

As I mentioned previously, I have set the spring loaded jog/shuttle wheel to control image zoom. At any time on either display, jogging the wheel to the right zooms in on the image, jogging to the left zooms out.

The two black buttons on either side of the center wheels have been assigned to [Undo] and [Redo], while two of the silver buttons on the bottom have been assigned to [Import] and [Export]. I have purposely left the very bottom two buttons unassigned.  Because it is so easy to program the buttons on the fly, I use these bottom two buttons for special projects, where it is convenient to have dedicated buttons to perform tasks, but only on a temporary basis.

I mentioned in the opening of this post that the ShuttlePRO v2 could also address the problem of Lightroom and Photoshop having different ways of accessing the same functions. An example of this is changing brush sizes. In Lightroom I can instantly change the brush size by simply moving the scroll wheel on my mouse up or down. In Photoshop, however, the developers have decided that the scroll wheel should always increase/decrease image size, not brush size. Instead, one must use the bracket keys on the keyboard, or the drop-down brush palate along the top menu strip. This just drives me up the wall – why must Adobe use different methods to achieve the same result in these two programs? But with the use of the ShuttlePRO, problem solved! I simply programmed the Inner Dial of the ShuttlePRO to control the brush size, and now it is as simple to adjust my brush in Photoshop as it is in Lightroom.


Conclusion

I have been amazed at just how useful the ShuttlePRO v2 has become in my editing routines. I have fully incorporated it into my Lightroom workflow, and am just beginning to explore the best ways to utilize it’s capabilities for my Photoshop usage. After that, I will see how it might integrate with other software I use on a regular basis. When I have settled on my ShuttlePRO v2 button settings for Photoshop, I will share them here.

Many times products promise the moon, but fall far short in actual performance. I feel the ShuttlePRO v2 actually delivers. It has been quite a while since I have found a piece of hardware that has hooked me so quickly. Thanks, Contour Design!


Note: The author has no relationship with, nor receives any compensation from Contour Design.

LED Bulbs Are NOT Created Equal – Three Bulbs Compared

cree-bulb-comparison

It is often suggested that a complete light painting kit for night photography should include both incandescent and LED light sources due to the tremendous variation in color temperature between them. But what is equally important to understand is that LED bulbs have a great deal of variation within the LED technology itself. The image above shows the variation in color temperature between three Nitecore company products, each fitted with a different CREE LED bulb.

The shots above were all taken from the same distance, with the three lights adjusted to the same approximate output. All three images were taken within moments of each other, using the same flat-white foam core board and x-Rite color checker device.

nitecore-led-lights

The CREE XP-G2 Cool White (as used in the Nitecore EC-21) appears to be the coolest of the three bulbs, with a strong bluish tint. The CRI (Color Rendering Index) of the cool white version of the XP-G2 bulb is 70. A high CRI number is good – the higher the Index, the more accurate the bulb can render the colors. In this case, a CRI of 70 is not a particularly good score for color rendition (for a discussion of the significance of the CRI Index, see here).

The CREE XM-L2 Neutral White (as used in the Nitecore HC-90 Headlamp) moves away from the strong cool blue cast of the XP-G2, but shows an almost greenish tint to the subject. The CRI of the Neutral White version of the XM-L2 is 80, and while not great, is an improvement over the XP-G2 Cool White.

The CREE MT-G2 EasyWhite (as used in the Nitecore P36) is the warmest of all three bulbs compared here. With this bulb, the blue color cast entirely disappears, with the bulb casting a rich warmth to the subject. The CRI Index of this bulbs jumps up to 90, which is considered a very good score. For color rendering accuracy, this bulb outperforms the other two in this article.

There is more to a light than just a bulb, however. Each type of light functions differently, and has been designed for a specific purpose. This is why the major manufacturers each have such a dizzying array of products in their lineup, and why it can be baffling trying to determine which light might be best to purchase. In this regard, I will be reviewing these three LED lights, as well as other lighting equipment in the near future, pointing out those features I find important, and those that are not.  I thought it would be helpful, however, to establish the difference in LED bulbs before starting the specific light reviews.