An Unexpected Visitor

Not too long ago, Retta and I began hearing an unusual noise emanating from the air conditioning duct work.  I went down into the basement utility room to investigate the source of the noise.  It soon became apparent that the noise was coming from the 5 ton air handling unit (pictured below) that is a part of the heat pump system that cools and heats our home.  Inside the housing (on the left side of the picture) there is a large blower unit, which utilizes a fan assembly that looks much like a giant hamster exercise wheel.  The sound seemed to be originating from inside this blower, so I decided to call the company that installed this HVAC system for us a few years ago.  Last week, the company sent a repair technician, who pulled the blower assembly apart and determined that a broken fan unit was causing the noise.

Air Handler Unit

Today the repair technician returned with the new parts, and after installing the new blower assembly, we were pleased to find that the offending noise had disappeared.  The technician then decided to test the unit under load, so we switched on the heat pump so that he could check the voltage and amperage draw.  He found that one of the two sets of auxiliary heating coils was drawing current, but that the other remaining set was not (both sets should have drawn the same amperage).

The technician proceeded to disassemble the unit again, this time to inspect the auxiliary heating coils, which are located at the rear of the air handler cabinet, above the blower unit.  He said something to me, which I could barely hear, because his head and shoulders were buried inside the air handler cabinet.  He said “there’s something I didn’t expect to find in here.”

And this is what he pulled off of one of the auxiliary heater coils - 

This visit didn't work out well for either of us!

It just goes to show – when you live out in the country, there are frequently critters showing up where you least expect them, so keep you eyes peeled and be on the lookout at all times!

Fall Colors Are Slowly Appearing

Hillside trees are beginning to change color

As you can see in the photograph above, the trees around this part of the Ozarks are just beginning to undergo the color transformation that makes this such a pleasant time of year to be outdoors enjoying the scenery.

Pin oak turning red

The pin oaks, such as this one, are among the first trees to exhibit a reddening of their leaves.  As such, they stand out in stark contrast to the surrounding greenery.

Pin oak leaves in early fall

The pin oak leaves change from dark green to red, after which they will turn rusty brown before leaping off the tree, in a final act of suicidal defiance in the face of the seasonal changes that are taking place.

The change has begun

This specimen of sugar maple begins it’s color change from the top down, and will undergo several variations of shading prior to the leaves falling from the tree.

Behind horse pasture

I haven’t identified this tree yet (hint, hint), but the outer layer of leaves regularly turn a brilliant purplish shade as the fall change progresses.

There is an excellent website that publishes the Ozark Mountains Fall Foliage Report, where you can learn all about the causes of the color change, as well as obtain up-to-date color reports and forecasts, and get directions for scenic local fall drives throughout the Ozarks region.

I will be posting the changes that occur at this location periodically over the next couple of weeks.  So far the weather has been favorable for a spectacular fall show.  If the cool, sunny days continue, along with cold (but not freezing) nights, we should be in for a real treat this year.  I’m keeping my fingers crossed!

Rusty Wheels Old Engine Club

There is a local group known as the Rusty Wheels Old Engine Club that stages a public show twice a year at their club site outside of Harrison, Arkansas.  Unfortunately, I usually read about how good their shows are in the newspaper after they occur.  This year was different however.  I ran across an advertisement regarding the show as Retta and I savored our dessert at the ice cream shop, after enjoying a delightful meal at a local diner, a Friday night “tradition” we have recently established.  So I spent Saturday at the show, taking in the old machinery while reveling in the beautiful fall weather we have been having.

John Deere 1951 Model A - HC

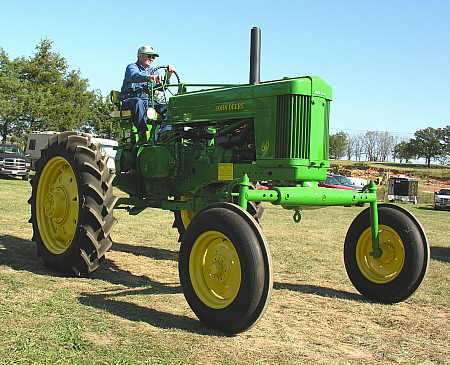
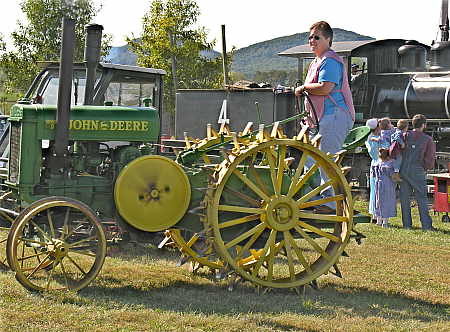
I had expected that I would see many restored tractors at the show, such as the John Deere 1951 Model A – HC tractor shown above, and the rugged looking steel cog-wheeled John Deere shown below. 

John Deere steel-wheeled tractor

I did not expected to see the large variety of interesting additional machinery and activities that were at the fall show.  Those items that I can identify, I will.  If I can’t, maybe you can fill me in with a helpful comment.  Forgive the lengthy post, but the following photographs a but a small sampling of what was available to see. 

1965 Bombardier log skidder

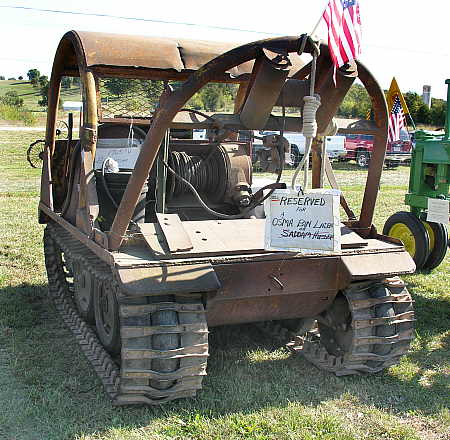
How about this 1965 Bombardier log skidder?  Un-restored, but it is still in daily use by a local logging crew.  And obviously, an opinionated owner ;)

John Deere crawler

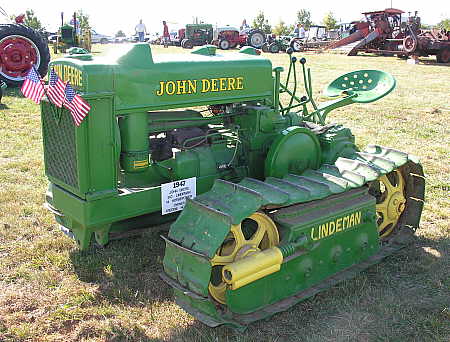
This 1947 John Deere/Lindeman 14 horsepower crawler would come in handy from time to time in my woods.

Home built buggy

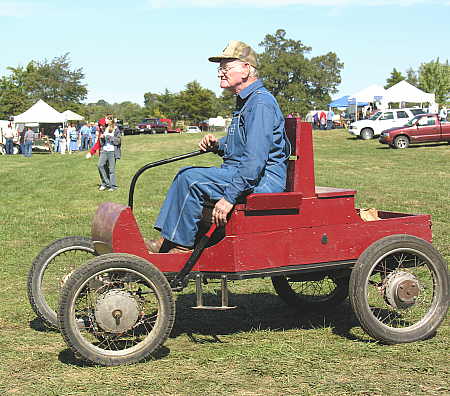
It’s funny, but every time I made it a point to prominently display my camera (I would pretend to be fiddling with the controls), somebody would take the opportunity to drive right in front of me in their unique machines, such as the gentleman in the home-built buggy, seen above.

Tractor pull weigh-in

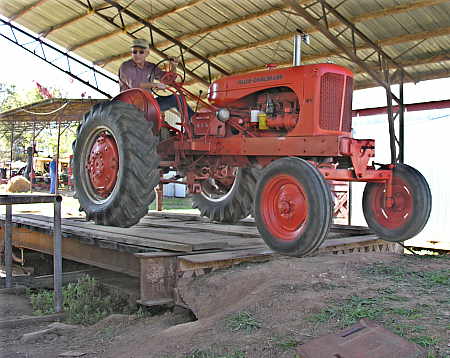
Shortly after lunch, the tractor pulling competition was scheduled to begin, so the preparatory tractor weigh-ins began about noon.  The Allis-Chalmers tractor (pictured above) has just been weighed, and is driving off the scale to await his chance to pull the sled. 

Tractor pulling the sled

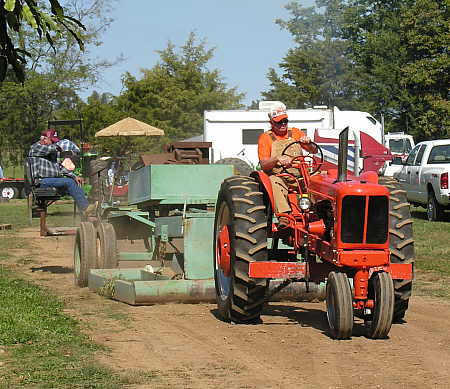
For those of you who may not be familiar with tractor pulling contests, here are the basics in a nutshell.  The tractor is hitched up to a device called a sled, the green piece of machinery shown in the picture above.  The sled is engineered with the wheels and axle acting as a fulcrum point, in such a way that the load borne by the tractor increases the further along the track it travels.  Eventually, even the most powerful tractor will come to a standstill.  The tractor that pulls the sled the furthest is declared the winner, and everyone rejoices afterwards!

But tractor pulling is not limited to conventional farm tractors.  Massive, high budget jet-propelled or diesel-propelled tractors compete in larger venues, but here in a more moderate income area, the souped-up tractor of choice for pulling competitions are the lawn tractor, as shown below.

Competition lawn tractor

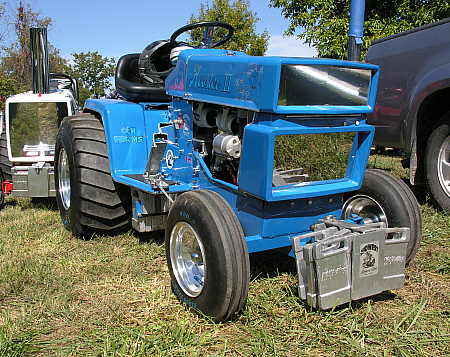
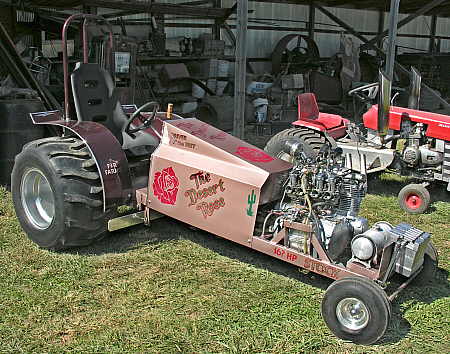
Not the ordinary lawn tractor you would expect to purchase at the local big-box store, but super-duper, highly modified and detailed custom jobs, especially built for these pulling competitions.  Some are so highly modified that they resemble a Top Fuel dragster more than a lawn tractor, as you can see in the following photo.

Highly modified lawn tractor

This is a motor sport that you can be competitive in at the top levels without having to budget hundreds of thousands, or even millions of dollars.

Why work when there's other stuff to do?

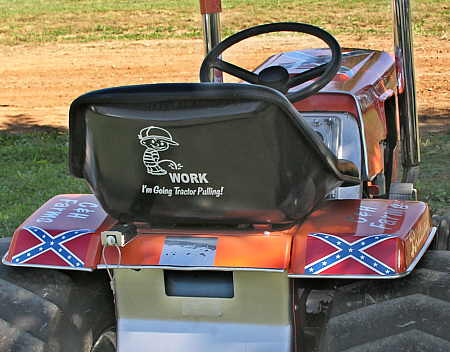
And as you can see above, the participants are generally equipped with an active sense of humor.

Heavy iron in operating condition

The variety of engine types represented at the show was vast, including this operational steam locomotive.  The engine only travels about 60-70 feet before it reaches the end of the track and has to back up, but it provides enough distance to show off the operational capabilities of the locomotive.

Light iron in operation

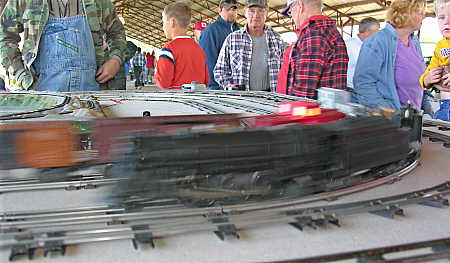
Not to be outdone by larger equipment, the tabletop engineers also had their trains running up and down the tracks.

Small antique engine

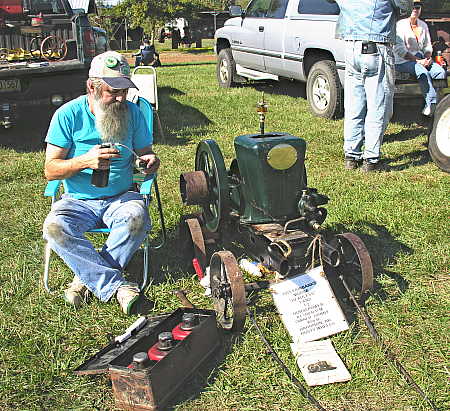
This fellow made it his goal to keep this antique engine running the entire duration of the day, so everybody who walked by could see it running.  He was on the road to success in this quest, but it was no easy task.  He was constantly fiddling with the engine to keep it chugging along, but then what else would you expect from a 1915 Fairbanks Morse 1.5 hp engine? 

Brand new model engine

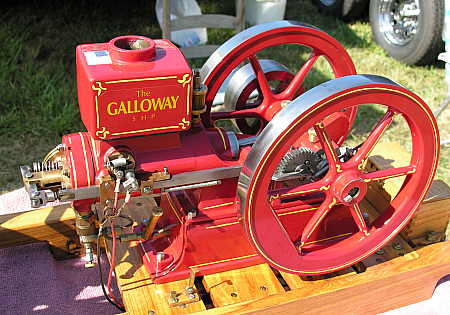
There were many variations of operational small engine replicas on display and for sale, one of which is shown in the picture above.  This kit is manufactured and marketed by a gentleman who lives in the neighborhood, using only a 7″ lathe and small milling machine for the production of his kits.

Anybody need something cut?

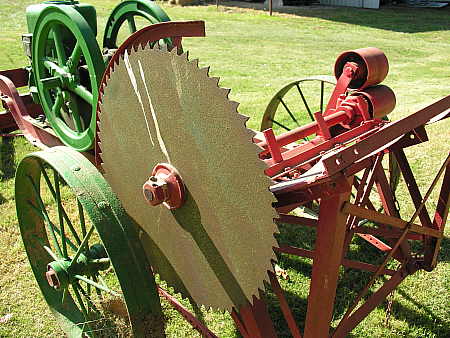
Various old saw and sawmill equipment was displayed at the Rusty Wheels Old Engine show, such as the tow-able cut-off saw seen above

Operational lumber saw mill

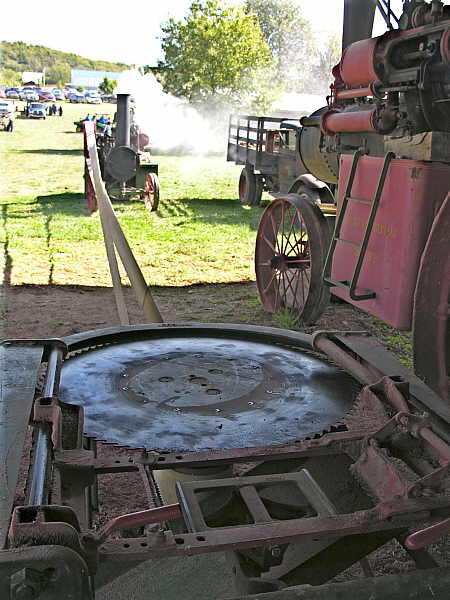
This horizontal saw is powered by the steam engine located a distance outside the shed.  The engine powers the saw via a long belt and pulley system, which you can see in the picture above.  There is a large distance separating the engine from the saw for several reasons.  This arrangement affords room for long lengths of lumber to be cut, keeps the saw operators out of the smoke and noise from the engine, and protects them from harm should some type of pressure failure occur in the steam engine.

Engine to power the saw

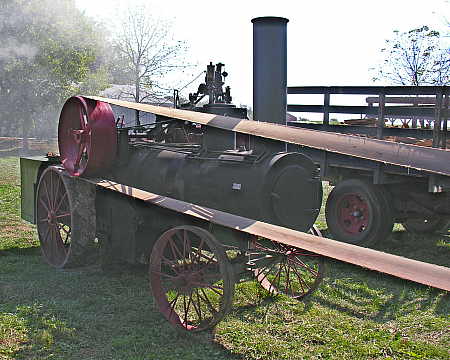
But the most important reason for the distance is to create the grip necessary for the belt to power the saw.  The sagging weight of the long belt causes it to exert tremendous pressure onto the surface of the pulleys, thereby reducing slippage to a minimum.  Additionally, since the seam that is used to join the two ends of the belt is prone to damage, the extreme length allowed the ends to be trimmed and re-spliced as necessary.  The engine would just have to be moved a little closer to the equipment, and all would be operational once again.

Cord braiding machine

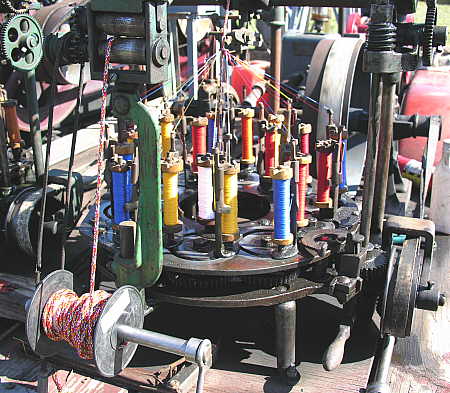
Various old industrial equipment was on display, and most had been restored to operating condition, with ongoing demonstrations of the machinery in action.  The photograph above shows a cord braiding machine.  This machine kept chugging along all day, weaving the brightly colored threads above into the cordage you see spooling onto the reel, seen at the lower left of the photograph above.

I could go on with hundreds of additional photographs, but instead I invite you to see for yourself at the next Rusty Wheels Old Engine show, which comes up again this spring.  It is well worth the time, and adult admission is free, children and seniors free-er, of course!

The website for the Rusty Wheels Old Engine Club is www.rustywheels.com.

UPDATE:

 Spring 2011 Show -  June 10th and 11th, 2011

 Fall 2011 Show -  October 7th and 8th, 2011      

There’s Gold In Them Thar Hills!

Well, maybe not gold, but possibly there might be silver.  And why do I think that there might be silver in the hillock that we so pretentiously call “our mountain?”  Because I know for certain that there has been lead ore extracted from this area in the past, and I just learned recently on the Discovery Channel that silver strikes may occur in proximity to lead ore veins.

Here is a brief history of lead mining in the general area.  The most prominent and successful mining operation in the area was under the auspices of the New York Zinc and Lead Company, which operated the Bear Hill Mining Property at George’s Creek in Bear Hill Hollow in the late 1800’s, however the mining of lead was first noted to occur in 1818.  During the civil war, there were three lead ore smelters operating in a nearby township (which is now at the bottom of Bull Shoals Lake).  The lead ore from this area was used primarily for bullets, which the area supplied to both the Union and Confederate armies throughout the Civil War.  My neighbor’s ancestors conducted a very successful business at the time of the Civil War, called the Markle Cannon Foundry.  They utilized the “Gillette Razor” methodology of doing business (sell the razor cheap, and profit from over-priced blade refills).  This company donated cannons to both combatant armies during the civil war, and then profited handsomely by provisioning the armies with expensive cannon balls, which were produced, in part, with lead mined locally.

Lead mining occurred on and off during the ensuing years, but became active with the onset of WWI, and later, WWII.  The last known commercial lead mining in the area ceased operations in 1959.

In reviewing the Abstract of Title which we obtained as a result of our purchase of the property, we have found five instances of mining leases that were granted to mining concerns by the various owners of this land, spanning the period from the early-1800’s to the mid-1960’s.  I have not been able to determine how much ore was extracted from this site, nor how long the mining was active, but I do know it occurred on this property.

Topo of

This is a topographic view of a part of “our mountain.”  You may recall the panoramic view from the mountain top, which is seen in the upper right part of the map above.  In the upper left side of the map, notice the red line I have drawn.  This line represents a ravine that cuts it’s way down one part of the slope, where lead ore has been extracted in the past.  Today’s post will show what the upper portion of this ravine (and past mining locale) looks like.  At the lower part of the red line, you can see the crossed pick-ax symbol that the USGS used to indicate the presence of a mining operation at the time the area was mapped.  We will explore the lower portion of the ravine in a future post, when more leaves have fallen and the area becomes more conducive to photography.

Looking up the ravine

This picture was taken at about the midway point of the mining area, looking up the ravine.  Notice the rock outcroppings on the right.  This is the result of the ore extraction process that occurred here.

Revetment pond

This photograph shows a dry pond site at the top of the ravine, denoted on the topographic map as a red O.  It was my initial belief, upon first seeing the dry pond, that it was an unsuccessful stock tank for cattle that at one time grazed a large, crescent-shaped pasture midway up the mountain.  I have now come to believe that it was constructed to be a revetment, or containment pond, to prevent a deluge of water from cascading down the ravine during the thunderstorms that sometimes manage to avoid bypassing our property.

Excellent critter habitat

The erosion that has occurred in the exposed rock outcroppings has created small caverns at the base of the rocks.  Although there was nothing in this hole at the time of this photograph, I am sure that it has been a shelter for some critters from time to time.

Ravine wall

This is another rocky ledge in the upper ravine area that has been created by the mining activities of the past.  One day, I would like to accompany someone trained in geology through this area, so that I can learn to understand what I am seeing in these outcroppings more fully.

Tenuous footing

This oak (?) tree appears to be growing directly out of the rock.  I find it interesting to see how it grows horizontally, and then makes an abrupt 90 degree turn, again reaching for the sky.

So now you have seen the upper part of the ravine where lead ore extraction has occurred on this property.  This might be the exact spot where I soon discover the “Mother Lode” silver ore vein on our land.  If I do, I’ll keep you all posted.  And then again, maybe not.  But that’s how legends are born.

Bois D’arc

Bois D'arc

This is a tree with various names.  Some refer to it as the bois d’arc (pronounced “bodark”), which is french for “bow wood.”  It is also referred to as an Osage orange tree, hedge apple tree, and horse apple tree.  All of these monikers have a basis in the properties of the tree, as we shall see in the following paragraphs.  Some people dislike these trees, while others adore them, depending upon their perspectives.

Trunk of bois d'arc

The picture above is a trunk of a bois d’arc tree.  The wood of this tree is extremely hard and tough, which makes it a sought after tree for cutting into fence posts.  But if you intend to cut one of these trees, you had better arm yourself with plenty of sharp chains on your chainsaw, as the tough, yellowish wood of the bois d’arc will dull the chain rapidly.  It is also advisable to wear long sleeves made of thick fabric, as the spines on the branches can cause painful lacerations if you are not careful.

Tangled branches of the bois d'arc

The canopy of the bois d’arc forms a tangled mass of branches, which are armed with stout, flesh-piercing barbs.  Because of the dense mass of resilient, barbed and tough wood that the tree produces, it was planted with tight spacing as a hedge row in times prior to the invention of barbed wire.  It is referred to as being “horse high, bull strong, and hog tight,” an ideal specification for a farmstead hedge row.  Because of the toughness and decay resistance of the wood, combined with the long, straight, resilient branches that this tree produces, it was prized as a source of wood in which to construct bows in the past, hence it’s name bois d’arc tree, or bow wood tree.

Bois d'arc fruit

This is the fruit produced by the bois d’arc.  Some call this the Osage orange, possibly because the skin emits a citrus-like scent when it begins to rot.  Because the trees were often grown as a hedge, the fruit has been called a “hedge apple” by some.  Because the fruit is consumed by horses, it is termed a “horse apple” by others.  Osage orange, hedge apple, or horse apple, it remains that humans do not consume this fruit.  But, as just mentioned, horses eat the fruit of the bois d’arc tree, as well as squirrels and cattle.

Inside of fruit

If you slice the fruit in half, which requires a stout knife, as the fruit is quit hard until it begins to rot, you will find that after a minute or two the fruit begins to “weep”, as you can see in the photograph above.  Only the female tree produces the fruit, which propagates the tree through the germination of the approximately 200 seeds contained within the fruit.  In the fall, the fruit begins to drop from the limbs of the tree, and when they do, watch out, as it hurts to be struck by the falling, heavy, hard fruit of the Osage orange, or bois d’arc tree.

Hoping To Top His Previous Record Harvest

In my post of a couple of days ago entitled It’s Fall And They’re Fallin’, I showed how an amateur (myself) goes about collecting fallen black walnuts from his lawn.  Today I will introduce you to a friend of ours, Jasper, whom you may recall from a previous post entitled Bee Hunting In The Ozarks, is an experienced bee keeper, as well as the regions most skilled practitioner of the vanishing art of “coursing” bees.

My friend Jasper 

  I would say without hesitation that Jasper (Jay) is an old pro at gathering black walnuts.  He is consistently this area’s top seller to Hammons Nut Products, who purchase black walnuts from local gatherers in 12-16 states each fall.  Jasper begins his nut gathering each year just prior to the opening of the Hammons collection stations, which, this year, will occur tomorrow.

Coaxing more nuts to fall 

The first step in the gathering process for this seasoned harvester is to shake the lower limbs of the trees, so that the loose nuts that remain attached to these limbs will fall to the ground.  The pole that Jay is using has a hook at the end, which Jay drapes over a limb and then tugs a few times.  As you can see from the photograph above, Jay wears a hard-hat while performing this task.  If you have even been hit in the head by a large, unhulled walnut that has fallen from the top of the tree, you will immediately understand the precaution that Jasper takes – it hurts!

Ready for gathering 

The photograph above shows the effectiveness of shaking the limbs.  Now, one only has to pick up the nuts and load them into the truck.  On Jay’s next visit to pick up nuts, he will bring an extension for his pole, which will allow it to reach limbs 20 feet higher than the lower limbs of today’s harvest. 

Gathering fallen walnuts

In last Friday’s post, you may remember this photograph, which shows me using an interesting tool designed to make the nut gathering process easier to accomplish.  I love this tool.  Two years ago, I showed it to Jasper and asked if he would like to try it out.  “Sure would,” he replied.  About an hour later, when I looked across a pasture to see how Jay was coming along, I noticed that he wasn’t using the tool I had lent him.  When I inquired later as to why he had abandoned the tool, looked at me and replied “It just slows me down.”

A pro at work!

And this is how Jasper prefers to gather the fallen walnuts – by hand, the old-fashioned way.  But that is how the pros do it.  Keep this photograph in mind as I take this opportunity to become a little bit analytical.

The record that the title of this post refers to is the personal annual total amount of nuts gathered by Jasper, which stands at over 17,000 pounds of hulled black walnuts, a record he achieved 2 years ago.  Jasper thinks he may top that amount this year, based upon the trees he has examined to date.  Now for some simple math.  Recall from It’s Fall And They’re Fallin’, that we derived the average weight of a small sample of black walnuts that I gathered the other day:  .0712 pounds/nut, or about 14 nuts per pound.

Jasper tells me, based upon his experiments, that a hulled walnut weighs about 60% less than it’s unhulled weight.  I have not confirmed this, but taking him at his word, we can derive the following.  To end up with 17,000 pounds of hulled walnuts, one has to start with 28,333 pounds of unhulled nuts (17,000#/.60).  If we take my calculation of 14 unhulled nuts per pound as accurate, then Jasper would have had to pick up a total of 396,666 nuts to arrive at 17,000 pounds of hulled walnuts.

When Jasper achieved this personal record two years ago, Hammons was paying $10.00/cwt for hulled walnuts.  So Jasper’s gross revenue from his efforts was $1700.  Considering the fuel expense involved in multiple trips to the collection station (about 25 miles distant), as well as multiple trips to many area farms, the net revenue does not amount to all that much income – especially when one imagines the amount of labor involved in hand gathering nearly 400,000 nuts!

By the way, Jasper will celebrate his 83rd birthday in two weeks.  Happy birthday, Jay, and we wish you many more to come!

Determination

See anything unusual here?

Look closely at the passenger seat on our utility vehicle.  Do you see anything unusual in this picture?


Don’t give up – keep looking!


 Still haven’t spotted anything out of the ordinary?


Scroll down, and I’ll show you what I can plainly see (in person, of course).


Lookee what we’ve got here:

How do I mow this?

I’ve heard of not letting grass grow under you feet, but how about not letting it grow under your seat?

But the real question is – how am I going to mow this?

It’s Fall And They’re Fallin’

Black walnuts in tree

As you may recall from a previous post entitled Black Walnuts On My Mind, we have from 200-300 black walnut trees on our property, out of which I have located and mapped 94 individual trees that are prolific nut producers this season.  Eventually, the time comes for the nuts to fall from the protective limbs of the walnut trees onto the ground below – that time has now come, as you can see from the following photograph.

Black walnuts on ground

Of the 94 productive trees, 7 are located in the yard surrounding our house, which, for aesthetic reasons, I like to maintain as mowed lawn.  The walnuts that fall from trees in our pastures and fields remain where they lie, until our friend Jasper comes to gather them (which will probably be in the next two weeks, and the subject of a future post).  But the nuts that fall upon my lawn get gathered soon after they fall from the tree, for two reasons.  As you can see in the photo above, the walnuts can easily cause twisted or sprained ankles for the unwary person traversing the lawn, so for safety reasons I like to remove them quickly.

Decaying walnuts

As you can see in the photo above, the walnuts begin their decomposition soon after hitting the ground, and the black, tar-like substance that emanates from within the husk will kill the grasses that lie beneath the rotting nut if it is allowed to remain on the ground.  If this happened with only a few nuts, it would not be a problem, but with thousands of nuts falling from each tree, the lawn would soon disappear beneath the trees if the nuts were not rapidly removed after falling.

Walnut picker-upper

What you see here is a tool for picking up walnuts (and other types of nuts, as well) that Retta was kind enough to purchase for me from a farm store she was visiting in Ozark, Missouri a couple of years ago.  Each and every time I use this tool, I am grateful to her for having had the foresight to buy it, as it has eliminated the back-wrenching stooping that I used to go through in order to pick up the walnuts that were befouling my cherished lawn.

Gathering fallen walnuts

Here, you can see how simple this tool is to use – simply roll it along the ground where the nuts have landed, and like magic, the nuts end up trapped inside.  Soon, the tool will fill with nuts, as seen below, but it is quick and easy to empty the nuts into a suitable container and continue with the task at hand.

Nut gathering tool filled with walnuts

Each morning, after gathering the nuts that have fallen the previous day, I dump them into a pile, where they will remain until either;  A) Jasper picks them up, or B) “my” squirrels gather and bury them for their winter sustenance.

Pile of walnuts awaiting Jasper's arrival

The picture above is the pile of nuts that had fallen in one single day from these seven trees in my yard.  I will gather these nuts on a daily basis until the trees are barren and enter their winter slumber, saving their strength for the crop that they will surely produce next summer.

Variable size of walnuts

It is hard to say with any degree of certainty how much an un-hulled black walnut weighs.  As you can see in the photograph above, the size of the nuts that fell from the same tree are quite variable.  To try to ascertain an average weight of the un-hulled nuts, I filled a five gallon bucket with walnuts, as seen below.

Guess how many walnuts are in this 5 gallon bucket

After filling the bucket, I weighed it on our bathroom scale, and determined the net weight to be 24 pounds.  A manual count indicated that there were 337 nuts in the bucket.  Therefore, simple arithmetic yielded an average weight of .0712 pounds/nut, or about 14 nuts per pound.  Remember these figures, for they will be used in an analysis of Jasper’s labors in a post that will appear here in the near future.

Feeder Maintenance Time – Part III

Regular readers of this blog, after perusing the title of this post, might conclude that I have a wildlife feeder fixation.  These readers would be correct – I do have a dogged determination to keep my wildlife feeders reliably operating at all times.  There is something very gratifying to me in seeing turkey or deer from my window on a regular basis, which is why I go through all of the fuss and bother keeping the feeders operating properly.  And fuss and bother it is, indeed.  The feeders that I have used all seem to have a common trait – they are built cheaply and lack any semblance of durability. Perhaps this is because feeders are mostly used by hunters for only brief periods of time each season, and therefore manufactures don’t feel the need to produce a high-quality product,  or perhaps it is because I have just not stumbled upon the right manufacturer yet.  In any case, I will probably end up having to write many posts about my episodes in keeping the feeders running.  It just might be the nature of the beast, as they say.

The first post was on my experiences with battery life and solar charging.  The second post was on the topic of general feeder maintenance.  You might recognize the following photograph from the general feeder maintenance post-

Changing the battery

This was the type of feeder timer/motor unit that I had been using in one of the feeder stations.  There were several things I did not like about this device.  Changing the battery was a task that required three hands, an abundance of dexterity, and a little bit of luck to accomplish.   When the battery was changed, the timer unit would have to be reprogrammed with start times and feeding durations for each of the feeding times you desired to set in a day, and the current time would have to be reset as well.  Setting all of these parameters was a tedious chore, due to the design of the user interface.  A major annoyance was the lack of a “test” button.  As the battery weakened, there was sufficient power to run the programming circuit, but insufficient energy left to spin the motor.  Without a test button, there was no way to determine the condition of the battery.  But the worst problem with this unit was it’s lack of durability.

Broken spinner plate assembly

The photograph above shows a broken spinner plate.  I had replaced the spinner plate on this unit once already, and the fact that the replacement spinner also broke is testament to the inferior quality of this feeder unit.  With all of it’s other shortcomings, I decided to replace it with a different brand this time around.

Emptying the barrel of corn

Before I could install the timer/motor unit on the feeder barrel, I had to empty the contents of the feeder onto the ground.  After removing the old unit, I drilled new holes into the barrel using the template provided with the new feeder unit, and then bolted the new timer/motor assembly onto the barrel. 

Timer/motor unit housing

This is the new housing for the timer/motor unit.  Unlike the previous unit, which was constructed primarily of plastic parts, this unit is built with powder-coated steel, and feels much more sturdy than the one it replaces.  Also unlike the old unit, this one is designed in a manner that makes battery replacement a quick, simple affair.  There is ample room inside for the battery, motor and controller module, and the housing is weather-proof.  The spinner plate, hub and motor shaft are constructed from heavier material than the previous unit was.

Feeder controller module

The controller module shown in the photograph above has several features that I like.  First, it is encased in it’s own weather-proof housing, providing a redundancy of moisture protection.  Second, the duration of each feed dispensing cycle can easily be adjusted by turning the dial on the upper right.  There is a test button located at the upper left.  Unlike the old unit, this one does not require re-programming each time you change the battery.  The cycle duration is controlled by the duration dial, and the feed dispensing times are set by placing the pegs (stored along the two sides) into the circular dial at the desired feeding hours.  The entire unit is protected by an in-line fuse, so that a jammed spinner plate (from debris in the feed) will not burn out the motor.

Access door for internal components

There is one other feature of this new feeder unit that I like.  On the old feeder, access was through a plate located on the underside of the unit.  Entry required the use of a screwdriver, and the four tiny screws always seemed to end up on the ground, especially during the cold winter months, when one’s fingers aren’t the most nimble of tools to work with.  If you look at the picture above, you will see that the access door of the new feeder is in the front, and is secured with one large thumb screw.  The thumb screw is attached to the housing with a ball-chain, so that it cannot fall to the ground if it is dropped.

I am hoping that this new timer/motor unit will help to alleviate some of the problems I have been experiencing in my quest for the “perfect” wildlife feeder.  As you may have guessed, I’ll keep you posted.

Surprises In The Clearing

Plenty of reseeding going on here

When you see the grill on the tractor looking like this, you’ll know that I’ve been bush-hogging a field with chest-high growth.  What you see is a variety of seeds that are knocked off the seed head of the plants as the tractor passes over them.  The suction created by the diesel engine’s cooling fan causes some of the seeds to cling to the grill, which requires me to stop and brush the grill clean every once in a while to keep the engine operating at it’s proper temperature.

Now that the fall season is nearly upon us, it is time for me to begin cutting some of the clearings on our land.  I’m not really sure that “clearing” is the correct terminology to use to describe these areas.  We have hay fields used in the regular production of hay, which I believe I correctly refer to as “fields.”  We also have a series of grazing pastures for our horses, which are correctly referred to as “pastures.”  In addition, we also have many areas that were formerly cattle grazing pastures, which I have regularly cut for the past five years, but have not been grazed by domestic livestock for the past decade.  I suppose some might refer to these areas as meadows, but I usually associate the term meadow with a former wetland that has filled in over time to become a meadow, prior to it’s continued evolution into forested land as trees successfully invade the grasses of the one-time meadow.  So the most descriptive term I have been able to come up with for these former pastures is the term “clearing.”

Now that you understand my nomenclature, I can describe the type of cutting schedules that I have created.  There is one set of considerations that determine the cutting schedule for the hay fields, which are described in the previous post entitled Fescue To The Rescue.  The horse pastures have an entirely different set of considerations, which will be the subject of a future post.  The clearings have their own unique set of considerations also, base upon the use priorities we have established for our land.

The two top priorities we have set for our land usage are family recreation and wildlife preservation.  Sometimes these two priorities are in harmony with each other, and sometimes they are in conflict.  The clearings represent an area where the two priorities may conflict.  The wildlife thrive in areas of long grasses.  Deer use the long vegetation for both browsing and for cover.  Ground birds and fowl will nest in the long grasses, and the insects that are ever present in the growth are tempting morsels for a host of creatures.  On the other hand, when we humans take our dogs hiking on our land, we enjoy the ease of travel, the (relative) freedom from massive insect attacks, and the aesthetics of a freshly cut clearing.  It is also nice to be able to see some of the more nasty varieties of snakes as you walk, without having to step on them to discover their presence! 

In an attempt to strike a reasonable balance between the sometimes conflicting uses of our land, we have decided to let some clearings grow for a year at a time, for the benefit of the wildlife.  I keep the remainder of the clearings cut for our recreational purposes.  I schedule the bush-hogging so that each individual clearing is rotated into, and then out of the cutting schedule on a regular basis, which helps to control the emergence of undesirable brush in all of the clearings, be they long or short.

Yesterday morning I took the tractor (as you see above) and cut one of our clearings.  About two hours into the bush-hogging activities, I was startled to see not one large buck, not two large bucks, and not three large bucks, but FOUR large bucks emerge from the edge of the woods surrounding this particular clearing.  I was surprised on two counts.  When I see a deer while on the tractor, it is usually on the far side of a clearing, field or pasture, and it usually flees immediately upon seeing me approach.  These deer emerged very close to where I was bush-hogging, and instead of immediately bounding off back into the woods, they stood their ground and examined me closely as I guided the tractor along.  The second reason I was surprised is that when I see a large buck, it is usually a solitary animal.  These four large bucks all arrived together, and when they departed, they all ambled off in the same direction together.  It was a very nice sighting, I’m just sorry that I don’t keep a camera on the tractor with me as I work.

It was such a fine, clear day out yesterday that after my tractor work, I decided to go up to the top of the mountain to try my hand at panoramic photography (see yesterday’s post).  After taking the series of photographs that I needed for the panorama shot, and then enjoying the view for a while, I decided to return to the clearing I had just finished cutting to snap a few photos for a possible blog post for today.  As I approached the clearing, through some brush I was able to make out the form of what I thought was a coyote nosing around in the freshly cut field, probably looking for displaced rodents, or rabbits, or whatever to snack on.

With camera in hand, I mustered up all of the stealth that I could, and approached my photographic target.  There he was, at the far edge of the clearing.  Knowing that I would probably get only one chance for a decent shot, I slowly drew the camera up into viewing position, and snapped the following photo. 

Stalking the coyote

He raised his head and spotted me, turned, and trotted off into the protective cover of the nearby woods.  I shot another picture, and …DARN, DARN, DOUBLE DARN …. I saw that the camera was still set up for the low-resolution panoramic photos that I had just finished taking on the mountain top!  Oh well, the pictures aren’t as good as I would have liked, especially since I don’t see coyotes during the day too often, and particularly when I have a camera in hand, but they at least prove that I wasn’t imagining things.

He's on to me!

Anyhow, when I was finished cutting the clearing, it looked nice and neat, as shown in the following photograph.  This clearing will now stay short for the next year, while an adjacent clearing will be allowed to stay uncut during this same time period.

The clearing

On the edge of this clearing is a rocky section that all of the previous landowners (myself included) had bush-hogged in the past.  After ruining several sets of rotary cutter blades, I decided that this was a fool’s errand, and so I have left this portion to grow over with brush, as seen below.

Letting go of the difficult spots

Although I tried to be careful about leaving all of the rocky area uncut, I missed a couple of spots, which could cause equipment damage in the future.  The following photo is of one of the emerging rocks that I missed.

Rocky encounters

I will probably place marker stakes at these rocky spots this winter, so that when I cut this clearing next time, I will avoid these areas.

Another surprise

One last surprise was the discovery of a small cactus patch growing in this clearing.  I have seen this occur in a couple of other clearings and pastures, but never in this one.  Maybe I wasn’t sufficiently observant in the past, or maybe this has recently spread to this part of the property.  Who knows?  But I do know this – yesterday was a fun day!

Â