Black Walnuts On My Mind

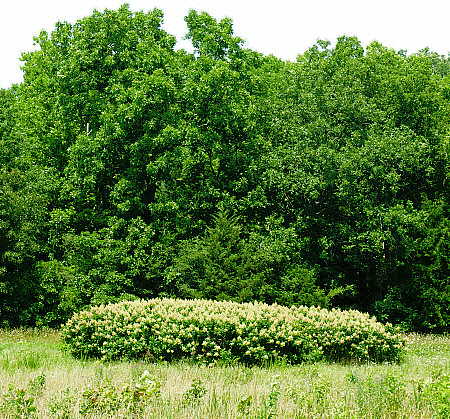
Here it is, Labor Day weekend in the Ozarks, and this morning I am found to be doing the very thing one would expect an Ozarker to be doing on a holiday weekend – surveying trees.  Not just any trees, but Black Walnut trees, which thrive in this part of the Ozarks.  The Black Walnut produces a nut that is used in cooking, and the shell and hull of the Black Walnut have commercial uses as well.  Every fall, Hammons Products Company sets up 250 collection stations across 12 states, where the Black Walnuts are purchased from the local collectors.  The following photograph shows a Black Walnut tree as it appeared in early August.

Black Walnut Tree

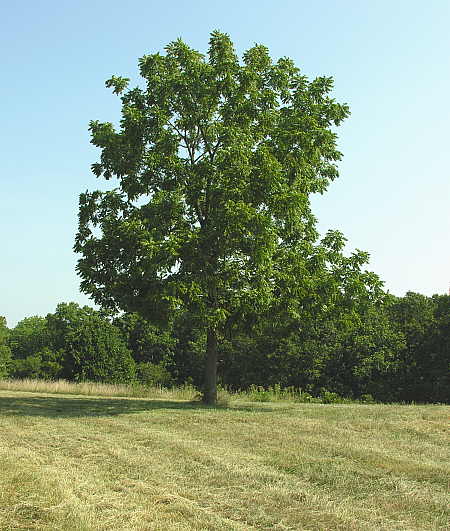
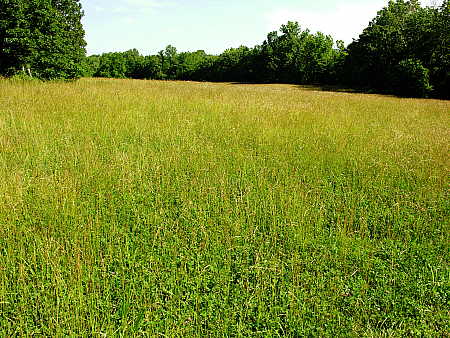
You will see from the photo above that the Black Walnut tree is not particularly distinct from a distance in the middle of summer.  They are easy to identify up close, but from far away they look much like many other trees that commonly grow here.  One of the things that I have noticed about the Black Walnut is that it is one of the last trees to leaf out in the spring, and it is the first of our local trees to drop it’s leaves at the end of summer.

The leaves are falling off the walnuts

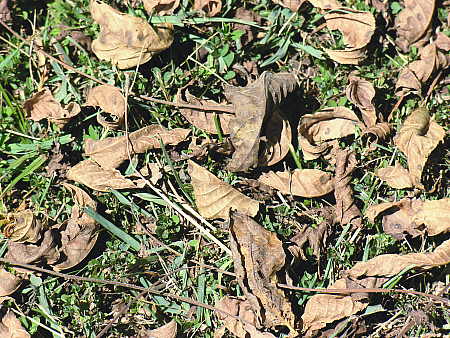
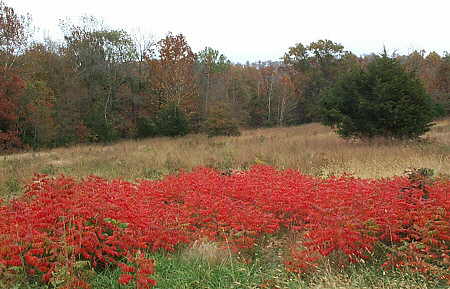
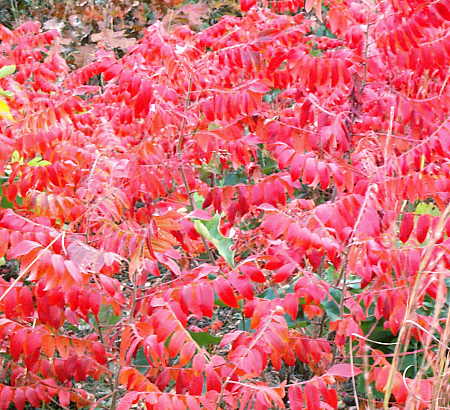
The leaves that appear on the ground in the photo above are from a Black Walnut tree.  The picture was taken this morning, September 3.  No other trees in my area are shedding leaves yet, however there is a brown carpet of leaves below the Black Walnuts.  The leaves that remain on the tree itself have now turned either yellow or lime green.  So why, you may ask, do I care so much that the leaves of the Black Walnut are the first ones to change color and drop in the fall?  Because when the Walnut trees are the only ones in the forest that exhibit this coloration, they become easy to spot from a distance.  In fact, as the following photograph shows, the Black Walnut trees stand out like a beacon in the night, they are so distinct.

Changing color of leaves

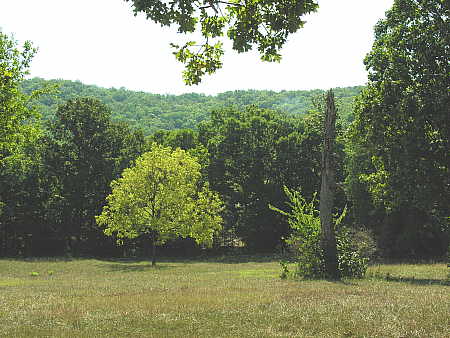
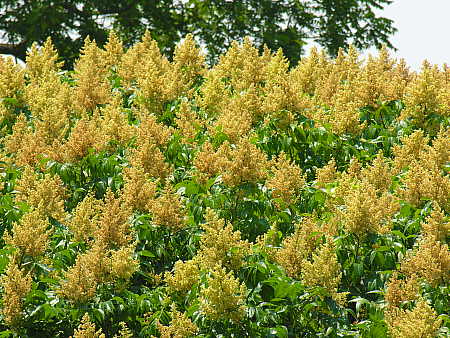
Now that the Black Walnut trees are easy for a non-botanist like myself to identify from a distance, I can proceed to make the preparations that will facilitate a successful harvest of Black Walnuts from our property.  The first step is to map all of the Walnut trees on our property that are currently bearing nuts.  Regular readers of this blog might recall a previous post entitled If They Can Do It, So Can I, in which I introduced you to my “super-duper, multi-purpose, portable cartographic data collection machine”  (SDMPPCDCM).  Using this device, I can easily drive around the property locating the Black Walnut trees that now stand out like a sore thumb, and examine each tree to see whether or not it is bearing nuts this season.  The following photograph shows a Black Walnut tree that is currently loaded with walnuts.

Loaded with black walnuts

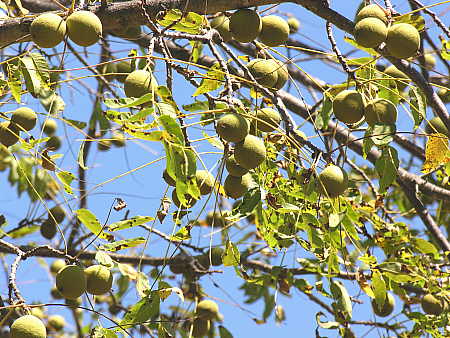
When I find a Black Walnut tree that has produced nuts, such as the tree above, I record the tree as a way-point in my GPS mapping system.  After pinpointing the coordinates of all the nut bearing trees, it is a simple matter to plot this data on a topographic map of the property.  The results are shown in the following screen capture from my mapping program.  The data layer that is selected below shows the results of this little exercise.  The location of all the nut bearing trees are clearly shown on the map (as blue way-points).

Nut bearing trees plotted on topographic map

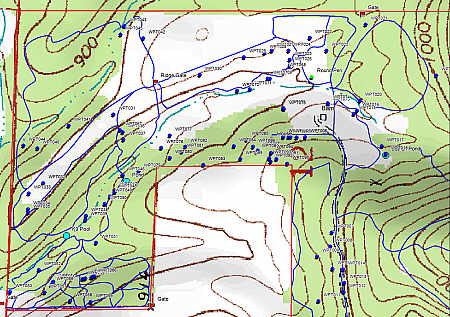
I do not know how many Black Walnut trees we have on our property.  My best estimate is between 200-300 trees.  This season I located 94 Black Walnut trees that are bearing nuts in a prolific manner. 

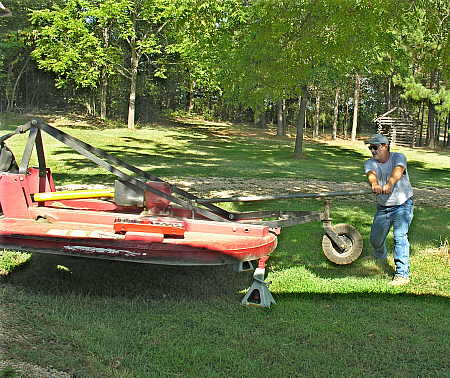
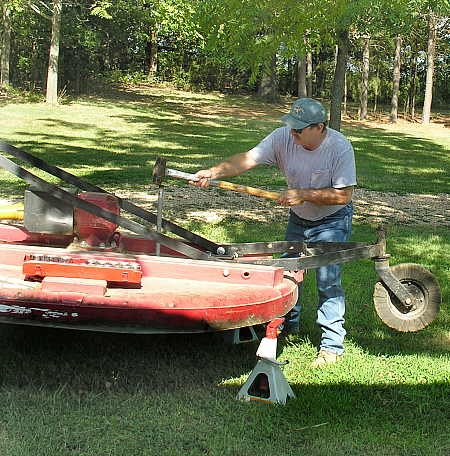
Step two of the Black Walnut harvest will be for me to get out the tractor and bush-hog the areas surrounding all of the nut bearing trees.  The goal will be to ensure easy access to the trees by Jasper Smith, my octogenarian friend who collects the Black Walnuts from our ranch each fall.  You may recognize Jasper Smith as the same friend who also keeps and courses bees as an avocation (Jasper, and photos of a “bee tree hunt” can be found here).  Jasper is an amazing man with amazing stories.  I will save my comments about him for a future post, when he comes around to gather the fallen walnuts. which will be step three of the Black Walnut harvest here.  Stand by for future posts on the subject.

What Someone Will Do For A Bite Of Barbeque

Having spent the better part of the past decade being a one car family, Retta and I decided that it was time to acquire a second vehicle, one that would be smaller and more fuel-sensible than the diesel powered uber-truck that we presently rely on for all our transportation needs.  When I read that many manufacturers were offering excellent incentives on remaining new 2006 vehicles, I investigated the offerings and settled on the vehicle in the following photograph.

The new vehicle

We selected this vehicle due to the fuel economy it offered, it’s styling and creature comforts, performance and reliability, and the fact that Ford was offering super financing (0%-APR for up to 72 months, no cash required – great terms for a cheapskate like me). 

When I checked the inventory at my local dealer, I found they were out of stock on this model.  I proceeded to check the manufacturer’s web site in order to search for this vehicle on-line.  While Retta had color preferences, we really only had 2 “must-have” options for the model we had selected; side-curtain airbags, and 4-wheel drive (a necessity for us in the winter).  Our search led us to three frustrating conclusions:

1) Because it is the end of the 2006 model year, and this is a popular vehicle, the pickings are pretty slim at the present time.

2) Side-curtain air bags are an option that dealers do not think is important to order for their stock vehicles.  Most all of the vehicles we tracked down omitted this option.  People are apparently willing to spend $1000 for a moon-roof, but not $500 for an option which just might save the life of a loved one.

3) The time-honored method of automobile marketing which revolves around the local dealership needs to be revamped to coincide with the advent of web-literate consumers. 

Picture this scenario – Ford has shed tens of thousands of jobs this year alone.  The company has stopped production of vehicles for the remainder of the year due to bloated inventories at the dealership level.  Ford Motor Credit Corporation is financing vehicles at 0% APR for up to 72 months in order to shrink inventories.

Now add to this scenario a customer who wants to buy a specific Ford model, equipped with side-curtain air bags and 4-wheel drive.  This customer is willing to buy from any dealer in the continental United States.  The customer requests from Ford (via their Personal Consultant service) a list of dealers in the United States who possess such a vehicle, so that the customer can purchase said vehicle.  Ford cannot produce such a list.  Or should I say, Ford will not provide such a list.  I know they can produce it, probably quicker than I can type this sentence.  Because Ford would not provide a list of stocking dealers, I was confronted with only one option if I wanted this vehicle – search each and every individual dealers’ websites to check their stock.  This meant searching over 5000 websites, one at a time, to find our vehicle.

I think most people would give up at this point, but not us.  Retta, having test driven the vehicle, fell in love with it, and because I have owned and loved many Ford vehicles over the years, we decided to devote the next several days to searching dealer inventories via the Internet.  I was bound and determined to buy this Ford product, despite Ford’s best efforts to keep me from it!

After a long and frustrating search, we located potential vehicles in Seattle, Washington and Raleigh North Carolina.  After several telephone calls with each dealer, we finally made a deal with the dealer in Raleigh, NC.  And thus we were to be the owners of a new vehicle, and proud supporters of the workers in Kansas City, Missouri (a state reported to exist somewhere north of Arkansas).

Buying American

Now we faced only one remaining problem – how to get the vehicle from Raleigh to our place here in the heart of the Ozarks.  After receiving quotes from several vehicle transport companies, I decided that I could fly to Raleigh and drive the new vehicle home for much less than the cost of trucking it home.

It wasn’t until I looked at the map to determine the mileage I would have to drive, that it dawned on me – I would be traveling through one of the BBQ meccas of the world, North Carolina and Tennessee.  What could possibly be better for a dyed-in-the-wool BBQ fanatic such as myself?  So, stocking my travel kit with plenty of TUMS, I mapped out all the BBQ joints along my route (182 within 5 miles of my planned route).

I will spare you all the gastronomic details, but let it be noted that I consumed, among other things, scrumptious hickory-smoked pulled pork, course-chopped pork with lots of “brownies”, pork spareribs, beef ribs, cole slaw, hush puppies, beans, stuffed jalapenos, pickled green tomatoes, and fluffy biscuits.  I had my fair share of Eastern NC style BBQ, which is pulled pork, highlighted with a tangy, mostly vinegar sauce.  I also managed to get my fill of Western NC (Lexington) style BBQ, which is also pulled pork, but the sauce tends to the more western style sweet tomato base, and the cole slaw not quite as tangy.

Not only was the food delectable along the way, but the trip allowed my to drive through some of the most beautiful countryside you can hope to see.  Driving through the Blue Ridge Mountains and the Great Smoky Mountains is a wonderfully scenic experience.  The western portion of North Carolina and the eastern portion of Tennessee consists of lush green forest, combined with rugged rock outcroppings, offering superb vistas at every turn.  It is well worth taking the drive if you have the opportunity.  And don’t forget to sample the BBQ ;)

Another Steamy Ozarks Morning Sunrise

Steamy Ozarks sunrise

Retta took this photograph at 5:41am this past Wednesday morning, after rising with the sun to let the dogs out of the house.  Having recently returned from an unexpected trip to congested southern California to pay my respects due to the passing of a dear loved one, this photo serves to remind us of the beauty that we are fortunate to wake up to each and every day.  For this, we feel truly blessed.

Equipment Maintenance Chores

Now that the Fall season is rapidly approaching, it is time to get the Bush Hog rotary cutter into shape, as there are many acres to be cut in the upcoming months.  After greasing and inspecting the various components of the rotary cutter, the most common maintenance task is to sharpen the blades of the cutter. 

Bush hog blade sharpening

During the course of cutting pastures and fields the blades of the rotary cutter will become worn and dull, primarily from impact with rocks (see previous post entitled Dang Rocks!).   You can see what a worn rotary cutter blade edge looks like in the following photograph.

Dull, rock-beaten blade

Before working underneath the rotary cutter, I would like you to take a look at the upper link assembly of the three-point hitch, which is the means of attaching the cutter to the tractor.  At the top of the link assembly you can see a bolt which acts as a pivot for the upper link arm.  This bolt is prone to breakage.  When it breaks, the entire rear portion of the rotary cutter comes crashing down to the ground.  If you happen to be underneath this rotary cutter (which weighs 1247 pounds) when this bolt snaps, it would certainly ruin your day!

Upper link of 3-point hitch

To prevent the possibility of an accident occurring when working under or around the rotary cutter, I use several heavy-duty axle stands to support the implement, as shown in the photograph below.

Heavy-duty axle stand

Once the cutter is properly braced, the next step is to remove the two blades from the flywheel.  In the next photograph you can see that the manufacturer has provided an access hole for the blade bolts at the top of the cutter.  This is a sturdy and massive 1-3/4″ bolt, which requires the use of a heavy duty socket set.

Blade pivot bolt access

In order to even begin to budge this bolt, brains must take precedence over brawn, and so you see me resort to the use of a “cheater” bar to coax the retainer bolt into submission.

Cheater bar in use

Eventually, the nut for this large retainer bolt will loosen and come off, but the bolt itself will be firmly stuck in the flywheel of the rotary cutter.  At this point, a sledge hammer and a length of galvanized pipe can usually persuade the stubborn bolt to part ways with the flywheel.

The

The photograph below gives a good indication of the size of the rotary cutter blades.  Each blade is 5/16″ thick and weighs in excess of 20 pounds.  The blade on the left is the blade that has just been removed from the cutter, and the blade on the right is a sharpened replacement blade.

Blade sections

Sharpening the blades is a simple matter of running the cutting edge along the surface of a grinding wheel, as shown below.

 Sharpening blades

While it is not necessary for the two blades on the opposing sides of the flywheel to be exactly equal in weight after sharpening, they must be reasonably close to avoid unnecessary vibration and premature wear to the rotary cutter gearbox.  To achieve this result, I use a simple self-devised method.  I hang each blade from the end of a bungee cord and measure the amount of stretch that the bungee cord undergoes.  When the cord stretches an equal distance for both blades, than I know that they are approximately the same weight.

Sharpened blade

The photograph above shows the sharp edge that is obtained from grinding the rotary cutter blades.  It is not as clean looking and smooth as a kitchen knife, to be sure, but it is now plenty sharp enough to tackle the grasses, weeds and brush in the pastures and fields scattered around our property.

Now that the blades are reasonably sharp and balanced, the only thing left to do is re-assemble the blades onto the flywheel of the rotary cutter.  This is a simple task, however it is now that you are required to venture underneath the implement to install the blades.  I always double-check the axle stands before sliding underneath the cutter, and as the photo below shows, I make it a point to coat the bolt with a good anti-seize compound before re-assembly.

Anti-sieze compound used on retaining bolt

Now that I have finished sharpening the rotary cutter blades, it’s time to fuel the tractor and go bush-hog some fields.  Adios, amigos.

Just Hanging Around Today

In a post of two days ago entitled Feeder Maintenance – Part II, the issue of back strain while loading the feeders with heavy sacks of corn was raised.  In the comments that followed that post, Tjilpi (a practicing physician who knows all about such things) pointed out that hoisting the full drum of corn up to the top of the feeder was possibly causing pressure on my spinal disks.  My joking reaction to Tjilpi was “I figure that whatever compression damage I’m doing by hefting the bags onto my shoulder is being offset by the extension damage I’m doing by pulling on the hoist.”  Tjilpi suggested that the act of pulling down on the rope was actually causing compression of the disks, rather then the extension damage that I had assumed would be occurring.

Notwithstanding the fact that he resides in the Southern Hemisphere, where even gravity sometimes behaves in an unpredictable manner, I respect Tjilpi’s learned opinion on the matter, and figured that I had better self-treat my compression damage from loading the corn feeders.  And so it is that you see me in the basement in the following photograph, defying Newton’s laws of gravity as I hang fearlessly upside-down in Retta’s inversion chair.

Hanging in an inversion chair

After spending sufficient time in the inversion chair to stretch out my spine, I figured I had better end the session before bursting a vein somewhere in my cranium, which would have really ruined my day :)

Now You See It, Now You Don’t

Fescue and clover hayfield

Perhaps you recall seeing this picture before on the Ranch Ramblins blog.  I used this photograph in a post entitled Fescue To The Rescue, which extolled the virtues and cautioned about the vices of fescue grass.  The picture was taken on June 8, 2006, and at the time of the photo this fescue/clover field, as well as several others, were in prime condition to be cut, dried and baled into large round bales for winter feeding of local cattle.

Early this past spring, I had made arrangements with a neighbor for baling this hay.  The deal was a sweetheart deal from his point of view, as I offered him all of the hay and asked nothing in return.  And what do I get out of the deal?  About 20 fewer acres of grass that I need to cut using my own time, tractor and fuel.  It was my hope to photograph the cutting, raking, drying, baling and hauling process, and to document these activities here on this blog.  Alas, the best laid plans of mice and men sometimes go awry, and thus it was with this particular endeavor.

For reasons that most likely revolved around health concerns (this neighbor has had more than his share of medical problems) and recalcitrant equipment (40+ year old tractors, sickle-bar mowers, and hay rakes), the hay field went uncut.  By the time I had realized that the neighbor wasn’t going to bale the hay, as previously arranged, it was too late to find someone with the time and equipment to bale these hay fields.

Hayfield after shredding

Last week I took the bush hog to this particular field, as you can see from the picture above.  From a selfish point of view, I should be happy that things worked out the way that they did.  Leaving the shredded fescue and clover to decompose in the field will be healthy for the grass in the long run, and the fescue was laden with seed, some of which will germinate next season as conditions warrant.  The overall result will probably be healthier hay fields than would otherwise be the case had my neighbor baled the hay.  On the other hand, with the persistent draught that has beset this region, hay prices have shot up through the roof, and I can’t help thinking that some local farmer, who might be struggling to make ends meet, would have loved to have 20 acres of fescue/clover hay for the taking.

Hopefully, next season I will have haying photographs to share with you.

Feeder Maintenance Time – Part II

If you have been a regular reader of this blog, you may recall that we utilize game feeders here at the ranch on a year round basis.  Notwithstanding the temporary feelings of angst regarding wildlife feeding (detailed in the previous post Birds Of A Feather), we have enjoyed the benefits that having feeders provides us, namely, regular visits from the local wildlife.

Having game feeders operating reliably full-time has proven to be more of a challenge than I would have previously thought.  In a previous post entitled Feeder Maintenance Time Again, I pointed out my experiences providing a reliable source of power to the feeder units.  One of today’s chores was to replace the batteries in two feeders and refill them both with deer corn, so I thought I would take you along to see what this is all about.

Tripod feeder with hoist assembly

The feeder pictured above is a tripod mounted plastic drum which utilizes a block-and-tackle hoisting mechanism.  The drum holds three bags, or 150 pounds of deer corn.

Changing the battery

In the photo above, you see the actual feeder timer and motor assembly, all housed into a neat, compact package.  The 6 volt alkaline battery that we are replacing hangs from two alligator type clips on the end of a short set of wires.  In fact, the wires are so short that it is actually quite difficult to attach the alligator clips onto the battery terminals.  After finally managing to attach the clips to the battery, it becomes a comical sight to watch me try to push the battery back up into the housing and attach the bottom cover plate with the four tiny sheet metal screws provided.  It usually takes me several tries, with frequent interruptions as I search for the small parts that invariably drop to the ground (dang gravity).   If only the people who design these things were required to actually use them in the field, this probably wouldn’t happen.

Varmint protection

In the photo above you can see the funnel tube (coming down from the drum) and the spinner plate that the corn comes to rest on.  Some of the previous feeders that we have owned were produced with plastic funnels and spinner plates.  The varmints of the area soon learned to chew through the plastic parts, thus allowing the entire contents of the drum to spill out onto the ground.  One manufacturer even has the audacity to sell replacement parts fabricated out of metal, even while selling new feeder units with the useless plastic parts.  Even with the metal parts, eventually the larger varmints manage to bend the spinners to the point that the corn is released to the ground, and the feeder unit fails to operate due to the bent spinner plate.  The solution to this problem is to surround the entire feeder assembly with a varmint-proof enclosure, as is shown in the photo above.  There are after-market enclosures for sale by various manufacturers.  It would be nice if they were included as a standard item on all complete feeder kits, but they are not.  A word to the wise – if you buy or build your own wildlife feeder, spring for an optional varmint guard.

Appetizing plastic top

In this photograph you can see that this particular feeder drum lid is held in place by a sturdy expansion hoop that is fitted with a cam-lever type closure system.  This system works great – it is quick and can be operated in all kinds of weather easily.  You can also see that the drum is made from plastic materials.  The advantage of the plastic is that it will not rust or corrode.  The obvious disadvantage to the plastic materials is that they are not resistant to the sharp, persistent teeth of varmints.  You can see in the photo above that I have had to patch up the lid with duct tape after some critter chewed its way into the drum of delectable apple flavored deer corn.  Several times.  If the people who designed feeders were compelled to actually use and maintain them, we would probably see an end to plastic drum lids.

Filling the feeder with corn

The great advantage of this tripod feeder unit is the block-and-tackle hoist system that it incorporates.  By simply lowering the drum to ground level, it is relatively easy to fill the drum to capacity with the necessary three bags of deer corn, as you can see from the photograph above.

Hoisting the drum into place

After the drum is filled, the block-and-tackle hoist system makes it a breeze to lift the corn-filled drum back into the raised position.  It is a simple, effective system for easing the job of filling feeders, which can be a back breaking task, as you shall soon see.

Stationary tripod feeder system

The type of feeder you see above is a stationary tripod style of feeder.  This feeder drum and lid are built entirely from metal and the feeder unit is enclosed in a varmint cage, so there is no possibility of varmints chewing their way into the corn supply.  Because the drum does not have to be hoisted up off the ground after filling, it can be built to accommodate a larger supply of corn.  Whereas the first feeder has a capacity of 3 bags of corn (150#), this feeder has a capacity of 4-1/2 bags of corn (225#), so the interval between fillings is longer.

Poor closure engineering

The picture above shows the pitiful lid closure mechanism that this manufacturer employed.  To remove the lid, you must first completely remove the bolt from the lid retaining hoop.  This requires the use of a screwdriver (which I store on top of the lid for convenience) to remove the bolt, whilst stretching up to reach it’s lofty height.  In the warmer months this is merely an inconvenience, but in the depths of winter, when the thermometer indicates unspeakably low temperatures, and you are trying to remove the lid while hungry deer peer out at you from the forest edge, it is a royal pain-in-the-butt.  If the people who engineered these closures were required  to operate them regularly in January, we would probably not see these in use anymore.

I have saved the very best for last.  To fill this type of tripod feeder requires the strength, height, and stamina of Shaquille O’Neal, and not the tired, worn out body of this Ramblin Rancher, as you can clearly see from the following picture.

Oh!! My aching back!!

To get the corn into the feeder requires a sort of “clean ‘n jerk” technique, as used in Olympic style weight-lifting.  First, using your knees as best as possible, the sack is snatched up off the floor in one fluid motion, while at the same time, your body comes down into position so that the 50# sack of corn comes to rest on your shoulder.  Now that the corn is held up by your shoulder, straighten your legs to full extension, and then lift the sack as high as possible over your head, hoping to aim it well enough so that the corn ends up in the drum, and not on the ground.  If all goes well, then repeat this procedure four more times, before heading for the house to rest your aching back for the balance of the day!  If the designers of wildlife feeders were required to fill feeders with corn on a regular basis, I’ll bet these types of stationary tripod feeders would disappear.  But then again, what do I know?

Oh My! Where Did It Go?

In a previous post entitled The Catfish Pond, I described one of the ponds located on this property, and discussed the problem of insufficient water clarity in that pond.  Today’s post is about another pond on the opposite side of the ranch property.  It is a spring-fed pond, so naturally we call it the “spring pond.”  Whereas the catfish pond is plagued by insufficient water clarity, the spring pond is beset by insufficient water!  This is a recent occurrence, and one which has us scratching our heads and wondering what course of action, if any, to take.  To understand our dilemma, it is necessary to present a little background information.

The spring pond is fed by a small fresh water spring that, to my knowledge, has been steadily and reliably flowing for at least the past 3 decades.  Below is a picture of the spring as it flows into the pond, which was taken April 10th of this year.

Spring outflow into spring pond

Although this is a small spring, it has provided an ample enough flow to keep the small spring pond full year round, even through the heat and dryness of our summers here in the Ozarks.  Each spring and summer, the grasses in and around the pond will grow in abundance, and each winter the grasses and other vegetation die off, amassing as a thick organic matting on the pond floor.  Over time, this organic matter had built up to the point that something needed to be done, lest the pond fill itself in and cease to exist at all.  The photograph below, also taken on April 10th, show the condition of this small pond at the time –

Spring pond on April 10th, 2006

After examining the pond in April, Retta and I decided that we would schedule a pond cleaning for the spring of 2007, which would entail the services of an excavator and a bulldozer to dredge and reshape the pond to it’s previous spring-fed glory.  In the meantime, I thought that I would introduce several grass carp (white amur) into the spring pond to see if they would help consume the excess grasses in the pond.  We have had success with this method of pond vegetation control in yet another pond on our property (see The Grassing of the Carp), and we were confident that the carp would work in this pond as well.

When the local farm store scheduled a fish stocking day in early May, I was the first in line at the stocking truck to order my 4 grass carp.  Returning to the ranch, I followed the recommended procedures for introducing and acclimating the carp into the spring-fed pond, and proceeded to forget about them for the time being.  On July 2, roughly two months after introducing the carp into the pond, I decided it was time to check the progress of my experiment.  Returning to the pond on July 2, this is what I found –

Spring pond on July 2, 2006

You can see in the photo above that the carp were doing their job, slowly but surely.  In previous years, by July the grasses would have completely covered the entire pond surface, and so it was evident that the carp were making a big difference in the vegetative mass in the pond.  Satisfied with the progress that the carp were making, I again put this pond out of my mind, and proceeded on with other tasks at hand.

It has been a little over a month since I last inspected the spring pond, so this morning (August 6) I thought it would be a good idea to mosey on over and see what was happening over there.  The first sign that something was amiss is shown in the following photo –

Dried up water hole

This creek bed is just below the outflow from the spring pond.  It has been a reliable watering hole for the animals, as it has always been supplied with a fresh supply of water from the spring pond.  As you (and George) can see, it is now bone-dry, as dry as dry can be.

Fearing the worst, I continued on over to the spring pond, and as you can infer from the following photo, I was not happy with what I saw.  From the same vantage point as the previous photographs, you can see that the spring pond has shrunk to a fraction of it’s former size, and the spring itself can no longer replace water lost to evaporation.

Spring pond August 8, 2006

For what it’s worth, the carp still seem to be doing their job, as the following photograph shows that the remaining small amount of water left in the pond is clear of vegetation.

Small amount of water remains in the pond on August 6, 2006

But I am doubtful that the pond will contain any water at all come September, unless something radical changes in the interim.  The following photo shows the diminished flow coming from the spring, which can be compared to the very first photo in this post, which was taken this past April.

Spring outflow into pond as of August 6, 2006

So now Retta and I face the dilemma – what to do with this pond?  We had originally intended on hiring heavy equipment to visit our property for the purpose of cleaning out the pond.  But if the spring itself is drying out, we will probably be wasting our time and limited resources undertaking this project.  Is this spring experiencing a reduced water flow that is just a temporary aberration, or are we feeling some of the effects of global and regional temperature changes that are here to stay?  Inquiring minds want to know!

Beating The Heat

Gracie and George go for a swim

The weather has been very hot in the Ozarks and across most of the country for the past few days.  The weather map shows two domes of high-pressure, super heated air that has caused stifling heat, reminding us that summer is here in full force.

When the temperature soars to triple digits, and the relative humidity hovers in the 50%-60% range, it can feel like a steam bath.  When the heat of the day threatens to cook all who venture forth outdoors, follow the animals, for they seem to have an instinctive sense of where and how to cool off.

Landscaping, My Way – Installment #1

 Introduction

This is to be the first in a continuing series of posts in which I will attempt to portray the method by which I undertake landscaping projects here at the ranch.  Before you can appreciate my style of landscaping, I must lay a little background.  I know very little about the flora that surrounds me, and even less about the science of horticulture.  I must further confess to having a near complete mental block when it comes to memorizing plant names and details of their existence.  I have never understood why I can retain trivial facts for years and even decades, and yet, anything having to do with plants seems to evaporate from the nooks and crannies of my brain nearly immediately.  I can recall the exact computer assembly language coding for the Fibonacci series that I learned in 1970, but I need to look up the names of common plants nearly every season!

Here is another piece of background information that influences my style of landscaping.  I do not plant any plants, shrubs, or trees.  With 330 acres to tend to around here, I find that there is a perpetual amount of work to be done just to maintain the neat appearance of the grounds that we enjoy so much.  It might be different if I were able to always keep up with my maintenance schedule, but invariably, I find that I am usually playing catch up with necessary chores.  When trying to keep the ever-encroaching wilderness at bay, the last thing I want to undertake is digging holes, transplanting, watering, fertilizing and fencing in additional species of plants or trees.  To my way of thinking, on this much land, mother nature has provided a sufficient variety of species.  All I need to do is simply appreciate it.

So, having said all of this, what exactly is my style of landscaping?  It is merely my feeble attempt to encourage the growth of species that I enjoy, while discouraging the growth of species that I dislike, for whatever reasons.  To illustrate the point that I am trying to convey, the first installment in this series portrays one encounter with a plant that inhabits this property.  As additional installments of this series of posts appear on this blog, I think you will see a pattern developing – this pattern is what I am calling “Landscaping, My Way.”

Dwarf Sumac

Dwarf Sumac in fall

In the fall of the first season that we lived on this property, there was a good amount of remedial and catch-up field work to be done.  Some fields and pastures had been allowed to grow wild for many seasons, and decisions about their future use had to be made soon, or else we risked the prospect of having to re-establish these fields in the future.  As I was busy bush hogging one of the fields, I ran across a patch of some bright red plant, which at the time, I could not identify.  Whatever this plant was, it immediately caught my eye because of the intense color of the leaves, and I made an on-the-spot decision to spare their colorful lives.  Instead of shredding them into oblivion, I decided to allow them to continue to grow, at least until I could take the time to learn more about them.

Dwarf Sumac leaf pattern

By gathering samples of the leaves and stems, I was able to identify this plant as a type of sumac, which occurs throughout most of the eastern United States.  Later I learned that this was a species called dwarf sumac.  The thin, reed-like stems of this plant, along with the opposing leaf structure make it easy to identify at a glance, and this made it easy to isolate and spare clusters of this plant in the fields where they grew.  As a result of this ease in identification, soon I had numerous clusters of dwarf sumac growing in some of the fields.  Each fall now brings numerous bright-red splotches of color into these fields, and a big grin onto my face when I see them in the course of my chores.

Dwarf Sumac patch in field

In the photo above you can see what a typical cluster of dwarf sumac looks like in the field during the month of July.  The sumac is in bloom this time of year, and the creamy yellow flowers grow thick amidst the shrubbery.

Dwarf Sumac blooming in July

The dense concentration of the bloom on these plants attracts the attention of any bees in the area.  If you have any desire to “course bees” in order to locate elusive “bee trees”, these clusters of sumac are a good place to start.  If you would like, click on this link to see my pictorial essay on “Hunting for Bee Trees.”

The sumac has year round nutritional value for wildlife.  In the summer, many species of songbird dine on the prolific seed of the plant, joined by grouse and quail.  Birds and many mammals partake of the berry-like fruit of the sumac, and deer love to browse the bark and stems of the plant in the winter.  Native peoples of the eastern U.S. used the plant for medicinal purposes, and herbalists today utilize the root, leaf, and bark for a number of homeopathic remedies.  So besides being a lovely, ornamental species that grows wild in this region, the plant brings with it numerous practical and beneficial properties.

Whenever I pass the many sumac patches that now exist in my fields, I can now say with pride, “that is the result of landscaping, my way.”