Omen of the Coming Winter in the Ozarks

Icy beads form on the trees

The storm system that recently passed through this area dropped about 5 inches of rainfall before the cold Canadian air mass dropped down from the north, bringing with it sub-freezing temperatures and a paltry 1″ of snow.  However, the interplay of the moisture and temperature caused icy crystals and frozen water droplets to form on trees and grasses around the ranch.

Sunshine and ice create sparkling glow

Sensing a golden photo opportunity was at hand, I grabbed the camera and headed outside to take a walk in the frigid morning hours.  For about a one hour duration, the sun and the ice conspired to bring a surreal, almost magical quality to the scenery surrounding me.

Ralph's pasture bathed in ice crystals

Heading along one of the main pathways on the property, I came to the area we call Ralph’s pasture (due to cousin Ralph’s fondness for this scenic locale), and hiked along it’s trails to shoot some pictures.

All the trees are shimmering

The trees were all covered with frozen water droplets, which shimmered in the sunlight.  The frozen water on the stems would crack and shatter in the soft breeze, creating a lovely high-pitched noise (not unlike a crystal wind chime) that only added to the allure of this magical morning.

More icy tree limbs and grass glow in the sunshine

Even the fescue grass in this clearing, which I have left un-cut for the benefit of the wildlife this winter, harbored it’s share of icy beauty, shimmering and singing out it’s melody as it swayed in the gentle breeze.

The fall color change ended a month ago, but the picturesque beauty of the area remains, only this time it takes on a different appearance.

A Simple Way to Display Your Photographs

From the moment that I picked up my first camera and started taking pictures, I have always desired the ability to easily and quickly create and display a print of my work, and to do so in an inexpensive manner.  But in the film medium, the steps involved in film processing into negatives (or slides), darkroom enlargement onto photographic paper, and the subsequent chemical baths and processes needed to bring the print to fruition are neither quick nor easy.  And the cost of the enlarging equipment and processing supplies, as well as the need for a dedicated and specially equipped darkroom makes the endeavor anything but inexpensive.

Because of the costs and difficulties involved, I had opted to sit it out on the sidelines, with an occasional trip to the local camera store (or film counter) to take care of my photographic print needs.  But all things eventually change, and so it has with the entire film experience.  We are now in a digital world, and the equipment and processes have changed, along with the associated technologies utilized to produce a fine photographic print.

For the photographic hobbyist such as myself, there is a type of digital photo printer that has reduced the skill and effort required to produce an astoundingly high quality print to simply pushing a button.  The type of printer I am referring to is a dye-sublimation printer, such as the Olympus P440 unit shown below, the various Kodak dye-sub printers, and those produced by many other manufacturers as well.  The cost of this type of printer has dropped dramatically in recent years, to the point that some now cost no more than one decent enlarger lens alone!

Olympus P440 Dye-Sub Printer

Using this type of printer is simple.  Either pop the camera’s memory card into the printer’s memory card-reader slot and print directly from the card, or connect the printer to your computer (via USB) and print from within any imaging application.

The results are indistinguishable from an 8″x10″ enlargement ordered from a photo lab, since they are using the same types of printer technologies to produce the prints that you order.  The cost for an 8″x10″ print (using the P440) is $1.60/print, factoring in the ribbon cartridge and the special dye-sub paper that is required.  Printing an 8″x10″ is quickly accomplished in a four-pass printing process, which leaves a clear protective coating on the finished print.

Simple matting tools

Here you can see the few simple tools and materials needed to mount, mat and frame your finished 8″x10″ photograph.  First, mat board in a color that compliments your picture and frame is necessary.  I purchase 11″x14″ mat board from Internet art supply storefronts, where an assortment of various colored boards can be purchased at a steep discount from normal prices.  By buying the mats this way, I can buy them for about 40 cents each, and I can usually find an appropriate color to fit my needs..  A mat cutter is essential to be able to produce a fine, bevel-cut mat edge, in whatever custom size and style you choose to use.  A straight edge/ruler for measuring mat opening layouts is necessary, and spray adhesive is used to cement the photograph to a backing board so that it does not warp and curl beneath the mat.

Mat Cutter

The mat cutter is composed of a few simple parts, one being the cutter assembly shown above.  The cutter rides along a track that keeps it moving straight and true, and the 45 degree slant to the blade produces a nice beveled cut.  Once the photo is attached to the backing board, the pre-cut mat is placed over the photo, and the entire unit is placed within the frame of your choosing.  Now, all you need to do is find an empty space on the wall to hang the mounted, matted and framed photograph on.

Finished product

The total cost for the print shown above?

8″x10″ photo paper and cartridge cost, per print = $1.60

11″x14″ mat board (2), per print = $0.80

11″x14″ Frame (Walmart special) =$5.00

Grand total = $7.40 for framed, mounted and matted print.

There you go – it’s as simply as that!

Purple Martin Housing Maintenance

Martin condo at full height

You may recall from a previous post entitle Purple Martin Scouts Have Arrived that the spring season is the time when we open our martin condo for the in-migrating birds to take up residence.  Now that the martins have departed the area in favor of warmer climes, it is time for us to clean out the nesting cavities of the condo and seal them off until next spring.  But how do I reach the martin house, which is at the top of a very tall pole?  The sharp eyed among you may notice that the pole is equipped with a crank and pulley mechanism, which make it simple to lower the unit for periodic maintenance.

Martin house lowered for cleaning

Once the unit is in the lowered position, I proceed to clean out the nesting materials that the birds have placed inside the cavities.  Each cavity has a hinged opening, which facilitates cleaning.

Aluminum floor plates

The martin condo that we have installed comes with removable aluminum floor plates.  The plates elevate the nest off of the condo floor, allowing for air circulation which helps to prevent molds and fungi from developing within the nesting materials.  As you may well imagine, the floor plates accumulate quite a bit of debris during the course of the season, so that it is imperative to scrub them clean before closing up the house for the winter.  A scrub brush and some high pressure water makes them look like new, as you can see from the photograph above.

Plugging the condo openings

After making certain that the insides of the condo cavities are sparkling clean, the floor plates are replaced, and then it is time to affix the plugs into the cavity holes.  This will prevent nuisance birds from taking up residence in the condo, which is designated for “purple martins only” (read the lease documents, you darn sparrows and cowbirds).

Cranking the martin condo back up the pole

Now it is an easy task to crank the martin house back to the top of the pole, where it will remain idle until the martins return to the area next spring.

This season we experienced mixed results with this particular martin house.  I installed this condo on the site of a previously successful, but smaller martin house (this condo has 24 cavities, the previous house had 12).  I relocated the smaller martin house in another location, about 300-400 feet away from this spot, and it has attracted martins this season.  This spring saw a few cavities with martin activity in the new unit, but far fewer than we had hoped for.  There may be two possible reasons for this.  First, notice the fence in the background of these photographs.  This section of fencing was under construction at the very time that the martins would have been establishing their nests this past spring.  The close proximity of the condo to the construction activity may have deterred the martins from nesting in the condo unit.  Second, we now have three cats in residence, and while they do not seem to have intimidated any of the other birds that frequent our yard, they just might make the martins a tad nervous.

Although this martin condo was not filled to capacity this spring and summer, do not think that we did not see purple martins.  To the contrary, martins were a regular sight to behold this past summer.  The natural habitat of purple martins are dead trees, and because we have an abundance of dead trees around our acreage (see post entitled Seeing Things In a New Light), many martins continue to call this spot their summer home, despite the fact that they did not utilize the condo to the extent we would have liked.  We shall be persistent, and I believe the purple martins will eventually book this condo to capacity each and every spring – at least, that is our hope.


Off topic aside:  This is the time of year that I am very busy with tractor work, getting my fields, clearings, and pastures in order.  And don’t forget the billions of leaves that fall off the trees, some of which must be picked up by this stickler for a neat lawn.  Because of these, and other projects that I have been undertaking, I have found less time to devote to writing blog posts than I would like.  Soon, I will be caught up with my work, and my posting (for better or worse) will be more frequent.  Thanks for continuing to check in regularly, I really do appreciate it.


Was This the Peak?

The colors are probably at their peak in this photo

I took this photograph of the woods behind the house last Wednesday, November 1.  If I were to have parked myself at this location continuously for several days in a row, shooting as many photographs as I possible could, using as many different exposure techniques as I could conjure up, I would end up with a vast collection of images.

I suppose that collectively, you and I could sit down with the images, and reach some kind of conclusion as to which photograph best represented the peak of the seasonal color changes that occur in Autumn here in the Ozarks.  We could then look at the EXIF header embedded in the digital image file to see when the photograph was taken, and thus determine with precision the exact date and time of the color peak.  Or is it so easy?

Look at just a few of the variables that can affect the outcome of an Autumn photograph, and with it, the judgements that are made with reliance upon our photographic evidence.  The weather conditions, along with the time of day greatly affect the natural lighting that we rely on to capture landscape photographs.  The film used in the photograph, such as Fuji Velvia 50 or Kodak Kodachrome 100 (or in the case of digital images, the ISO setting and white balance controls of the camera), have a direct affect on the color saturation within the image.  The concept of “reciprocity” shows that the combination of f-stop and shutter speeds also play a role in determining the colors that appear in an image.

With these, and many other variables to play with, who is to say that any given photograph represents the peak of fall colors?  Perhaps a photograph taken prior to the color peak, but with excellent weather and technique, looks visually superior to a later photograph taken under poor lighting conditions, or with inferior technique.  Does that mean that the color peak actually occurred at the time of the superior photograph?  No, it doesn’t, and for that reason, we can never really be exactly sure of the exact moment that the Autumn colors have peaked.

Having said all that, I think the colors peaked here last Wednesday, as shown in the photograph above.  The photo below was taken one day earlier, on Tuesday, October 31 (and no, for any who may be interested, we did not get any Trick ‘r Treaters).

 Photo from a day before the local peak of color

Since these photographs were taken, we have had a couple of sub-freezing nights, and some rainy, overcast skies.  Definitely not the conditions that are favorable for continued color development of the leaves.  The red, purple and yellow leaves are quickly turning to shades of brown and rust, or are simply committing “‘leaficide” and leaping from the limbs to their ultimate demise upon the ground below (it is a horrible sight indeed, to see their flattened bodies on the ground, shriveling up and drying out right before your very eyes)….

Better To Be Safe Than Sorry

Last month, in a post entitled There’s Gold In Them Thar Hills, I pointed out that lead ore mining had occurred to some extent on this property in the past.  The ever-observant Florida Cracker over at Pure Florida asked in a comment whether we tested our well water for the presence of lead.  We do test our water for lead, as well as other possible contaminants, using the WaterSafe home drinking water test kit.

WaterSafe drinking water test kit

This home testing kit is easy to use and tests for the presence of the most common contaminants found in drinking water.  The directions for use are complete and easy to understand, and all of the tests (except for E.coli) provide results within minutes.  The E.coli bacteria test is a simple test, but it requires 48 hours to produce results.

The test kit is available for purchase on-line from the manufacturer, Silver Lake Research, at the following website:

                        WaterSafe Home Testing Kits

Each test kit costs $16.99, with a nominal shipping charge added to the price at checkout.  I bought two kits on my last order, and the shipping and handling totaled $4.00.

For less than $20.00 you can buy yourself quite a bit of peace of mind, which is an excellent deal in my book.  And if your well water does not pass the tests, wouldn’t you rather know what the problems may be, rather than bury your head in the sand?

An Exercise In Futility?

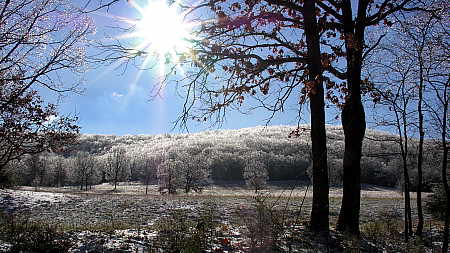
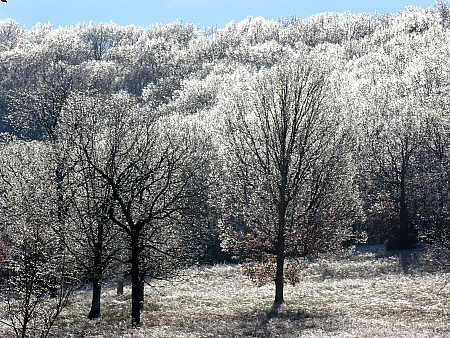
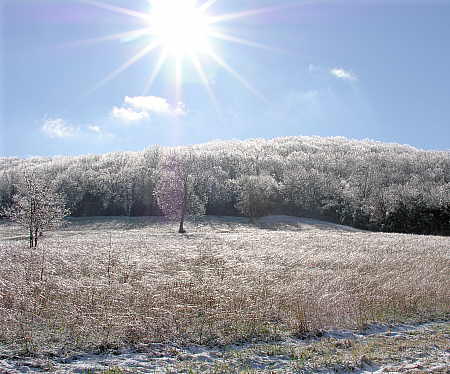
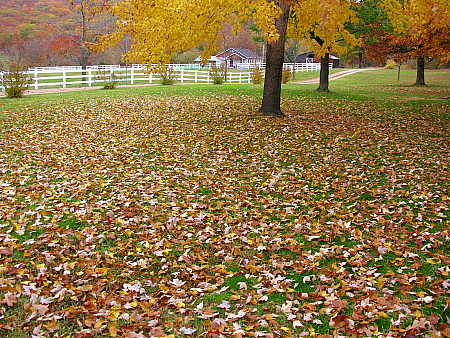
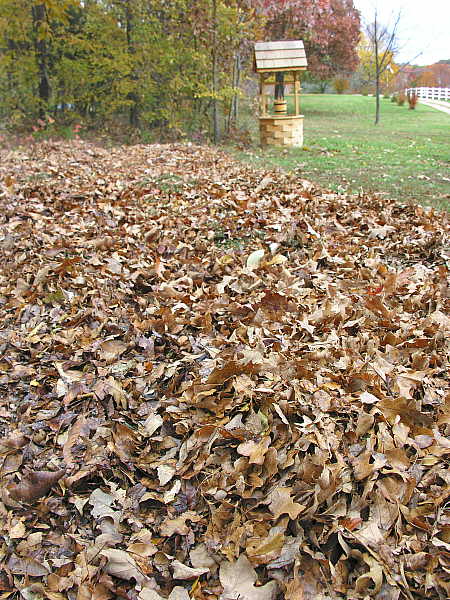
Are you ready for a simple math exercise?  If not, just scan the pictures below – you’ll probably get the drift.

Where do they go from here?

According to Arkansas Birds – Their Distribution and Abundance (James & Neal, pg 41, Table 3-5), there are, on average, 272 trees per acre in NW Arkansas upland forested areas.  The same reference indicates that of these 272 trees, over 65% are a species of oak, so for the purposes of this exercise only, and for the sake of simplicity, let’s assume that they are all oak trees.

Now, we have 330 total acres here.  Aerial photography shows that of the 330 acres, approximately 50%, or 165 acres are wooded.  Multiply 165 wooded acres by 272 trees per acre, and you arrive at a grand total of 44,880 trees.  That’s a lot of trees!

According to this response from Google Answers, there are approximately 200,000 leaves per oak tree (Google – the ultimate authority on everything).  By multiplying 200,000 leaves times the previously derived 44,880 trees, we find that each and every year, approximately 8,976,000,000 leaves are produced on our land.  Based upon the casual accuracy of these calculations, let’s just say around 9 billion leaves per year!

Now, if you’ve followed this blog recently, you will know that I have been ecstatic with joy over the beautiful fall colors we have been experiencing this year.  Witness the following posts to appear in the recent past:

Fall Colors Are Slowly Appearing 

The Fall Colors Keep Getting Better

Oh, Those Precious Fall Colors

Nearly At It’s Peak

People will sometimes ask me, “Hal, even though the colors are great, there must be something about autumn that you don’t like.  What’s the worst thing about the Fall season, in your opinion?”

To which I reply “The thing I dislike about Fall the most is just that – the FALL, as in the leaves falling from the trees” (O.K. – nobody really asks me that, but you knew that all along).

Who is going to rake up those 9 billion leaves each year?  Fortunately, all of those leaves don’t need to be raked each season, just a small percentage of them.  Why do I bother to rake any of them at all?  For two reasons: neatness, and fire containment.

The Neatness Angle

The neatness aspect pertains to the fact that we have two large dogs that are, for all intents and purposes, an integral part of our family.  They come and go, in and out of the house, just as we humans do.  But in a messier fashion.  Our first year here, I attempted to rake the leaves around the yard, so that the dogs would stop tracking them into the house.

Broad plastic leaf rake

I used a wide leaf rake made out of plastic, that I had purchased in the garden department of my nearest super-duper discount center.  The idea was to rake up the leaves as they fell, and to transport them a distance from the house.  But the sheer quantity of leaves around the house quickly made it apparent that I could not perform this task manually.

My natural inclination, being a technophile, is to turn to technology as a solution to my problems, and here was a situation where equipment was readily available to help.  I figured what I needed was a good “leaf vacuum cleaner” to neaten the lawn.

Solution to my problem?

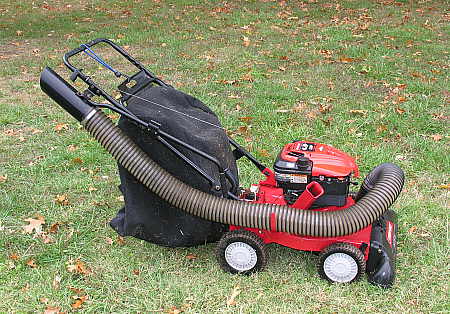
Here is a machine that I purchased to vacuum and shred the leaves that fall around the house.  It seemed like a good idea at the time, but experience with the machine soon proved me wrong.  First of all, I thought I would save some money by buying a NON self-propelled model.  Big mistake!  By the time the collection bag was half-full, the machine weighed so much that you could not push it.  When the bag needed to be emptied (frequently), the engine had to be stopped, the bag removed (with much difficulty), the bag of shredded leaves had to toted to a preselected spot and dumped, returned to the location of the shredding machine, and re-installed onto the machine (not a simple procedure).  The engine would then have to be restarted with a rope starter.  By the time I had finished around one tree, I was exhausted for the balance of the day!  I soon abandoned any fantasy that I had about using this machine to solve my leaf removal problem.

Upright verses cannister mode of operation

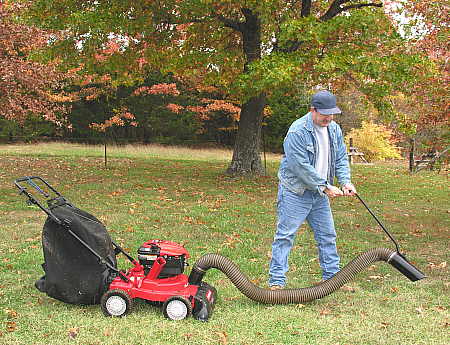
This machine has a feature which allows it to suck up leaves with an attached hose, as shown above.  Although the machine failed to meet my expectations for all my leaf cleanup needs, at least I can still use it around planters and flower beds using the hose feature, so it has not been a total waste of money, but I certainly would not have parted with the cash for this minor task that I put it through.  Oh well, that’s how you learn.

The following season was a complete disaster, as far as the mess situation was concerned.  I decided to affix mulching blades to my lawnmower, and simply shred the leaves in place, allowing nature to take care of decomposing the leaves over time.  Nature will decompose the shredded leaves over a period of time, but not over one winter, as I soon learned.  The shredded leaves accumulated on the ground where they fell, and the cold rains of fall, followed by the blankets of snow in the winter quickly matted the leaf litter into a muddy, leafy mess where my lawn has once existed.  So now, the dogs tracked in not only leaves, but mud as well!  Good going, Hal!

Mower to the rescue

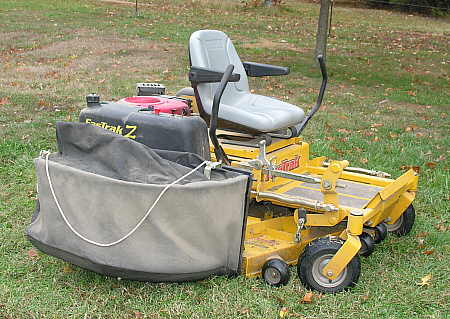
The following season I tried a slightly different strategy.  Instead of merely mulching the leaf litter, I bought a leaf collection system for the lawnmower, as shown above.  Now, the leaf litter would be removed from the lawn completely, thus allowing a healthy carpet of grass to exist as ground cover all year long, and the dogs would be free to come and go without tracking in a huge mess.

Leaf dumping system

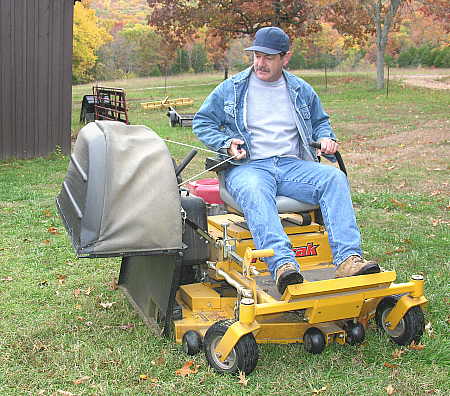
Not only has this procedure been successful in minimizing the amount of leaf litter and mud that comes into the house, it has been a blessing for my physical well-being also.  You can see in the photograph above how the collection container empties.  The mower does not have to be shut down, and I do not even have to get off the machine.  All I have to do is drive the mower to my predetermined dumping spot, slow down, and then pull a release cord affixed to the container.  The container flips up, thereby allowing the shredded leaf litter to fall to the ground using the force of gravity.

Whereas with the leaf vacuum machine, I could clean up around one tree per day before running out of energy, with the method I’m using now, I can clean up the entire yard in less than one morning, and have energy to spare for the rest of the day.  Quite an improvement, indeed.

Pile of collected leaves

Eventually, I end up with a huge pile of leaves in my designated dumping spot, which we can compost for the garden or use as mulch over the winter.  In any event, the leaf litter does not get tracked into the house very much anymore.

The system works well, and I am happy once again.

The Fire Containment Angle

Regular readers of this blog may recall that up until his arrest, we had been plagued by several fires on our property started by an arsonist.

 A rake would have been nice to have here

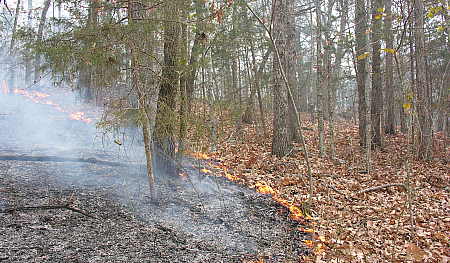
The first time I ran across fire on the property, I found the fire burning through leaf litter on the forest floor, as seen in the photograph above.  Quickly returning to the house to phone the authorities, I then grabbed the black leaf rake (that was previously pictured), and returned to the scene of the fire.  With the flames rapidly spreading through the dried leaves, a rake is an important tool used to contain a fire in an emergency.  But as I soon learned, a plastic rake just doesn’t fit the job at hand.  Within minutes, the rake, being made of plastic, had melted, rendering it useless in my hands.

Steel tined leaf rake

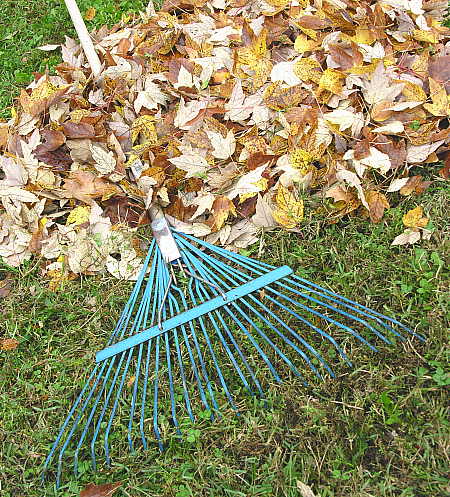
Always trying to learn from my mistakes, I armed myself with a proper steel-tined leaf rake (as pictured above), in preparation for any fire that might come in the future.  Little did I know at the time, that day would come all too soon.  And the steel-tined rake stood up to the heat of the fire this time.  The only downside to the type of rake I had was it’s size.  While it’s large size was beneficial in raking up leaves on the fire line, it was difficult to lug into the woods, where the fire was burning.  It would get snagged in the briers and underbrush of the woods, impeding access to the fire area at times.

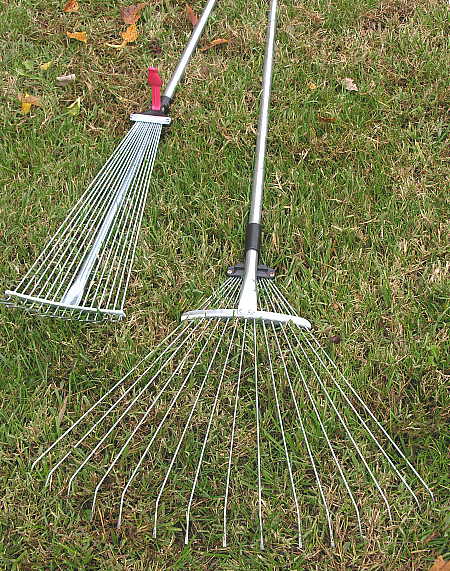
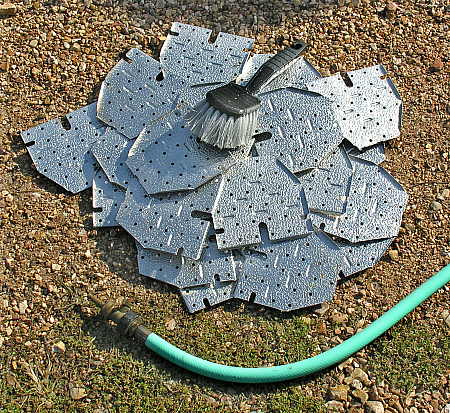
Recently, I found these adjustable steel-tined rakes at the local farm store.  They seem to be tailor-made for raking leaves ahead of an advancing fire, although I have not had the opportunity (thankfully) to test them yet.  As you can see, with the simple flick of a lever, they go from the fully closed position to the fanned out working position.  They are built entirely from metal parts, so the heat of the flames should not cause these rakes to melt or burn.  Now that the neighborhood arsonist has been apprehended, I hope to not have to use these rakes, but time will tell. 

Gettin’ Goin’ While The Goin’s Good

Migrating geese

We have been treated to the sights and sounds of migrating geese for the past couple of days.  Apparently, we are directly beneath one of the many flyways that the migrating geese use in their annual fall journey down to warmer southern climates.  One of the great benefits of living in such a remote, rural area is the relative quiet that comes from residing a respectable distant from civilization.  In the case of the geese, this allows us to hear their approach long before we can catch sight of the flocks flying accross the sky. 

Nearly At It’s Peak

Are you getting tired of my fall color change photographs?  I’m not.  I just wish that I had the skill and equipment to capture the beauty that my eyes behold, but alas, that is not the case.  In any event, here are two more pictures that I have taken today.

Neighbor's log home

Yesterday’s post contained a panoramic photograph overlooking our property.  I took that photograph from the balcony of a neighbor’s log home, which overlooks our property.  The photograph above is that neighbor’s log home, as seen from down here.  The colors just keep getting better each day.

Tojo's pasture has a great view

A few days ago, I posted a picture that contained a tree which I believe is a autumn purple ash.  In this photograph, you can see that the ash tree has continued to turn from green to purple.  The trees on the hillside also continue to adopt their autumn hues.  Tojo, the Missouri Foxtrotter in the picture, really seems to enjoy the view from his pasture when he takes a moment out of his busy grazing schedule to look up.


Oh, Those Precious Fall Colors

Hillside turning red

As you can see from the photograph above, the fall color change continues to evolve, bringing with it the varied red, gold, and orange hues that glimmer so brightly in the mid-day sun.  The colors become more vivid with each passing day, and I think we are still a few days away from this year’s peak coloration.

You may recall from a previous post entitled Is That You I’m Seeing Over There?, I like to take panoramic photographs.  The link below will take you to a large panoramic photograph which overlooks our property, and which shows what the countryside is looking like right now.  It is a large file and may take a minute to load, but it is well worth the short wait (even for the impatient amongst you readers).

                           Panoramic view of property in fall

As you may have figured out by now, I’ll keep posting about fall colors as long as they last.  As I already mentioned, I suspect that we are about at the peak of this year’s colors, although the forecast is for continuing weather conditions conducive to a beautiful show.

The Fall Colors Keep Getting Better

We have been having good cooperation among the weather deities, as rainfall, day time, and night time temperatures have been nearly ideal for the production of vivid fall leaf coloration in this area.  The photograph below shows the progress that has occurred since my last post on the subject of fall colors.

Color change is underway

You may recall from a previous post entitled Landscaping My Way – Installment #1 that I have taken pains to preserve patches of dwarf sumac in some of the clearings on the ranch.  The photograph above shows why I save the sumacs – they are the beautiful bright red plants that you see at the base of the hills above, and I revel in their vivid splendor this time of the year.

I will continue to post periodic updates on the fall colors out here, as long as they continue to improve.  A bright, sunny day is forecast for Saturday, so maybe I will have the opportunity to take some nice pictures.