I Signed the Cast, Have You?

 Stephen Colbert’s wrist cast

Stephen Colbert’s cast was removed from his (now healed) broken wrist on August 23, live on his Comedy Central television show.  The cast, which has been signed by Michael Bloomberg, Mayor of New York; CBS Evening News anchor Katie Couric; Bill O’Reilly, host of FOX’s The O’Reilly Factor; Nancy Pelosi, Speaker of U.S. House of Representatives; Tim Russert, host of NBC’s Meet The Press; Tony Snow, White House Press Secretary,  and NBC Nightly News anchor Brian Williams, has been submitted for auction on e-Bay. 

The auction on e-Bay can be accessed here.  As of this posting, the bidding was up to $16,900.00, which would be ridiculous were it not for the fact that the proceeds are going to a fine charitable cause, The Yellow Ribbon Fund.

If you would also like to sign Stephen Colbert’s cast (as I have in the photograph above), you may easily do so by following the directions at this link.

Boosting the Average

5′ x 5′ round bale

Remember a previous post on this blog (It’s Time for Another Try) wherein I lamented a mere .500 success rate in getting our hay fields cut and baled over six growing seasons?  Well, the average has just been upped to .571 (four full cuttings over the past seven seasons).  Our neighbor Bill, along with his sons Craig and Matt, have been out here over the past several days cutting, raking and baling several of our hay fields, and will probably be continuing their activities here for the next few days.  I thought I would take this opportunity to briefly show how the process occurs here in the Ozarks, for those of you who may have never seen grass being converted to bales of hay.

The first step in the baling process is to cut the grass near it’s base.  There are several choices the farmer has in a mower.  Some use a sickle-bar mower, which resembles a giant hedge trimmer adapted to cutting grass.  Others use a hay mower/conditioner, which not only cuts, but also crimps the crop for faster drying, while still other farmers use a  forage macerator  to complete the cutting.

Disk mower

Craig and Matt are using an implement called a disk mower to cut the grass in preparation for baling.  It consists of a series of small rotary disks, each with two pivoting cutting blades attached to the disk via a shoulder bolt.

Persuasion

Unfortunately, besides hay, we also grow rocks prolifically here in the Ozarks, as you may remember from an old post (Dang Rocks).  In the photograph above, you can see Craig applying a little “persuasion” to a bent cutting blade, the result of an encounter with a rock that probably wasn’t there last year!

Cut grass left to dry before baling

When the hay is cut, it is allowed to dry in the field prior to being put up into bales.  The drying time is affected by many variables, including the type of forage crop, humidity and temperature levels, and procedures used in the baling process.  If a mower/conditioner or forage macerator has been used to cut the crop, drying time will be shortened.  Alternatively, a hay tedder can be used to turn the hay over in the field and fluff it up, thus allowing the hay to dry quickly.

Hay rake

When the hay is sufficiently dry,  a side-rake such as the one seen above is used to sweep the cut crop into wind rows, in preparation for the actual baling.

Raking grass into wind rows

In the photograph above you can see Bill pulling the side rake through the field.  First traveling in one direction, and then turning around and repeating the process from the other side produces a nice wind row of grass.

Completed wind row awaiting hay baler

This is what the wind row looks like after two passes of the side rake.  It is now ready to be swept up by the baling machine.

Hay baler sweeping up the wind rows of dried grass

In this photograph you see Craig operating a tractor pulling a large round baler over the previously wind-rowed forage.  The baler gathers the hay and rolls it into a tight, uniformly sized dense round bale, and when the bale capacity is reached, the baler wraps the round bale with a continuous spiral of baling twine.

Discharging the finished bale of hay

After securing the integrity of the bale with twine, the baler opens up to eject the finished bale from the rear of the machine, then closes back up again in order to repeat the process once again.

Size comparison

I included this photograph to illustrate the size of the bales that are being produced by this particular round baler.  This is a 5′ X 5′ bale.  Depending upon the crop the weight of each bale can range from about 1200-1600 pounds.  As you can imagine, it take special equipment to be able to handle these large round bales.

The next step in the process is to gather the bales of hay to transport them to their final destination, which, along with a final tally of this year’s hay production will be the subject of a future post.

Trial and Error Sometimes Works

Example #1 – Foiling the Rats

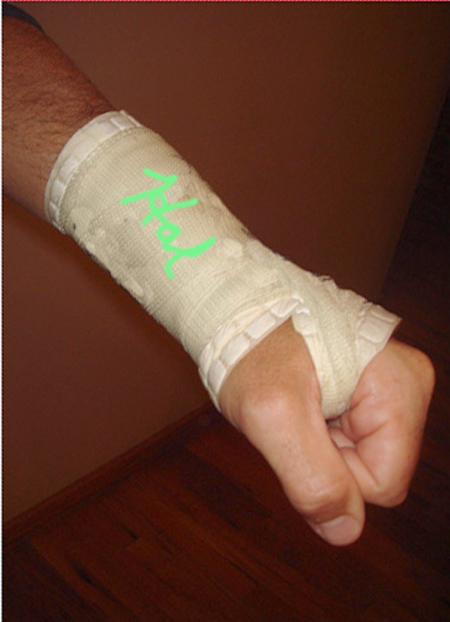
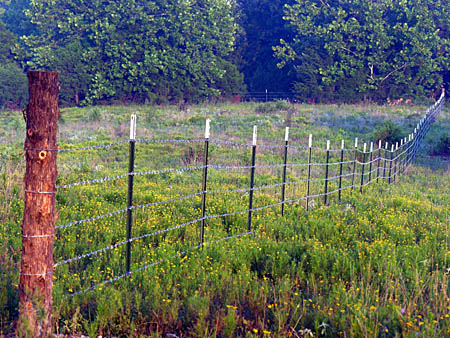
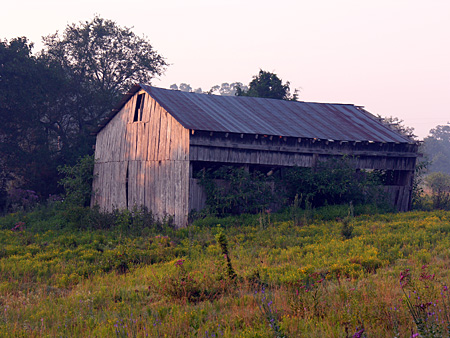
Perhaps you recall from a previous post (entitled In This Corner…) that over the past several years I have been engaged in an on-going battle of wits with a rat in my equipment barn.   This rat had found a good nesting spot in the engine compartment or behind the dash of our tractor,  and in the course of his day to day activities, took to chewing up the wiring harnesses that are located in these spots.

This became more than an annoyance, as the tractor would have to be trucked over to the local New Holland dealer for repairs, which became very expensive, very quickly.  I ultimately decided to try and discourage the rat from nesting in my tractor by placing rubber snakes at various points in the barn and on the tractor.

Snake guarding the engine compartment

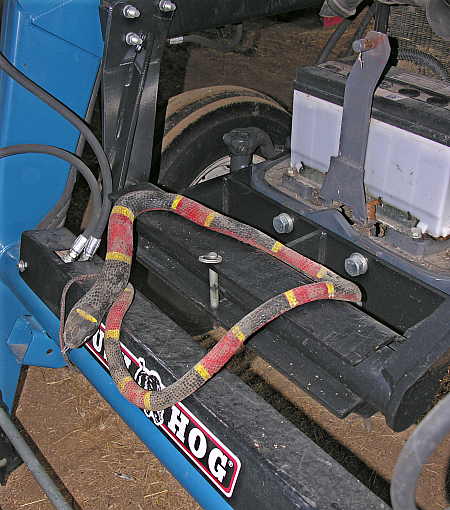
After using the tractor, I store it in the barn with the engine hood opened up, and I place this rubber snake in plain sight to deter any pesky varmint from finding a warm, protected nesting spot within the confines of the diesel engine.

A snake in the tractor cab

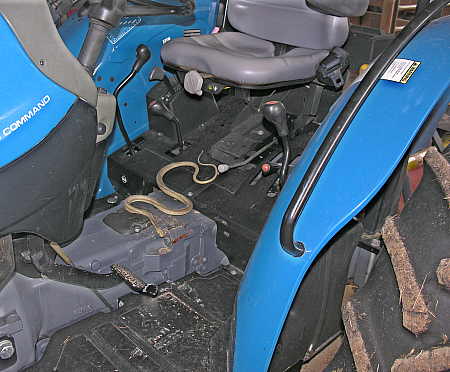
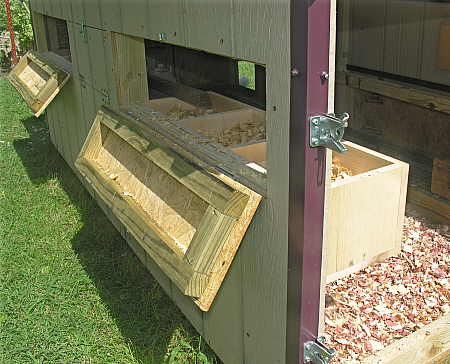
This is a rubber snake that I place on the floor of the cab when I am finished using the tractor.  The purpose of putting the snake here is to deter any pests from climbing up into the dashboard of the tractor, where a massive tangle of electrical wires is located.

I purchased these rubber snakes in September of 2005.  Since that time, which has been nearly two years now, I have not had any repeats of the incidents like those referred to in the post entitled In This Corner… 

If you are interested in purchasing rubber snakes, there is a large selection available from the Nature Pavilion on-line store at reasonable prices.  This trick has worked for me for two years now, and maybe it can work for you too.


Example #2 – Foiling the Locust Thorns

Trecherous locust thorn

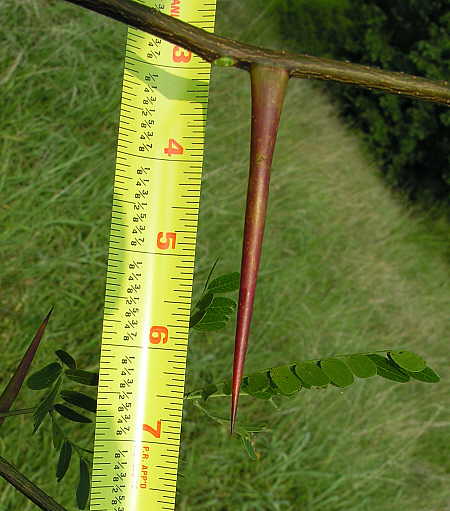
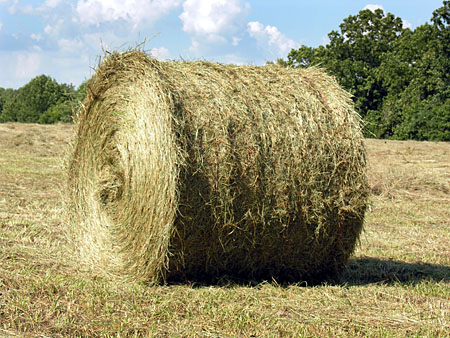
If you have locust trees on your property,  you will undoubtedly recognize this thorn as being the weapon of choice for these wicked trees.  And if you drive any kind of vehicle around where these trees are situated, you will most certainly have experienced the woe of having a perfectly good tire run flat due to a puncture from a locust thorn.

I battled frequent flat tires on my tractor due to these thorns for a few years before finding a solution to the problem.  My local tractor dealer was no help.  They insisted that I should be running my tractor with fluid filled tires that utilized inner-tubes.  The purpose of filling the tires partially with fluid is to provide increased traction and a lower center of gravity for the tractor.  To prevent the fluid (water) from freezing in the winter, a solution is formed by adding either alcohol, ethylene glycol, or calcium chloride to the water.

So my tractor had great traction, and was less likely to roll over due to the lower center of gravity caused by the fluid filled tires, but was a major headache when the inevitable encounter with a locust thorn occurred.  To repair such a tire, it was necessary to call for a mobile tire truck to visit the farm, where the technician would pump the fluid out of the tire, dismount the tire, patch the tire and put in a new inner tube.  The tire would then be remounted, and the inner tube refilled with the fluid solution that was previously pumped out.  About $100 later, the tractor tire would be good as new, but with flat tires coming about frequently, this became rather expensive.

As a possible solution, I investigated the use of foam-filled tires.  These are tires that have been filled with a poly foam filling and cured,  creating a puncture-proof tire.  This is a technique that is often used on military vehicles, where tire performance is critical.

No dampening suspension underneath the tractor

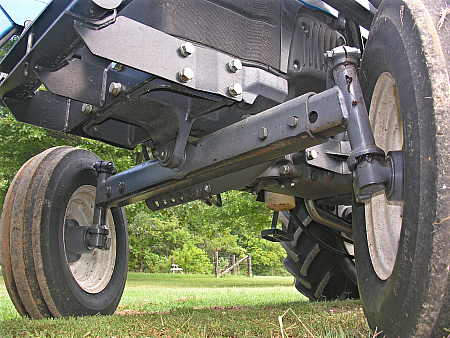
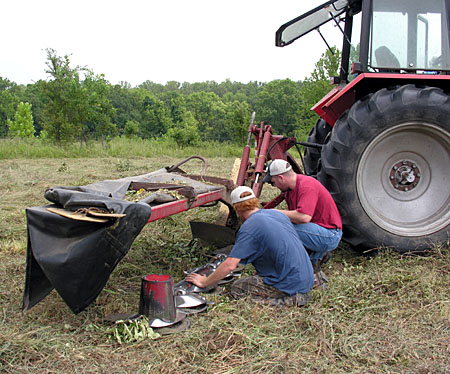
The problem with this solution is that the foam-filled tire is not very forgiving to the vehicle operator when traveling over rough terrain.  As you can clearly see from the photograph above, my tractor (and most every other tractor in existence) does not have any kind of sprung suspension between the wheels and the chassis.  In effect, the only shock absorbers are the tires themselves, and of course, the adjustable suspension seat found in the cab of the tractor.  If the tires are foam-filled, then the ride of the tractor would quickly take it’s toll on the operator’s back.

My local tire dealers all told me that this is just the way it is in the Ozarks – you live with frequent flat tires due to locust thorns and briers, and just have to get used to it!  I believed them too, that is, until I got to listening to two gray-haired, coverall clad old farmers talking to one another.  Without knowing it, they had divulged the secret to flat-free farm equipment in the Ozarks.

Slime

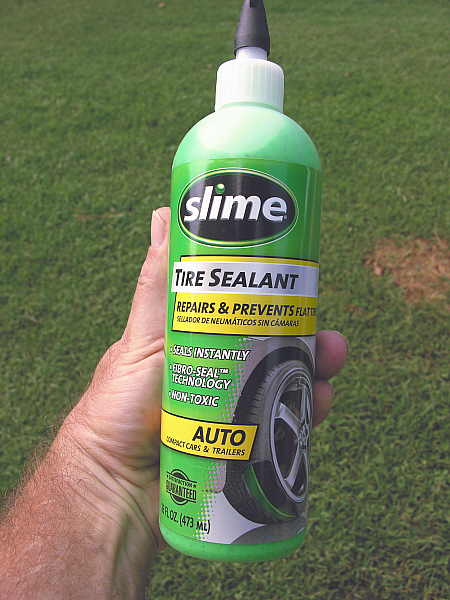
The trick was simple enough – ignore the tractor dealers, and ignore the tire dealers.  Instead of using fluid-filled tubed tires, as they suggested, switch to a tubeless agricultural tire and put a sufficient quantity of tire sealant into the tire.

Since making the change, as the old experienced farmers had talked about, I have not experienced one flat tire on the tractor as a result of a puncture.

Using the front-end loader as a jack

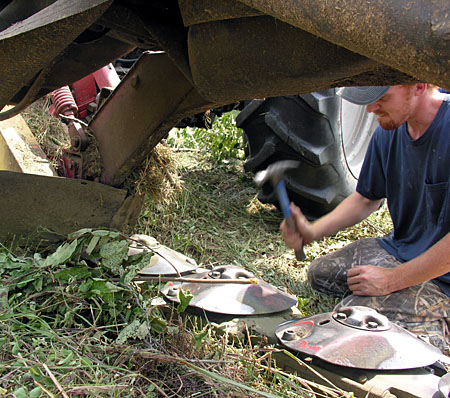
So if this works so well, why am I removing the front tires from my tractor, as seen above?

Cracked sidewall

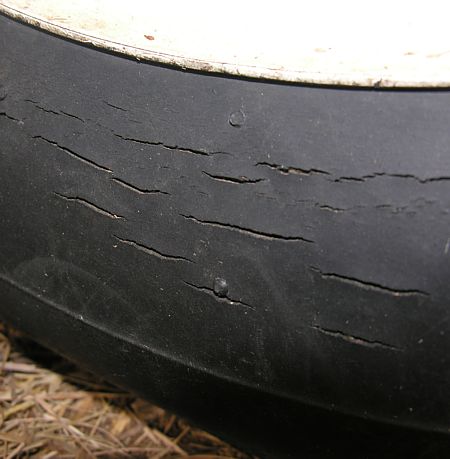
Even though the tires have not been affected by punctures, the sidewall will still tend to crack over time, as you can see here.

Leeking sealant

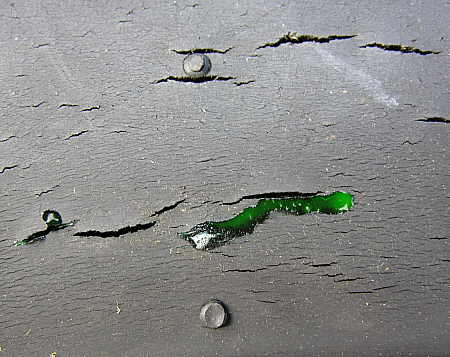
Eventually, the cracks will progress to the point that the sealant will no longer perform its intended task, as it begins to leak out of the sidewall cracks.  When this happens, the tire will no longer hold pressure, and it is time to replace the tire.  But at least the tire has provided service for a decent amount of time, without the expense and hassle of constant thorn-induced flats.

My thanks to the anonymous old farmers who inadvertently let me in on the secret to tire longevity here in the Ozarks.

Deferred Maintenance

My workshop is now complete,  so there is no longer any excuse for putting off all the little maintenance chores that accumulate around here.  The past few weeks have found me busy setting up shop, which has become the center of activity for detailing each and every piece of equipment that we use on our grounds.  I am beginning to catch up on deferred maintenance chores, so my blog posting frequency will probably pick up now.

I am very good at performing necessary maintenance on our equipment according to the manufacturers’ schedules for things such as oil changes, lubrication, and critical adjustments.  But there are some tasks that are non-critical that I have been putting off, simply for a lack of a decent place to do the work.  That has now changed with the establishment of a workshop.

One job that needed to be done was to fix the sun canopy on the tractor.  In my never-ending quest to achieve grounds keeping perfection, I have several designated areas that I have been trying to keep “park-like” for recreational purposes.  In order to accomplish this, I find myself having to bush hog around numerous trees.  Tractor-hating trees, if you will.

Crumpled sun canopy

You can clearly see what damage these trees have wrought upon my tractor’s sun canopy in the photograph above.  I swear, I am a good judge of the height of tree limbs.  I am certain that many of the trees around here have it “in” for me and my tractor.  Just as I pass underneath their shade-producing limbs, the branch will suddenly (and without warning) drop down a few feet, intent on snagging the tractor canopy, if not my head!  The result is a crumpled-up canopy, as you can see above.

This is not the way a canopy should look!

Here is a closer look at the damage to the front of the canopy.  The rear, although not visible in this photograph, has about as much damage as the canopy’s front.  In addition to the bent metal on the canopy itself, the iron frame portion of the canopy has also been bent out of shape.  It’s off to the workshop, where a heavy sledge hammer, a three-foot long pry bar, and a pair of 4″x 4″ pieces of oak (used as dolly blocks) and a lot of sweat coerced the twisted metal back into a rough semblance of its former shape.

Canopy after preliminary straightening

Now that the canopy was fairly straight,  as seen above, all that remained was the finish hammering, which after much tedious work, made the canopy look almost as good as new.  But the most challenging task was getting the canopy installed back on the tractor.  Between the sheet metal, the iron frame, and the 1″ thick insulation material (which prevents the canopy from acting like a giant solar oven, ideal for baking brains), the assembly weighs in at about 150 pounds.  Getting it back up on top of the tractor could be a little tricky for someone such as myself, who had no help available (now I see why farm families are usually large – they need all the help they can get).

Using the bush hog to help reinstall the canopy

On the theory that “brains can overcome brawn,”  I examined the task ahead of me, and devised a plan of action.  The first step was to maneuver the canopy up onto the support rails of the bush hog.

Taking advantage of the folding ROPS

The next step required folding the ROPS (roll-over protection system) down to a level where I could reach the support brackets.  Using a couple of C-clamps to help align the canopy with the ROPS, I was able to install the front retaining bolts of the assembly.  Once this was accomplished, the rest of the installation job was a piece of cake.  Using a come-along style winch attached to the front-end loader, I was easily able to pull the canopy and ROPS back up into their proper position.

Finished, at last!

After a few minutes of adjusting, squaring and bolt tightening, the job was finished, and the tractor looked as good as new.  And now I won’t have to drive around looking like a dork on a tractor with a crumpled-up canopy anymore! 

Relocation Day For This Critter

Morning sunrise at the ranch

Woke up this morning to a wonderful sunrise, and as I stood savoring the moment, I noticed Retta making her way toward me from the direction of the barn.  “It’s a baby raccoon,” she said.   “OK,” I replied,  “I’ll take care of it now, and then have my cup of coffee.”

After lacing up my boots and donning a light jacket, I headed out to the barn, where we are temporarily housing about 30-40 of our juvenile guineas.  Over the past few nights, some predator has consistently found a way to out-maneuver our defenses, with the result that several young guineas have (literally) lost their heads over these visits.

You can check-in anytime you want, but you can never leave…

So “Trapper Retta” fetched the Havahart live-animal trap, baited it with cat food,  and set it out alongside the guineas’ pen last night, and sure enough, she caught the (alleged) culprit.

Please, kind sir, don’t harm me!

It wasn’t really a baby – I’d say more of an adolescent raccoon, but he was plenty capable of bestowing deadly havoc upon our fowl.

Our journey begins

I loaded him into the back of our utility vehicle (thank goodness the captive wasn’t a skunk), and proceeded to transport him to a location a couple of miles away from our barn area.

The great iron barrier

To reach the relocation spot I had in mind for this raccoon required us to traverse a cattle guard.  Could this help foil the critter’s return to our barn?  I doubt it, as he could easily scamper across the iron pipes, or simply walk around the cattle guard to reach the other side.

The fork in the road

A little further down this road, we came to the (proverbial) “fork in the road.”  I suppose  it is possible that the critter might become confused about which direction to follow when he reached this junction,  but I wouldn’t count on this outcome as being probable.

Momma, why does he look like a man, but smell like a raccoon?

As we continue along the road some distance further, we pass momma and calf, whose presence (along with other members of the herd) might deter a wayward raccoon from trespassing upon their cherished grazing pastures.

Ouch!

The next “barrier” we must pass is the new barbed-wire fence our neighbor just completed across a section of his property.  If you were a raccoon, would you want to chance scraping your back on the sharp, pointed barbs of a newly-stretched fence?

Actually, I sincerely doubt that any of these so-called “barriers” will prove to be an impediment to the raccoon, should he choose to return to our barn.  A couple of miles is not a particularly long distance for a raccoon to range,  and the barbed wire fencing, the herd of cattle and the iron cattle guard are mere trivialities to a critter such as this raccoon.

Hey, this doesn’t look so bad after all.

What I am counting on is my blissfully naive hope that this young raccoon will find his new relocation spot sufficiently attractive in it’s critter-type amenities so that he wouldn’t even consider leaving it to return to our farm.  I’m hoping he will find this old, unused barn to be a perfect home for a young raccoon, who is just starting off in this world.

Or perhaps I should have loaded him into the truck, and transported him down the highway for about twenty miles before releasing him into the wilderness?  We’ll know soon enough!

They’re Back!

It sometimes seems as if there is no middle ground in the precipitation department.  While some areas of the country are still undergoing a drought of severe proportions, with crop failures, a pending rampant fire season, and localized water shortages, other regions (Texas, Oklahoma and Kansas, for instance) find residents with flooded homes, rivers 20′ or more over flood stage, and farmers with ruined crops.

Fortunately, we have fared pretty well weather-wise in this part of the Ozarks.  You may recall my post lamenting the lack of enough rain to keep the ponds completely full.  You may also recall, however, my post regarding this season’s hay crop, which ended with a photograph of the ominous skies that appeared over our hayfields at precisely the time that the grass should have been cut, dried and baled.  Since that time, we have not had three successive dry days in a row, which is about the dry period that is needed to process the grass into bales of hay.   The result is that our hayfields have still not been cut.  It remains to be seen whether or not the grasses will be sufficiently nutritious and appropriate for baling when the next dry spell occurs, whenever that may be.

Too much rain?

On another front, the lack of dryness has caused the lawn around the house to grow much higher than I normally like to keep it.  Even when there has been no outright rain, the fog, and the dew that accompanies it, has prevented the lawn from drying enough for me to play lawn-mower man.

Mushrooms poping up all over the lawn

Because the weather conditions are just perfectly fine for fungi, the giant, unidentified mushrooms (which you may recall from this post) have returned in force to my perpetually damp lawn.

A shovel beside the mushrooms to show scale

Again, in case you missed the last post about the mushrooms, here is a picture to help depict a sense of scale of these mushrooms.

Young mushroom specimen

When they first emerge, the mushroom cap looks like the one in the photograph above, which takes on a sort of helmet shape.

Mushroom taking on a convex shape

Soon, however, the mushroom cap breaks free of the ring at its base, and flares out into this convex configuration that you can see in this picture.

Mushroom cap that has flattened out

After attaining a convex shape for a short period of time, the cap then starts to flatten out, and even begins to curl up around the outer edges, which can be seen in the photograph above.

In my last encounter with these mushrooms, I contemplated making a meal out of them, but Duane, for my own safety,  convinced me not to, even though Ed reassured me that Cholula Sauce goes well with anything!  But now I am re-assessing the situation.  Maybe I was a little too tentative last time.  Perhaps I shouldn’t have chickened out, and just doused the mushrooms with Cholula Sauce and proceeded to eat them.

Maybe this is the way to deal with them!

On the other hand,  perhaps they would taste better basted with Stubb’s Mopping Sauce and grilled until golden brown. 

I’ll let you know how they turn out.  Or maybe I won’t!

Animal Roll Call

I’ve been “tagged” by Karl at Pile of O’Melay’s to compile a roll call of the animals we currently provide a home to.  Here is my pictorial animal roll of our domestic denizens.

Chipper

Chipper is our gelded quarter horse, probably around 18 years of age.  Born and raised on the farm next-door.

Tojo

Tojo is our gelded Missouri Fox Trotter,  who is about nine years old.

George

George, our yellow Labrador Retriever, has boundless energy.  He loves the water, which is what you would expect from most any Lab.

Gracie

Gracie is our very large Great Pyrenees.  She is a wonderful watchdog, as well as a loving, gentle pet.  She loves a good roll in the mud, as you can see from this photograph.

Max

Max (our oldest tabby) was the sole kitten in his litter, born on another farm located next-door to us.

Bosco and Hobbs

These two cats are Bosco and Hobbs, whom you may recall were rescued by Retta along the side of a local rural highway.

Adult guinea

We currently have 12 adult guineas, but they are soon to be joined by our fledgling flock of guinea keets.

Guinea keets

We now have 40 guinea keets that the adult guineas have hatched for us, and they will soon join the adults that wait outside the nursery.

Roosters

These are two of the three adult roosters that have survived the predators that occasionally pay a visit around here.  They are quite sociable, and always seem to be curious about any human activity that they observe.

Chicks

And these are a few of the 17 chicks we are currently raising.

 To recap in list form:

  • 2 horses
  • 2 dogs
  • 3 cats
  • 12 adult guineas
  • 40 guinea keets
  • 3 adult chickens
  • 17 young chicks

Be sure to check out Karl’s post to see what animals others have at the moment.

Will Today Be the Day?

Flycatcher chicks

It looks to me as if these flycatcher chicks are ready to get a lesson in flying from their parents.  Although you can only see three chicks in this photograph, there are actually five in the nest.  I suspect that they will be gone shortly, off discovering the world for themselves.

Ideal viewing location for nest

We normally discourage birds from building their nests on our house, but these flycatchers have chosen to build their annual nest in an overhang just outside a front-door window, which affords us a wonderful view of the nest from inside the house, as you can see above.  Having a nest at this location is a little messy at times, but because we have such a good view of the action,  it is allowed to remain year after year.  It doesn’t hurt their cause that flycatchers, as the name suggests, will consume vast quantities of flies.  You may recall from a previous post, entitled Non-Toxic Fly Control, that we try to utilize as many natural methods of fly control as possible.  These flycatchers are just one more tool in our arsenal.

I’m In a Fowl Mood Today

Turkey parade

I’m in a fowl mood because it seems like I’m surrounded by the feathered creatures day and night.  Stepping out the door, I see a group of wild turkey parading before me.  It’s a sight I always enjoy, and it gets me to thinking about the domestic fowl we (“we” – meaning Retta) raise as a hobby.

The old hen house

Here is one of our hen houses, which you may have seen in previous posts.  We use this building to house our guineas, whose numbers range variously from a few, to several dozen, depending on the time of year and activity of the local predators.

Broody guinea hens

Usually, our guineas would find some secluded spot in the tall pasture grasses in which to lay their eggs.  This year, however, several have decided to utilize the nesting boxes that are installed in the hen house.  They have been very broody as well, sitting on the eggs in quite a maternal fashion, patiently waiting for the eggs to hatch and the new-born chicks to emerge from their confining shell.

 Hatchling nest litter

Daily, Retta inspects the nest boxes, and when she finds newly hatched keets, she removes them from the box, leaving behind the litter of egg shells and feathers that you see in the photograph above.  To date, we have 36 little keets, and the number grows daily.

Temporary guinea keet nursery

We place the new-born keets into our makeshift nursery, which is comprised of a couple of livestock water tanks, having a bed of pine shavings and warmth provided by a pair of incandescent heat lamps.

Guinea keets

We will keep these fine looking guinea keets indoors, under our watchful eyes, until such time as their feathers come in fully and they grow to a more substantial size.  Then, it’s back out to the hen house for them, where we will keep them penned up for a few weeks.  After that, when the keets are large enough, we will begin letting them out of the hen house during the day, so that they can go about their glorious job of devouring thousands upon thousands of those ticks that we all love to hate so much.

New hen house for the chickens

Meanwhile, you may remember a post where we took a ride across Bull Shoals Lake on the Peel Ferry, the sole surviving Arkansas public auto ferry.  Ostensibly, the reason for that ride was to look over some professionally built hen houses, to determine if we should buy, rather than build, a new domicile for the chicks Retta had ordered from a local hatchery.  You can probably tell from the excellent workmanship of the new hen house in the picture above that we opted to buy, rather than build.  After looking at the cost of materials to build an equivalent structure, it turned out being worth our while to purchase this hen house.  It is sturdy, portable, and heavily constructed with quality materials by a group of Amish craftsmen in the Seymour, Missouri area.

Hen house interior

The interior has a translucent fiberglass panel to allow light into the house, and features 6 nesting boxes, perches, and slide-out litter drawers beneath the perches.  There is access to the protected outdoor “yard” area from within the house, and it is all protected from the weather with well-built metal roofing.

Egg doors for nesting boxes

The nesting boxes have doors that open up from the outside, so that we can easily collect the eggs that the hens will begin laying sometime soon.

Chickens enjoying the shade of the hen house

Here are just a few of the young chickens that now call this hen house their home.  They say variety is the spice of life, and we seem to be pretty well-seasoned with this eclectic mix of chicken breeds, which includes assorted Polish chickens, Silkies, and Spitzhaubens.

So now, perhaps, you understand why I sometime feel that I’m in a fowl, fowl mood.