Equipment Maintenance Chores

Now that the Fall season is rapidly approaching, it is time to get the Bush Hog rotary cutter into shape, as there are many acres to be cut in the upcoming months.  After greasing and inspecting the various components of the rotary cutter, the most common maintenance task is to sharpen the blades of the cutter. 

Bush hog blade sharpening

During the course of cutting pastures and fields the blades of the rotary cutter will become worn and dull, primarily from impact with rocks (see previous post entitled Dang Rocks!).   You can see what a worn rotary cutter blade edge looks like in the following photograph.

Dull, rock-beaten blade

Before working underneath the rotary cutter, I would like you to take a look at the upper link assembly of the three-point hitch, which is the means of attaching the cutter to the tractor.  At the top of the link assembly you can see a bolt which acts as a pivot for the upper link arm.  This bolt is prone to breakage.  When it breaks, the entire rear portion of the rotary cutter comes crashing down to the ground.  If you happen to be underneath this rotary cutter (which weighs 1247 pounds) when this bolt snaps, it would certainly ruin your day!

Upper link of 3-point hitch

To prevent the possibility of an accident occurring when working under or around the rotary cutter, I use several heavy-duty axle stands to support the implement, as shown in the photograph below.

Heavy-duty axle stand

Once the cutter is properly braced, the next step is to remove the two blades from the flywheel.  In the next photograph you can see that the manufacturer has provided an access hole for the blade bolts at the top of the cutter.  This is a sturdy and massive 1-3/4″ bolt, which requires the use of a heavy duty socket set.

Blade pivot bolt access

In order to even begin to budge this bolt, brains must take precedence over brawn, and so you see me resort to the use of a “cheater” bar to coax the retainer bolt into submission.

Cheater bar in use

Eventually, the nut for this large retainer bolt will loosen and come off, but the bolt itself will be firmly stuck in the flywheel of the rotary cutter.  At this point, a sledge hammer and a length of galvanized pipe can usually persuade the stubborn bolt to part ways with the flywheel.

The

The photograph below gives a good indication of the size of the rotary cutter blades.  Each blade is 5/16″ thick and weighs in excess of 20 pounds.  The blade on the left is the blade that has just been removed from the cutter, and the blade on the right is a sharpened replacement blade.

Blade sections

Sharpening the blades is a simple matter of running the cutting edge along the surface of a grinding wheel, as shown below.

 Sharpening blades

While it is not necessary for the two blades on the opposing sides of the flywheel to be exactly equal in weight after sharpening, they must be reasonably close to avoid unnecessary vibration and premature wear to the rotary cutter gearbox.  To achieve this result, I use a simple self-devised method.  I hang each blade from the end of a bungee cord and measure the amount of stretch that the bungee cord undergoes.  When the cord stretches an equal distance for both blades, than I know that they are approximately the same weight.

Sharpened blade

The photograph above shows the sharp edge that is obtained from grinding the rotary cutter blades.  It is not as clean looking and smooth as a kitchen knife, to be sure, but it is now plenty sharp enough to tackle the grasses, weeds and brush in the pastures and fields scattered around our property.

Now that the blades are reasonably sharp and balanced, the only thing left to do is re-assemble the blades onto the flywheel of the rotary cutter.  This is a simple task, however it is now that you are required to venture underneath the implement to install the blades.  I always double-check the axle stands before sliding underneath the cutter, and as the photo below shows, I make it a point to coat the bolt with a good anti-seize compound before re-assembly.

Anti-sieze compound used on retaining bolt

Now that I have finished sharpening the rotary cutter blades, it’s time to fuel the tractor and go bush-hog some fields.  Adios, amigos.

Photo Collages

Collage of sponges and barracuda

FloridaCracker, the author of the informative and always interesting Pure Florida blog, inquired in a comment yesterday about two photographs that are to be found hanging on the wall in the background, as I hang precariously suspended, upside-down in Retta’s inversion chair.  The two photographs depict fish that I shot with a Nikonos underwater camera while scuba diving some 16 years ago.  Or should I say, the two photo-illustrations, because those prints on the wall are digital collages that I created back in the early days of my experimenting with scanned slides and Adobe Photoshop.

Before I show you how I created these collages, I would like to point out what was involved in creating these simple works some 16 years ago.  First, the hardware that was in use back then was abysmally slow by comparison to today’s standards.  Second, the shear size of the digital files required to generate a decent result from a film recorder (which was used to create the working negative of the finished product) overwhelmed the amount of RAM that standard operating systems and PC hardware could provide.  The trials and tribulations of such endeavors are outlined in a previous post, Bridging The Generation Gap, but for the purposes of this post, I’ll just say that it used to take my computer 7 minutes just to open up 1 image file.  The creation of just one of these collages usually involved at least a month of manipulation on my part, whereas today, with the tools and hardware that are available, the same result could be achieved in a matter of hours, if not minutes.  So now that I have apologized, sort of, for the amateurish results of my labors, here’s how it was accomplished.

Background image

The first step in creating the collage is to find an interesting background.  It is absolutely amazing to see how much the background of a photo affects the quality of the overall composition.  The slide of the bait fish school above, taken off the island of Bonaire, is not a particularly compelling photograph.  While it is technically adequate, it seems to lack a central subject.  But as I studied it, I realized that it might make an interesting background for a future project, so I filed it away with the many other background slides that I was accumulating.  After deciding to use the slide as a background for the project which resulted in the slide that begins this post, I decided to add other visual elements.

Purple sponge

This slide of coral and a purple sponge was taken off the island of Cozumel, and it also is a technically adequate photo, but with no pizazz.  Maybe this would work in my collage.

Purple sponge

If one purple sponge is a good thing, then why not two?  So off I went to find another slide of sponges, this one again from Cozumel, but taken a year later than the first.  So now I had everything in place, except for a main subject.  Searching through my slides, I came across the following mediocre picture of a barracuda.

Barracuda

Without going into a detailed critique of this slide, I’ll just point out the obvious – it cries out for a better background.  Since I had all of the other element already in place, I added the barracuda to my composition, adjusted the various layers to my satisfaction, and created the photo-illustration that begins this post.  It is not the greatest composition in the world, to be sure, but it does manage to take some otherwise bland photographs, and blend them into a picture that is pleasant to view.

The second photo-illustration hanging on the wall is a collage that was assembled from various undersea life in the waters of the Pacific off the coast of California.

Treefish

Again, I started with a slide taken from my collection of possible backgrounds, which in this case are some sea fans found at Anacapa Island.

Sea fans

The next element that I chose to add to the composition was an egg sack from a swell shark, which is a common small shark that inhabits the sandy tracts near shore.

Nurse shark egg sack

The final element in the arrangement was the main subject, a treefish, which is a type of rockfish that was once common around the Channel Islands of California.

Treefish

Let me take this opportunity to stress one thing.  These photo-illustrations are quite crude by today’s standards.  Never the less, the point to be made is that a photograph you might decide to toss just might be a “keeper” when you view it again in the context of a photo-illustration.  Maybe it lacks a central subject, but would make a good background.  Maybe it is a technically adequate photograph of a subject, with a terrible background.  Don’t throw it away!  If it is properly exposed, and if it is in sharp focus, put it away, and maybe some day in the future it will become an element in one of your prize-winning photo-illustrations.

NOTE: This would be a good spot to post my Photoshop policy – any photographs that you see on this blog are undoctored photographs (photos which have only undergone minor cropping, exposure and sharpening procedures, similar to what normally occurs in the darkroom process), unless I indicate otherwise with the term photo-illustration.  If I call an image a photo-illustration, then it is understood that anything goes!

Just Hanging Around Today

In a post of two days ago entitled Feeder Maintenance – Part II, the issue of back strain while loading the feeders with heavy sacks of corn was raised.  In the comments that followed that post, Tjilpi (a practicing physician who knows all about such things) pointed out that hoisting the full drum of corn up to the top of the feeder was possibly causing pressure on my spinal disks.  My joking reaction to Tjilpi was “I figure that whatever compression damage I’m doing by hefting the bags onto my shoulder is being offset by the extension damage I’m doing by pulling on the hoist.”  Tjilpi suggested that the act of pulling down on the rope was actually causing compression of the disks, rather then the extension damage that I had assumed would be occurring.

Notwithstanding the fact that he resides in the Southern Hemisphere, where even gravity sometimes behaves in an unpredictable manner, I respect Tjilpi’s learned opinion on the matter, and figured that I had better self-treat my compression damage from loading the corn feeders.  And so it is that you see me in the basement in the following photograph, defying Newton’s laws of gravity as I hang fearlessly upside-down in Retta’s inversion chair.

Hanging in an inversion chair

After spending sufficient time in the inversion chair to stretch out my spine, I figured I had better end the session before bursting a vein somewhere in my cranium, which would have really ruined my day :)

Now You See It, Now You Don’t

Fescue and clover hayfield

Perhaps you recall seeing this picture before on the Ranch Ramblins blog.  I used this photograph in a post entitled Fescue To The Rescue, which extolled the virtues and cautioned about the vices of fescue grass.  The picture was taken on June 8, 2006, and at the time of the photo this fescue/clover field, as well as several others, were in prime condition to be cut, dried and baled into large round bales for winter feeding of local cattle.

Early this past spring, I had made arrangements with a neighbor for baling this hay.  The deal was a sweetheart deal from his point of view, as I offered him all of the hay and asked nothing in return.  And what do I get out of the deal?  About 20 fewer acres of grass that I need to cut using my own time, tractor and fuel.  It was my hope to photograph the cutting, raking, drying, baling and hauling process, and to document these activities here on this blog.  Alas, the best laid plans of mice and men sometimes go awry, and thus it was with this particular endeavor.

For reasons that most likely revolved around health concerns (this neighbor has had more than his share of medical problems) and recalcitrant equipment (40+ year old tractors, sickle-bar mowers, and hay rakes), the hay field went uncut.  By the time I had realized that the neighbor wasn’t going to bale the hay, as previously arranged, it was too late to find someone with the time and equipment to bale these hay fields.

Hayfield after shredding

Last week I took the bush hog to this particular field, as you can see from the picture above.  From a selfish point of view, I should be happy that things worked out the way that they did.  Leaving the shredded fescue and clover to decompose in the field will be healthy for the grass in the long run, and the fescue was laden with seed, some of which will germinate next season as conditions warrant.  The overall result will probably be healthier hay fields than would otherwise be the case had my neighbor baled the hay.  On the other hand, with the persistent draught that has beset this region, hay prices have shot up through the roof, and I can’t help thinking that some local farmer, who might be struggling to make ends meet, would have loved to have 20 acres of fescue/clover hay for the taking.

Hopefully, next season I will have haying photographs to share with you.

Feeder Maintenance Time – Part II

If you have been a regular reader of this blog, you may recall that we utilize game feeders here at the ranch on a year round basis.  Notwithstanding the temporary feelings of angst regarding wildlife feeding (detailed in the previous post Birds Of A Feather), we have enjoyed the benefits that having feeders provides us, namely, regular visits from the local wildlife.

Having game feeders operating reliably full-time has proven to be more of a challenge than I would have previously thought.  In a previous post entitled Feeder Maintenance Time Again, I pointed out my experiences providing a reliable source of power to the feeder units.  One of today’s chores was to replace the batteries in two feeders and refill them both with deer corn, so I thought I would take you along to see what this is all about.

Tripod feeder with hoist assembly

The feeder pictured above is a tripod mounted plastic drum which utilizes a block-and-tackle hoisting mechanism.  The drum holds three bags, or 150 pounds of deer corn.

Changing the battery

In the photo above, you see the actual feeder timer and motor assembly, all housed into a neat, compact package.  The 6 volt alkaline battery that we are replacing hangs from two alligator type clips on the end of a short set of wires.  In fact, the wires are so short that it is actually quite difficult to attach the alligator clips onto the battery terminals.  After finally managing to attach the clips to the battery, it becomes a comical sight to watch me try to push the battery back up into the housing and attach the bottom cover plate with the four tiny sheet metal screws provided.  It usually takes me several tries, with frequent interruptions as I search for the small parts that invariably drop to the ground (dang gravity).   If only the people who design these things were required to actually use them in the field, this probably wouldn’t happen.

Varmint protection

In the photo above you can see the funnel tube (coming down from the drum) and the spinner plate that the corn comes to rest on.  Some of the previous feeders that we have owned were produced with plastic funnels and spinner plates.  The varmints of the area soon learned to chew through the plastic parts, thus allowing the entire contents of the drum to spill out onto the ground.  One manufacturer even has the audacity to sell replacement parts fabricated out of metal, even while selling new feeder units with the useless plastic parts.  Even with the metal parts, eventually the larger varmints manage to bend the spinners to the point that the corn is released to the ground, and the feeder unit fails to operate due to the bent spinner plate.  The solution to this problem is to surround the entire feeder assembly with a varmint-proof enclosure, as is shown in the photo above.  There are after-market enclosures for sale by various manufacturers.  It would be nice if they were included as a standard item on all complete feeder kits, but they are not.  A word to the wise – if you buy or build your own wildlife feeder, spring for an optional varmint guard.

Appetizing plastic top

In this photograph you can see that this particular feeder drum lid is held in place by a sturdy expansion hoop that is fitted with a cam-lever type closure system.  This system works great – it is quick and can be operated in all kinds of weather easily.  You can also see that the drum is made from plastic materials.  The advantage of the plastic is that it will not rust or corrode.  The obvious disadvantage to the plastic materials is that they are not resistant to the sharp, persistent teeth of varmints.  You can see in the photo above that I have had to patch up the lid with duct tape after some critter chewed its way into the drum of delectable apple flavored deer corn.  Several times.  If the people who designed feeders were compelled to actually use and maintain them, we would probably see an end to plastic drum lids.

Filling the feeder with corn

The great advantage of this tripod feeder unit is the block-and-tackle hoist system that it incorporates.  By simply lowering the drum to ground level, it is relatively easy to fill the drum to capacity with the necessary three bags of deer corn, as you can see from the photograph above.

Hoisting the drum into place

After the drum is filled, the block-and-tackle hoist system makes it a breeze to lift the corn-filled drum back into the raised position.  It is a simple, effective system for easing the job of filling feeders, which can be a back breaking task, as you shall soon see.

Stationary tripod feeder system

The type of feeder you see above is a stationary tripod style of feeder.  This feeder drum and lid are built entirely from metal and the feeder unit is enclosed in a varmint cage, so there is no possibility of varmints chewing their way into the corn supply.  Because the drum does not have to be hoisted up off the ground after filling, it can be built to accommodate a larger supply of corn.  Whereas the first feeder has a capacity of 3 bags of corn (150#), this feeder has a capacity of 4-1/2 bags of corn (225#), so the interval between fillings is longer.

Poor closure engineering

The picture above shows the pitiful lid closure mechanism that this manufacturer employed.  To remove the lid, you must first completely remove the bolt from the lid retaining hoop.  This requires the use of a screwdriver (which I store on top of the lid for convenience) to remove the bolt, whilst stretching up to reach it’s lofty height.  In the warmer months this is merely an inconvenience, but in the depths of winter, when the thermometer indicates unspeakably low temperatures, and you are trying to remove the lid while hungry deer peer out at you from the forest edge, it is a royal pain-in-the-butt.  If the people who engineered these closures were required  to operate them regularly in January, we would probably not see these in use anymore.

I have saved the very best for last.  To fill this type of tripod feeder requires the strength, height, and stamina of Shaquille O’Neal, and not the tired, worn out body of this Ramblin Rancher, as you can clearly see from the following picture.

Oh!! My aching back!!

To get the corn into the feeder requires a sort of “clean ‘n jerk” technique, as used in Olympic style weight-lifting.  First, using your knees as best as possible, the sack is snatched up off the floor in one fluid motion, while at the same time, your body comes down into position so that the 50# sack of corn comes to rest on your shoulder.  Now that the corn is held up by your shoulder, straighten your legs to full extension, and then lift the sack as high as possible over your head, hoping to aim it well enough so that the corn ends up in the drum, and not on the ground.  If all goes well, then repeat this procedure four more times, before heading for the house to rest your aching back for the balance of the day!  If the designers of wildlife feeders were required to fill feeders with corn on a regular basis, I’ll bet these types of stationary tripod feeders would disappear.  But then again, what do I know?

Flashback Friday #13: Lay Lady, Lay…..

…Lay Across My Big Grass Bed.

Skeletal remains of Lady

My apologies to Bob Dylan, but how else could I introduce the gentle readers of this blog to Lady (or at least her remains)?

This ranch takes on it’s present form due to the labors of a family I shall call the Farmers.  The Farmers built the present day house and most of the outbuildings in 1980.  They lived here, working the land, raising cattle and operating a small dairy operation until 1996, when they sold the ranch to other owners.

There are three generations of the Farmer family that lived here.  The Farmer parents, the Farmer children, and the Farmer grandchildren.  In fact, a Farmer daughter gave birth to a Farmer grandchild right in the master bedroom of this house.

Eventually, we came to purchase this property in 2001.  In the course of moving our belongings into the house, I discovered an envelope taped to the underside of a desk drawer.  Naturally, curiosity took hold, and I opened the envelope to find a multi-page hand written letter within.  The letter was addressed to nobody in particular, and yet was written as if intended for everybody.  One of the Farmer grandchildren had penned this letter just prior to moving away from this ranch for good.

As I read this letter, I recall that tears began to well up in my eyes, as it soon became obvious how much this young woman loved both the property and the lifestyle that went along with living here.  It was apparent that she leaving the property out of necessity and not choice, which made me feel very bad for this unknown young woman.  Somewhere within the text of her open letter, she mentioned the names of various people that had enjoyed life on this ranch, and at one point the name Lady came up.  I did not think much of the reference at the time, other than to think that Lady was an unusual name (or nickname) for a person.  After sharing the letter that I had found with Retta, I filed it away in a safe place, for posterity’s sake.

Some time later, Retta and I happened to have the opportunity to meet the Farmer family.  At our gathering, when we mentioned the existence of the open letter we had found, one of the Farmers inquired as to whether we had discovered letter #2, written by another of the Farmer grandchildren.  When we replied that we had not yet found this second letter, they told us where it was located.  Just as they had indicated, the letter lay hidden behind the back wall studs of an under-stairs storage closet in the basement.  It was so well hidden that we would have never stumbled upon it, had we not been steered in the right direction by the Farmers.  The second letter had the same poignient tone as the first letter, and again I found a lump in my throat as I read it’s contents.  This second letter also contained a reference to someone named Lady, just as the first letter had.

So that sums up the two open letters that we discovered (with some help, I have to admit).  In the meanwhile, shortly after moving here we began an intense exploration of the hills and hollers of this ranch.  Along a fence line, in a very remote section of the property, we came upon the skeletal remains of a horse, which seemed to be in fairly good condition.  For reasons that I still cannot explain, I felt a desire to bring the horse’s skeletal head over to the house, where we set it among our collection of “yard art.”  And there it remained for quite a long time.

Fast forward a couple of years.  We received a telephone call from a Farmer grandson, who asked if he could come visit the property and reminisce.  We readily agreed, and soon he was hiking and exploring the property he knew so well as a child.  As I began to pick his brain for tidbits of information regarding the history of this ranch, I happened to ask him who this “Lady” was, that I had read about in the letters left by his sisters.  He explained that Lady was a gentle old nag that was ridden frequently by the Farmer grandchildren, and that when she died in 1994, they placed her carcass in a far corner of the property to decompose, which is where Retta and I found the remains.

Now that we knew the history behind the skeletal remains, and the attachment of the Farmer grandchildren to this nag named Lady, we felt that is was almost sacrilegious to leave her skeletal head among our yard art.  So I immediately took the remains out of our yard and returned them to where we had originally found them.  The picture above was taken where the bones now lay, in their former location.

What has surprised me is how the bones have been left undisturbed (except for the temporary relocation that we put them through) for such a long period of time.  It is twelve years since Lady died, and yet the bones remain in the location where first placed, unchewed and unmolested by the native wildlife.

Whenever we pass by Lady’s remains, we pay our respects, now that we know of her past connection to the originators of this ranch.  And I have vowed not to disturb her remains ever again!

Wildblue Satellite Broadband Update

I have had a number of comments inquiring about my experience with Wildblue Broadband Satellite Internet access, so I thought I would write a post pertaining to my experiences with this service.  The original installation occurred in January of 2006, and the post regarding the installation and subsequent comments can be found here.

Wildblue Satellite dish

Wildblue Satellite Broadband is one of several satellite Internet service providers.  Wildblue has targeted the rural areas of the country in it’s marketing, and has teamed up with rural electric cooperatives and small telecommunications companies to provide installation and support.  Wildblue offers three levels of access to consumers as follows:

  1. $49.95/month  -  512Kpbs/download, 128Kbps/upload
  2. $69.95/month  -  1.0 Mbps/download, 200Kbps/upload
  3. $79.95/month  -  1.5 Mpbs/download, 256Kpbs/upload

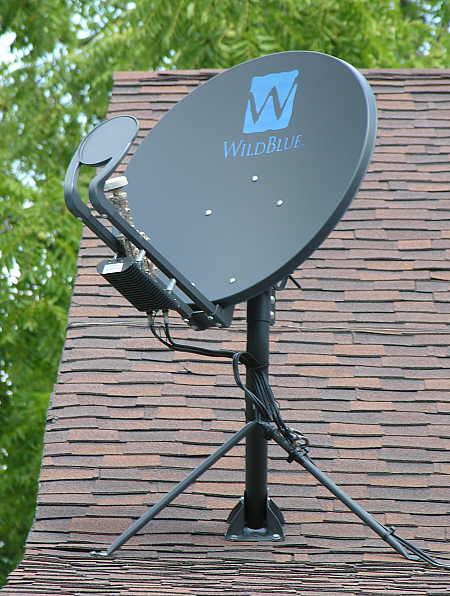
All subscribers will have to buy their equipment, which consists of the satellite dish, a dedicated satellite modem, and a surge suppressor for both the power and coaxial leads. The cost of the equipment package is currently $299.   Wildblue seems to have a perpetual promotion which offers free standard installation.  If a special type of installation is required, you will have to pay your local installer for the additional parts and labor.

Wildblue maintains a web based BBS type forum for the benefit of subscribers, which can be found here.

My background with Internet access is fairly limited.  For years I was saddled with dial-up access, which as you probably know, leaves much to be desired.  After moving to this rural property, we opted for ISDN (Integrated Services Digital Network) service, which was made available to us through Northern Arkansas Regional Telephone Company (NATCO).  ISDN is a dedicated telephone line to each subscribing household, and offers the convenience of always-on service with speeds up to 128Kbps.  The ISDN line can be used for telephone service simultaneous with web browsing or faxing.  Wanting faster download speed than ISDN could provide, I was quick to jump at the opportunity to move up to satellite broadband when it became available in my area.  Using NATCO as the agent for Wildblue, I subscribed to the fastest service available (1.5Mbps/256Kpbs) at $79.95 per month.

My experience with Wildblue has been varied.  In terms of speed, the advertised 1.5Mbps that I am paying for is usually achieved.  Using the on-line testing available at Testmy.net, my service has consistently fallen in the range of 1.5Mbps-1.6Mbps, just as I would expect.  Occasionally, download speeds will fall to 1.0Mbps, but this has only rarely occurred.   Although download speeds occur as expected, upload speed is a distressing 48Kbps, which is a far cry from the 256Kbps that I am paying for.  In reviewing the postings on the Wildblue Forums, I find that my experience in this regard is pretty wide spread. Complaints about slow upload speeds (relative to advertised upload speeds) are common in the forums.

The other aspect of Wildblue service that has to be examined is service reliability.  In this regard, Wildblue has fallen far short of my (and other subscribers) expectations.  Wildblue satellite Internet access is supposed to be an “always on” service, much like DSL or cable Internet access.  However, with Wildblue, you can expect to find that you have no service from time to time.  It is not unusual to have the modem lose contact with the satellite while you are in the middle of some computing activity.  If you happen to be in the middle of a banking transaction, or in the process of making an on-line purchase, this can be a disconcerting situation.  On some days, this might happen a dozen times throughout the day.  On other days, satellite contact is never lost.  Sometimes you may go for days at a time without loss of service, while at other times, service loss occurs day in and day out, for weeks at a time.

Unfortunately, Wildblue does not seem to be on the ball in providing accurate, timely information to it’s customer base.  Communications with the company, both through it’s website, and by telephone support, seems to be a one-way street.  The bulk of complaints that appear in the Wildblue forums do not seem to ever be addressed by the staff of Wildblue.  My impression is that there are many dissatisfied customers, who would appreciate better service and communication from Wildblue, but who are trapped in a one-sided contract with Wildblue, and have no practical alternatives to the poor service (short of switching back to dial-up service).

The following message from the Wildblue forums sums up one customer’s dissatisfaction:

http://www.wildblue.cc/wbforums/showthread.php?t=2769

It is a must read for anyone considering Wildblue service now, or in the future.

The other issue that must be raised with satellite Internet access, via Wildblue or any of the other vendors, is the issue of latency.  I am not knowledgeable about computer networking, network infrastructures, or any other aspect of the Internet’s inner workings.  I only know what I have come to expect when I “click” on a link on a web page. 

My experience with dial-up and ISDN service takes the following form:

Click on a link – wait a fraction of a second, and the page begins to load, albeit slowly.

Start a download of a large file – wait a fraction of a second, and the file begins to download, albeit slowly.

My experience with satellite Internet access takes the following form:

Click on a link – wait SEVERAL seconds, and the page loads instantly.

Start a download of a large file – wait SEVERAL seconds, and the file begins to download, albeit very rapidly.

The obvious question is, would I recommend Wildblue Satellite Broadband Internet access base upon my own experiences?  One indicator of my answer is that I do not plan to cancel my Wildblue service anytime soon.  Although the latency issue can be maddening at times, and the upload speeds are dreadful, and the inconsistency of reliable service can disrupt important on-line business activities, the alternatives are just too painful to bear.  Would I jump ship at the first opportunity to subscribe to DSL or cable Internet access?  You bet I would, and I would never look back to my days as a satellite subscriber.  Much like a passenger on a crowded bus, you get the feeling that, yes, it is uncomfortable, but it sure beats walking to your destination.

AFTERNOON UPDATE:

Wouldn’t you know it, but as I tried to publish this post today, the Wildblue system went into a tizzy.  Long load times for the pages, several attempts necessary to save pages to my server, etc.  I performed on-line broadband speed tests from testmy.net and cnet.com, and the results for download speed varied from .536Mbps to .640Mbps, which is about 1/3 the 1.5Mbps speed that I am paying for.

A worse problem occurs when I perform some ping tests.  Issuing the following command at the command prompt:

        C:>ping yahoo.com -n 20

results in some horrible statistics, notably latency in the range of 800ms-1200ms.  Worse yet, the timeouts and lost packets are horrendous.  Out of 20 packets sent, 5 packets were lost.

I have looked at some recent posts on the Wildblue forums, and it seems that I am not alone in these results.  It seems that beam 35 (which is the spot beam for my area) is experiencing a multitude of problems at this time.  I will post the results of further speed and ping tests as updates to this post over the next several days, just to see whether or not there is any improvement.

2nd AFTERNOON UPDATE:

As I went to save the first afternoon update, my Wildblue satellite modem lost connection with the satellite.  The connection was down for the past two hours, and I am hoping to finish this update before it goes out again.  This seems to be the type of service that is occuring throughout the Wildblue system, so if you can live within these constraints, the service is acceptable.

3rd AFTERNOON UPDATE:

After the Wildblue satellite modem automatically reconnected with the Wildblue satellite, I am now achieving download speeds of 1.55Mbps, which is the speed to which I am subscribed.  A C:>ping yahoo.com -n 20 command now results in an average latency of 670ms, with zero dropped packets.

So for the time being, it is all systems go!

___________________________________________________

TUESDAY UPDATE

Noon Tuesday:

Download speed is .881Mbps, or roughly 1/2 of what it should be.

Ping test results in 1 lost packet out of 20 sent.


8:00pm Tuesday:

Download speed has dropped to .550Mbps, or 1/3 of what it should be.

Ping test results in 8 lost packets out of 20 sent.

Browsing web pages becomes painfully slow, with many retries required to load a page.

_____________________________________________

WEDNESDAY UPDATE


7:30am Wednesday

Download speed is 1.57Mpbs, which is what I am subscribed for.

C:>ping yahoo.com -n 20 command results in zero packets lost in twenty attempts.


11:00am Wednesday

Download speed is down to .63Mbps from the 1.57Mbps of earlier this morning.

C:>ping yahoo.com -n 20 results in 5 out of 20 packets being lost.

C:>ping southshore.cc -n 20 results in 7 out of 20 packets being lost.


7:00pm Wednesday

Download speed is now down to .42Mbps, less than 1/3 of subscribed speed.

C:>ping southshore.cc -n 20 results in 10 out of 20 packets being lost.


8:30pm Wednesday

Download speed has dropped to .32Mbps, or approximately 1/5 of subscribed speed.

The performance of Wildblue satellite service has been totally unacceptable today.  Tomorrow I will contact NRTC (my local telephone company who is an agent for Wildblue) technical support to see if this can be resolved.  It is possible that there is a problem with the dish alignment, the TRIA (transmit/receive unit at dish), the satellite modem or the dish grounding that is the offending culprit.

____________________________________________

THURSDAY UPDATE

I did not have the time to deal with tech support today, so just a recap of Wildblue performance for the day.

Download speed I pay for is 1.5Mbps

9:00am – Download speed is 1.57Mbps – right where it’s supposed to be.

2:30pm – Dowload speed is .76Mbps – 1/2 of subscribed speed.

5:30pm – Download speed is 1.79Mbps – higher than subscribed for.

5:35pm – Modem lost connection with satellite.

8:00pm – Modem has finally reconnected with satellite, but speed is .74Mbps, or half of subscribed speed.

Oh My! Where Did It Go?

In a previous post entitled The Catfish Pond, I described one of the ponds located on this property, and discussed the problem of insufficient water clarity in that pond.  Today’s post is about another pond on the opposite side of the ranch property.  It is a spring-fed pond, so naturally we call it the “spring pond.”  Whereas the catfish pond is plagued by insufficient water clarity, the spring pond is beset by insufficient water!  This is a recent occurrence, and one which has us scratching our heads and wondering what course of action, if any, to take.  To understand our dilemma, it is necessary to present a little background information.

The spring pond is fed by a small fresh water spring that, to my knowledge, has been steadily and reliably flowing for at least the past 3 decades.  Below is a picture of the spring as it flows into the pond, which was taken April 10th of this year.

Spring outflow into spring pond

Although this is a small spring, it has provided an ample enough flow to keep the small spring pond full year round, even through the heat and dryness of our summers here in the Ozarks.  Each spring and summer, the grasses in and around the pond will grow in abundance, and each winter the grasses and other vegetation die off, amassing as a thick organic matting on the pond floor.  Over time, this organic matter had built up to the point that something needed to be done, lest the pond fill itself in and cease to exist at all.  The photograph below, also taken on April 10th, show the condition of this small pond at the time –

Spring pond on April 10th, 2006

After examining the pond in April, Retta and I decided that we would schedule a pond cleaning for the spring of 2007, which would entail the services of an excavator and a bulldozer to dredge and reshape the pond to it’s previous spring-fed glory.  In the meantime, I thought that I would introduce several grass carp (white amur) into the spring pond to see if they would help consume the excess grasses in the pond.  We have had success with this method of pond vegetation control in yet another pond on our property (see The Grassing of the Carp), and we were confident that the carp would work in this pond as well.

When the local farm store scheduled a fish stocking day in early May, I was the first in line at the stocking truck to order my 4 grass carp.  Returning to the ranch, I followed the recommended procedures for introducing and acclimating the carp into the spring-fed pond, and proceeded to forget about them for the time being.  On July 2, roughly two months after introducing the carp into the pond, I decided it was time to check the progress of my experiment.  Returning to the pond on July 2, this is what I found –

Spring pond on July 2, 2006

You can see in the photo above that the carp were doing their job, slowly but surely.  In previous years, by July the grasses would have completely covered the entire pond surface, and so it was evident that the carp were making a big difference in the vegetative mass in the pond.  Satisfied with the progress that the carp were making, I again put this pond out of my mind, and proceeded on with other tasks at hand.

It has been a little over a month since I last inspected the spring pond, so this morning (August 6) I thought it would be a good idea to mosey on over and see what was happening over there.  The first sign that something was amiss is shown in the following photo –

Dried up water hole

This creek bed is just below the outflow from the spring pond.  It has been a reliable watering hole for the animals, as it has always been supplied with a fresh supply of water from the spring pond.  As you (and George) can see, it is now bone-dry, as dry as dry can be.

Fearing the worst, I continued on over to the spring pond, and as you can infer from the following photo, I was not happy with what I saw.  From the same vantage point as the previous photographs, you can see that the spring pond has shrunk to a fraction of it’s former size, and the spring itself can no longer replace water lost to evaporation.

Spring pond August 8, 2006

For what it’s worth, the carp still seem to be doing their job, as the following photograph shows that the remaining small amount of water left in the pond is clear of vegetation.

Small amount of water remains in the pond on August 6, 2006

But I am doubtful that the pond will contain any water at all come September, unless something radical changes in the interim.  The following photo shows the diminished flow coming from the spring, which can be compared to the very first photo in this post, which was taken this past April.

Spring outflow into pond as of August 6, 2006

So now Retta and I face the dilemma – what to do with this pond?  We had originally intended on hiring heavy equipment to visit our property for the purpose of cleaning out the pond.  But if the spring itself is drying out, we will probably be wasting our time and limited resources undertaking this project.  Is this spring experiencing a reduced water flow that is just a temporary aberration, or are we feeling some of the effects of global and regional temperature changes that are here to stay?  Inquiring minds want to know!

Flashback Friday #12

Hot Springs National Park, Arkansas

Obligatory tourist signage photograph

Hot Springs National Park lies within the city of Hot Springs, Arkansas, approximately 50 miles southwest of the capital city of Little Rock.   Hot Springs Reservation was established by Congress in 1832, and transferred to the National Park Service in 1921, making it the oldest property in the National Park Service inventory, even older than Yellowstone National Park.  The predominant feature of HSNP are the 47 protected hot springs which flow freely from the ground, and the eight historic bathhouses which are located on the famous “Bathhouse Row.”

There is a public observation tower located on a mountaintop above Hot Springs, and for a nominal charge you can ride an elevator to the top of the tower.  From the observation deck you are afforded a 360 degree view of the surrounding area.  The area known as “Bathhouse Row” is located below the tower, and the view of the town from up high is shown in the following photograph-

Aerial view of Hot Springs bath house row

The bathhouse row area is worthy of exploration.  The buildings in this area have been preserved and restored, and the architectural styles are varied and beautiful.  This bell tower is just one of many interesting features that can readily be viewed from the street.

Ornate architecture

On a terrace just above bathhouse row there exists a beautifully tranquil and inviting hiking path which is constructed from brick formed into intricate patterns.

Beautiful walking paths above bath house row

Along this path are many of the protected hot springs from which the town (and park) were named.  The photograph below is just one example of the many springs along the cobblestone lined walkway.

Natural hot spring

There are eight historic bathhouses located along bathhouse row.  At this time, five are operating and open to the public, with steam baths, sitz baths, and massages as part of the services offered to visitors for a fee.  The National Park Service has set up it’s headquarters and visitors center at the old Fordyce Bathhouse near the center of bathhouse row.  The Fordyce Bathhouse is not operational, but rather is restored and open to the public  for self-guided tours.  It is very interesting to tour the Fordyce Bathhouse.  You will see many beautiful stained glass works of art, such as this stained glass ceiling located on the top floor of the building.

Stained glass ceiling at Fordyce bath house

Within the Fordyce Bathhouse you will also encounter unexpected works of fine art, such as the sculpture shown in the photograph that follows. 

Artwork located throughout building

For those interested in the actual workings of a bathhouse, the Park Service has done an admirable job of preserving the equipment that is necessary for a bathhouse’s operation.  The photograph below shows a control manifold that is used to regulate the temperature of the spring water before it is introduced into the baths and showers.

Temperature regulation manifold

The sweat chambers shown in the next photograph were a very popular part of the bathhouse experience.  Personally, I think they look like instruments of sadistic torture, and I do not think I would have opted to enter one without coercion.

Torture chambers?

After a ride up to the top of the observation tower, followed by a foot tour of the historic buildings along Bathhouse Row, a look around the Fordyce Bathhouse, and perhaps some bathing in one of the five operational bathhouses, you might enjoy taking a ride around Lake Hamilton, which is located just south of the town of Hot Springs.  If you are lucky, you might just find an elusive pot o’ gold at the end of a rainbow!

Rainbow over Lake Hamilton

Beating The Heat

Gracie and George go for a swim

The weather has been very hot in the Ozarks and across most of the country for the past few days.  The weather map shows two domes of high-pressure, super heated air that has caused stifling heat, reminding us that summer is here in full force.

When the temperature soars to triple digits, and the relative humidity hovers in the 50%-60% range, it can feel like a steam bath.  When the heat of the day threatens to cook all who venture forth outdoors, follow the animals, for they seem to have an instinctive sense of where and how to cool off.